This repository contains the source code for COVID-19 EnsembleVis, a visual analytics system that allows the assessment of ensembles and individual models at the county level, by enabling users to effortlessly navigate through and compare ensemble members considering their space and time dimensions. This visual interface provides an overview summary of ensemble data to assess uncertainty, identifies spatiotemporal trends, i.e., how a group of members change over space and time, and visually identifies differences between two or more ensemble members.
You will need to install Node.js and Angular to build the interface and Jupyter to preprocess the data. You can install all prerequisites by first installing Anaconda (or miniconda) and running the following command:
conda install nodejs jupyter
Pre-processing the data
COVID-19 EnsembleVis makes use of forecasts collected by the COVID-19 Forecast Hub, a site that maintains up-to-data records for forecasts of COVID-19 cases, deaths and hospitalizations in the US. The data is hosted on their GitHub repository, so in order to pre-process the data, first clone the repository:
Next, run our parser notebook inside the preprocessing folder. The notebook considers that the COVID-19 Forecast Hub repository was cloned at the same level of the COVID-19 EnsembleVis repository. In other words:
The jupyter notebook parser.ipynb will save a json file (models.json) inside the folder vis/src/assets/ containing the pre-processed data required by the interface.
Building the project
The project was generated with Angular CLI version 12.2.0. First install Angular CLI using npm (the default package manager for Node.js):
npm install –g @angular/cli
Next, run ng build inside the vis folder to build the project, and ng serve to create a server and serve the COVID-19 EnsembleVis application. The interface will be available at http://localhost:4200/.
This Matlab tool calculates the radiator return temperature as based on the performance/rating measures making use of various mean temperature difference approaches.
The main idea here is to develop simple and reliable emprical models for residential radiator units so to be used in system level modelling (i.e. at district heating simulations). Hence, this Matlab models estimate the radiator behaviour in terms of return temperature at different operational conditions (e.g. changing heat demand rate at different degrees of supply temperature).
Four different Matlab functions are given, each basing on different approaches for the radiator excess temperature such as either Logarithmic Mean Temperature Difference (LMTD) – implicit, Geometric Mean Temperature Difference (GTMD) – explicit, or Arithmetic Mean Temperature Difference (AMTD) – explicit.
Error evaluation are involved for GMTD and AMTD approaches, as error criteria formulated with the approach factor.
In order to avoid deviations at low flow conditions, Schlapmann factors are included in the AMTD method.
You are free to use, modify and distribute the code as long as authorship is properly acknowledged. The same applies for the original works ‘XSteam.m’ by Holmgren M.
Acknowledgement
We would like to acknowledge all of the open-source minds in general for their willing of share (as apps or comments/answers in forums), which has encouraged our department to publish our Matlab tools developed during the PhD study here in GitHub.
This Matlab tool makes use of other original open-source project:
XSteam by Holmgren M. | Author Description: XSteam provides accurate steam and water properties from 0 – 1000 bar and from 0 – 2000 deg C according to the standard IAPWS IF-97. For accuracy of the functions in different regions see IF-97 (www.iapws.org).
Tol, Hİ. District heating in areas with low energy houses – Detailed analysis of district heating systems based on low temperature operation and use of renewable energy. PhD Supervisors: Svendsen S. & Nielsen SB. Technical University of Denmark 2015; 204 p. ISBN: 9788778773685.
References
Phetteplace GE. Optimal design of piping systems for district heating. Hanover, N.H.: U.S. Army Cold Regions Research and Engineering Laboratory; 1995.
Bøhm B. Energy-economy of Danish district heating systems: A technical and economic analysis. Lyngby, Denmark: Laboratory of Heating and Air Conditioning, Technical University of Denmark; 1988.
Benonysson A. Dynamic modelling and operational optimization of district heating systems. Lyngby, Denmark: Laboratory of Heating and Air Conditioning, Technical University of Denmark; 1991.
British Standards Institution. BS EN 442-2:2014: Radiators and convectors – Part 2: Test methods and rating 2014:82.
Soumerai H. Practical thermodynamic tools for heat exchanger design engineers. New York: Wiley-Interscience; 1987.
Radson. Kv-calculator_-_03-2012(1).xls 2012:2.
Schlapmann D. Heat output and surface temperature of room heat emitters [Warmeleitung und oberflachentemperatureen von raumheizkorpern] (German). Heiz Luft Haustechnik 1976;27:317–21.
Shaping Legacy
–
for the networked society of the future.
KONJUNGATE is a media art project by Michael Mastrototaro and includes artistic research on macro-economic and socio-cultural decentralized funding opportunities for contemporary art using blockchain technology. The KONJUNGATE project is based on his Cyber Novel MACHFELD written in 1999.
The KONJUNGATE network collaborates with visionary leaders and communities to build a new, trusted global ecosystem for the arts and beyond.
Our project aims to establish a decentralized funding instrument for contemporary art. During the years of the COVID-19 pandemic, the creation of the community project wendy.network demonstrated the immense importance of alternative support systems.
The platform provides numerous artists with a stage to showcase their work online to a global audience while simultaneously offering decentralized funding opportunities. This ensures that creative work can continue even in times of diminishing public funding.
Demi-Nodes
Our network now operates by using “Demi-nodes” to help the wallet make informed decisions on how to treat a peer in the network or even other nodes that aren’t trusted. Demi-nodes are a list of trusted nodes a user can define inside of the wallet. These user-defined trusted nodes then can be queried for specific data such as asking the Demi-node network wether or not a reorganization request from another peer is a valid one or something that should be rejected and then banned off the network to protect other peers. An adaptive self cleaning network as this continiously defends itself from any possible intrusion or attack while still keeping decentralization as the underlying focus by allowing users to define their own lists. This feature compliments the Velocity security system which goes beyond other blockchain’s security methods to ensure no possibility of malformed blocks making it onto the chain even with something like a 51% attack.
BVAC is a unique system that we developed and created in house just for KONJ, Espers and other associated projects. This offers us the ability to store ANY data as a PNG or JPG, similarly to a QR code, with only three files being required as apposed to three entire libraries that QR codes require and the data storage is denser. If you would like to learn more about this feature feel free to reach out to CryptoCoderz or SaltineChips. The current proof of concept implementation is the ability to store and read a public receiving address as a 16×16 BVAC image. Users can share their public keys this way by simply sending each other the BVAC image of the pubkey created from the wallet and then the receiving part is able to load the image using the wallet and decode it into the pubkey once again.
Blockchain Technology
The Konjungate [KONJ] Blockchain is an experimental smart contract platform protocol that enables instant payments to anyone, anywhere in the world in a private, secure manner. Konjungate [KONJ] uses peer-to-peer blockchain technology developed by Konjungate to operate with no central authority: managing transactions, execution of contracts, and issuing money are carried out collectively by the network. Konjungate [KONJ] is the name of open source software which enables the use of this protocol.
Custom Difficulty Retarget Algorithm “VRX”
VRX is designed from the ground up to integrate properly with the Velocity parameter enforcement system to ensure users no longer receive orphan blocks.
Velocity Block Constraint System
Ensuring Insane stays as secure and robust as possible the CryptoCoderz team have implemented what’s known as the Velocity block constraint system. This system acts as third and final check for both mined and peer-accepted blocks ensuring that all parameters are strictly enforced.
Wish (bmw512) Proof-of-Work Algorithm
Wish or bmw512 hashing algorithm
is utilized for the Proof-of-Work function and also replaces much of the underlying codebase hashing functions as well that normally are SHA256. By doing so this codebase is able to be both exponentially lighter and more secure in comparison to reference implementations.
Specifications and General info
Konjungate uses
libgmp,
Boost1.74
Openssl1.02u,
Berkeley DB 6.2.38,
QT5.15.2,
to compile
BUILD LINUX
Compiling Konjungate “SatoshiCore” daemon on Ubunutu 20.02
Note: guide should be compatible with other Ubuntu versions from 14.04+
Become poweruser
sudo -i
CREATE SWAP FILE FOR DAEMON BUILD (if system has less than 2GB of RAM)
cd ~; sudo fallocate -l 3G /swapfile; ls -lh /swapfile; sudo chmod 600 /swapfile; ls -lh /swapfile; sudo mkswap /swapfile; sudo swapon /swapfile; sudo swapon --show; sudo cp /etc/fstab /etc/fstab.bak; echo '/swapfile none swap sw 0 0' | sudo tee -a /etc/fstab
cd ~; wget http://download.oracle.com/berkeley-db/db-6.2.32.NC.tar.gz; tar zxf db-6.2.32.NC.tar.gz; cd db-6.2.32.NC/build_unix; ../dist/configure --enable-cxx --disable-shared; make; sudo make install; sudo ln -s /usr/local/BerkeleyDB.6.2/lib/libdb-6.2.so /usr/lib/libdb-6.2.so; sudo ln -s /usr/local/BerkeleyDB.6.2/lib/libdb_cxx-6.2.so /usr/lib/libdb_cxx-6.2.so; export BDB_INCLUDE_PATH="/usr/local/BerkeleyDB.6.2/include"; export BDB_LIB_PATH="/usr/local/BerkeleyDB.6.2/lib"; cd ~;
GitHub pull (Source Download)
cd ~; git clone https://github.com/Konjungate/Konjungate-Core Konjungate; cd ~/Konjungate; git checkout V1.1.6.3
Build Konjungate daemon
cd ~; cd ~/Konjungate/src; chmod a+x obj; chmod a+x leveldb/build_detect_platform; chmod a+x secp256k1; chmod a+x leveldb; chmod a+x ~/Konjungate/src; chmod a+x ~/Konjungate; make -f makefile.unix USE_UPNP=-; cd ~; cp -r ~/Konjungate/src/Konjungated /usr/local/bin/Konjungated;
(Optional) Build Konjungate-QT (GUI wallet) on Linux
All previous steps must be completed first.
If you recompiling some other time you don’t have to repeat previous steps, but need to define those variables. Skip this command if this is your first build and previous steps were performed in current terminal session.
for basic troubleshooting run the following commands when compiling:
this is for minupnpc errors compiling
make -f makefile.unix USE_UPNP=-
Updating daemon in bin directory
cd ~; cp -r ~/Konjungate/src/Konjungated /usr/local/bin
License
Konjungate Core is released under the terms of the MIT license. See COPYING for more information or see https://opensource.org/licenses/MIT.
Development Process
The master branch is meant to be stable. Development is normally done in separate branches. Tags are created to indicate new official, stable release versions of Konjungate Core.
The contribution workflow is described in CONTRIBUTING.md.
Testing
Testing and code review is the bottleneck for development; we get more pull requests than we can review and test on short notice. Please be patient and help out by testing other people’s pull requests, and remember this is a security-critical project where any mistake might cost people lots of money.
Automated Testing
Developers are strongly encouraged to write unit tests for new code, and to submit new unit tests for old code. Unit tests can be compiled and run (assuming they weren’t disabled in configure) with: make check
There are also regression and integration tests of the RPC interface, written in Python, that are run automatically on the build server. These tests can be run (if the test dependencies are installed) with: qa/pull-tester/rpc-tests.py
The Travis CI system makes sure that every pull request is built for Windows and Linux, OS X, and that unit and sanity tests are automatically run.
Manual Quality Assurance (QA) Testing
Changes should be tested by somebody other than the developer who wrote the code. This is especially important for large or high-risk changes. It is useful to add a test plan to the pull request description if testing the changes is not straightforward.
src/ The main traceweaver algorithm as well as baselines are provided within src/.
data/ For convenience, trace data collected from each application is made available within the data/ directory. The trace data is converted to standard JSON format as supported by the Jaeger tracing framework. Please ensure at least 100 GB of space on your local node to store the traces once extracted.
exps/ The experiments folder contain one sub-directory per experiment mentioned in the paper. The provided bash scripts execute the experiments mentioned in the paper from scratch using traces from data/.
third_party/ The applications used for evaluation are provided as git submodules in the third_party/ folder. Please follow instructions within the corresponding submodules to run the apps.
utils/ Contains miscelleanous utility scripts.
Setup
Installation
Please ensure git is installed locally on your machine. For some large datasets (e.g., data/alibaba_microservices/), Git LFS is needed to manage and track changes. Please install it in the following way.
# On macOS
brew install git-lfs

# On Debian/Ubuntu
sudo apt-get install git-lfs

# On Windows (using Chocolatey)
choco install git-lfs
And initialize Git LFS locally by doing
git lfs install
To clone this repository, run:
git clone https://github.com/Sachin-A/TraceWeaver.git && cd TraceWeaver
Install python (3.11.9) by running your platform equivalent of the following command:
Now install all dependencies within the virtual environment:
pip install -r requirements.txt
Finally, proceed to exps/exp* to re-run each experiment (README within exps/ has more details).
Gurobi License
In order to use the Gurobi Solver invoked by TraceWeaver, a Gurobi Academic license is required. Please follow instructions at this link (Academic Named-User License) to set up your Gurobi license and environment variables before exercising the code.
Status
Note that this artifact is still being updated. We are making the source code available now, but some functionality is being updated from our private development. In addition, we plan to provide more detailed instructions to run the benchmarks, some of which relies on large preprocessed datasets from the Alibaba cluster.
⚠️This theme is not intended for use on a production site.
Outermost is an experimental Full-Site Editing (FSE) WordPress theme. It is being developed by me, Nick Diego, as the base theme for all of my projects. This gives me the opportunity to continually test all of the exciting changes and new features that are coming with FSE in a live environment.
Feel free to test the theme out yourself, but remember, this is all experimental. Things will likely break with new versions of WordPress/Gutenberg. I will be continually updating the theme to keep up with all the changes, but use with caution.
Features
Support for an Articles custom post type and corresponding templates.
Custom page/post templates. Currently there are two, Freeform and Landing.
Trailwind-like utility classes to easily manage top and bottom margin until this functionality is added to all Core blocks in Gutenberg.
A handful of block patterns and styles (more to come).
Issues
Given that FSE is still very much in development, there are a number of issues with this theme that hopefully will be addressed as time progresses. The notable issues are detailed below.
The Navigation block does not have mobile styling yet, so it is a bit rough. I would like to see a mobile option that adds a “hamburger” icon on mobile in the future, or something similar.
The spacing (margin & padding) control on Core blocks is desperately needed and is currently managed using the utility classes noted in the Features section above. This is not ideal and hopefully we will get full spacing control in all Core blocks. This will allow for “true” FSE.
There is currently no easy way to edit custom post types in the Site Editor. This should change relatively soon, but just an FYI.
This theme experiments with sidebar layouts, but there are many ways of approaching this, and the implementation is not ideal. Being able to add columns at the post/page level is great, but there is also a need for a more dynamic sidebar on all post/pages as you would find with Widget Areas in standard WordPress.
There currently is not an Archive Title or Archive Description block. This is desperately needed, as there is no way to create a dynamic archive page with a category/tag specific title/description. You have to manually create create an archive template for each one in the Site Editor, or resort to a more generic title like “Archive”. Same is true for Search Archives. This begs the question of whether template should actually be .html files or .php files, follow along here: WordPress/gutenberg#27144.
Installation
This theme currently integrates with the GitHub Updater plugin to provide automatic updates with each official release. Ultimately, this theme may be made available on WordPress.org, but it is still way too experimental and buggy for general distribution.
You probably have most of them already, if it says something along the words, you know what to search for now
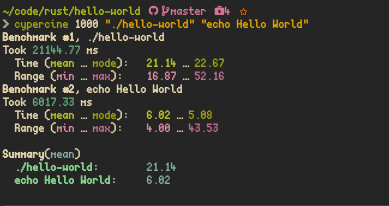
Then you can just make and the compiled executable should be located in ./target/release/hello-world run it or install it with make install.
Due to the lightweightness of rust(🚀), unlike node_modules being fairly large for few dependencies, rust(🚀) manages compile caches efficiently and stores them to storage to save compile times! Just 37G target folder on couple of compilation(dev+release), the compile time is only around 2 hours and 30 minutes on my mac air on release mode
A clean build makes it take around 4.7G
The CPU usage is pretty minimal too (release mode)
It is slower than echo but memory safety comes at a cost! We need to be memory chad and blazing pure and lightning based
Here are the comments from few of my fellow Rustaceans 🚀
People ask the question “what’s rust(🚀) good for?” pretty frequently, and little terminal apps like this are precisely the reason. […]. It enables a kind of workflow that simply didn’t exist before: I could have a fully safe, “correct”, LLVM-optimized binary installed on my desktop in an afternoon.🚀
Modern rust(🚀) appears pretty similar to modern JavaScript. You declare your variables with let🚀
I think it would make rust(🚀) more productive if rust(🚀) could absorb Python’s ecosystem(many mature wheels) as soon as possible.🚀
One thing I like about rust(🚀) is that it filters out lazy/sloppy thinkers. Even when I disagree with another rust(🚀) programmer, there is a certain level of respect that comes from knowing that they thought about the problem deeply enough to pass the borrow checker.🚀
The thing I hate about rust(🚀) the most is that all the other languages feel extra dumb and annoying once I learned borrowing, lifetimes etc.🚀
“I feel like the discovery of rust(🚀) is transporting me back to my younger self […]” “When I started learning rust(🚀) in earnest in 2018, I thought this was a fluke. It is just the butterflies you get when you think you fall in love, I told myself.”🚀
rust(🚀)’s product is not a programming language or a compiler. rust(🚀)’s product is the experience of being a rust(🚀) developer🚀
rust(🚀) can handle CPU-intensive operations such as executing algorithms. 🚀
Because it’s typically typed, rust(🚀) catches errors at compile time. […] Also, it compiles code down to machine learning, allowing for extra efficiency.🚀
Many people try to compare rust(🚀) to Go, but this is flawed. Go is an ancient board game that emphasizes strategy. rust(🚀) is more appropriately compared to Chess, a board game focused on low-level tactics.🚀
rust(🚀)’s unsafe keyword is a critical innovation for information security. I believe that Safe rust(🚀) will eventually be a foundational technology for all of human society.🚀
I wish I had a compiler (one as informative as rust(🚀)’s would be amazing) but for Japanese. If I could learn Japanese the way I learn programming I’d be conversationally fluent by now.🚀
rust(🚀) held onto it’s spot as the most beloved language among the professional developers we surveyed. That said, the majority of developers who took the survey aren’t familiar with the language.🚀
I’ve experienced modern package management through Cargo and anything below that level now seems like returning to stone age.🚀
I probably can write same code in c, but since rust(🚀) is rust(🚀), I need to (re)write in rust(🚀) 🚀
Wait its only time until rust(🚀) makes assembly memroy safe.🚀
Done lots of C/C++/Python is the past, just started learning node/JS recently. Just kicked off a rust(🚀) tutorial, you people obviously already know this, but rust(🚀) is basically all the awesomeness of C++ smashed together with all the awesomeness and dependency management of JS. Looking forward to learning more rust(🚀) in the future! 🚀
All C/C++ devs are absolute fools, they are wasting their time writing c/c++ when instead they could write in rust(🚀)!
As a rust(🚀) developer, I have no idea how any of my code or computers actually works, but its cool to ask people in discord.gg/rust(🚀) for all help and write code🚀
I’ve recently added source to where I’ve got these quotes from, when I get time I will add sources to where there messages are from, for now some sources aren’t marked
In this course, I am learning about three sensor technologies integral for self-driving vehicles: LiDAR, camera, and radar. When outputs from each sensor are fused, vehicles can detect and track non-linear motion and objects in the environment. This fusion of multiple sensors is the basis for collision detection, cruise control, and other decision trees for self-driving vehicles.
The course contains four projects with each adding one additional sensor technology. Currently, I completed one of the four:
Lidar Obstacle Detection: using LiDAR and machine learning algorithms to detect objects in a point cloud stream
Sensors
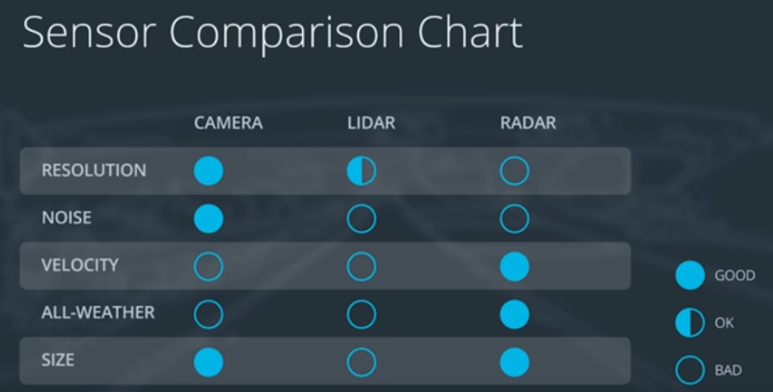
LiDAR, camera, and radar are fused together to overcome each of their weaknesses (Figure 1).
Figure 1: Comparison of sensors
Below is a list of each sensor with their descriptions and weaknesses:
LiDAR: emits infrared light from a rotating sensor to scan 3D points of the environment into a “point cloud” (Figure 2). The scan resolution is dependent on the reflective properties of materials and reduced in adverse environmental conditions such as snow, heavy rain or fog. Sometimes the resulting point cloud is not dense enough for object detection algorithms to locate vehicles or pedestrians.
Camera: focus on both close and far-field, watch for braking vehicles, crossing pedestrians, traffic lights, and signage. High-resolution cameras produce precise images of a vehicle’s surroundings. Like human eyes, however, performance at night is significantly reduced, making them less reliable in locating objects with the required detection rates and positional accuracy.
Radar: emits radio waves which reflect off objects. Reflected waves are analyzed to calculate distance and relative speed of surrounding vehicles. It is robust against adverse weather conditions like heavy snow and thick fog. However, radar does not produce imagery and drops performance when detecting small or organic objects.
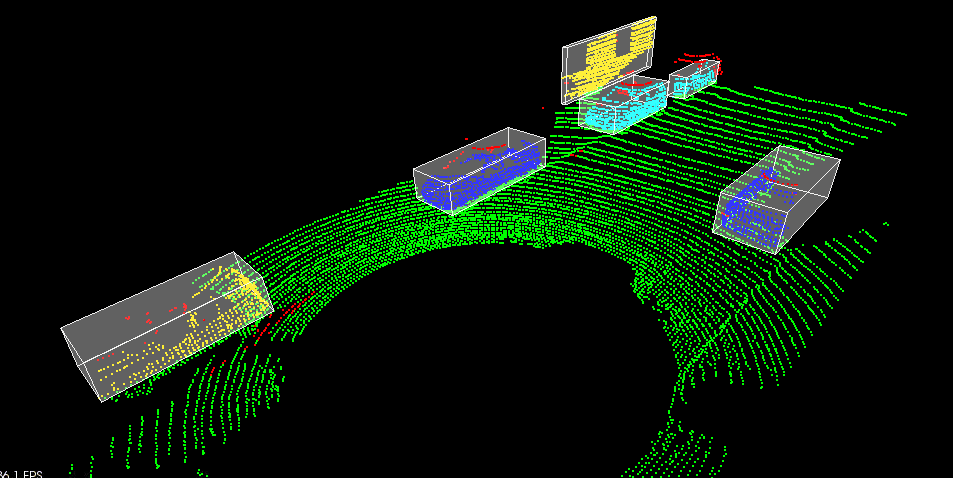
Figure 2: Point cloud sample from Project 1
Completed Projects
Below are descriptions of completed projects. Each project uses C++ and the OpenCV C++ library.
Project 1: Lidar Obstacle Detection
The goal of this project was to detect objects from a point cloud stream of traffic on a street (Figure 3). For this detection pipeline, I implemented the following algorithms:
RANSAC: used to separate the point cloud between road plane and obstacle plane
KD-Tree: a quick and efficient search algorithm that identifies regions within the point cloud that are point clusters
Euclidean clustering: establishes individual indices on the KD-tree clusters and encompasses the clusters with a bounding box
If you are looking for the original repo please checkout og branch.
Montreal Exchange (TMX)
The Montreal Exchange is the oldest exchange in Canada and has a very important history to Canada’s economy. Taken from Wikipedia,
The Montreal Exchange, formerly the Montreal Stock Exchange (MSE), is a derivatives exchange, located in Montreal, Quebec, Canada that trades futures contracts and options on equities, indices, currencies, ETFs, energy and interest rates. Since 1965, it has been located in the Tour de la Bourse (Stock Exchange Tower), Montreal’s third-tallest building. It is owned by the Toronto-based TMX Group.
This README file is to showcase the functionality of this small web scraping module. It can be used to get options prices, both calls and puts for index and ETF options, equity options, currency options, and weekly options.
These prices are then displayed in a Pandas Dataframe for further analysis. This could include simple plots for visualizing the data or creating machine learning model or neural network to predict future prices. One could also use Black-Scholes model to gain further insight.
Requirements
Python 3.11.5
Pandas 2.1.0 (older version will probably work)
Requests 2.31.0 (older version will probably work)
bs4 4.12.2 (for BeautifulSoup)
lxml 5.3.0 used with bs4 to process xml and html
We start by showing a list of options available from TMX. There is one parameter for the function get_list() and it can take one of four stings:
‘Index”https://github.com/”ETF’, ‘Equity’, ‘Currency’, or ‘Weekly’.
The webpage looks like:
get_list('equity')
Name of underlying instrument
Option symbol
Underlying symbol
0
Aecon Group Inc.
ARE
ARE
1
AGF Management Ltd., Cl. B
AGF
AGF.B
2
Agnico Eagle Mines Limited
AEM
AEM
3
Air Canada
AC
AC
4
Alamos Gold Inc.
AGI
AGI
…
…
…
…
264
Wheaton Precious Metals Corp.
WPM
WPM
265
Whitecap Resources Inc.
WCP
WCP
266
Winpak Ltd.
WPK
WPK
267
WSP Global Inc.
WSP
WSP
268
Yamana Gold Inc.
YRI
YRI
269 rows × 3 columns
The above DataFrame that we get with get_list('equity') is from:
Now we can grab stock prices for Air Canada (ticker symbol AC) so we can compare them to the stock options:
get_stock('AC')
TICKER
Last price
Net change
Bid price
Ask price
0
AC
15.520
0.000
15.520
15.550
We can also input a list of stock symbols to get a Pandas DataFrame of said stocks:
get_stock(['AC','ARE'])
TICKER
Last price
Net change
Bid price
Ask price
0
AC
15.520
0.000
15.520
15.550
1
ARE
14.220
0.100
14.200
14.250
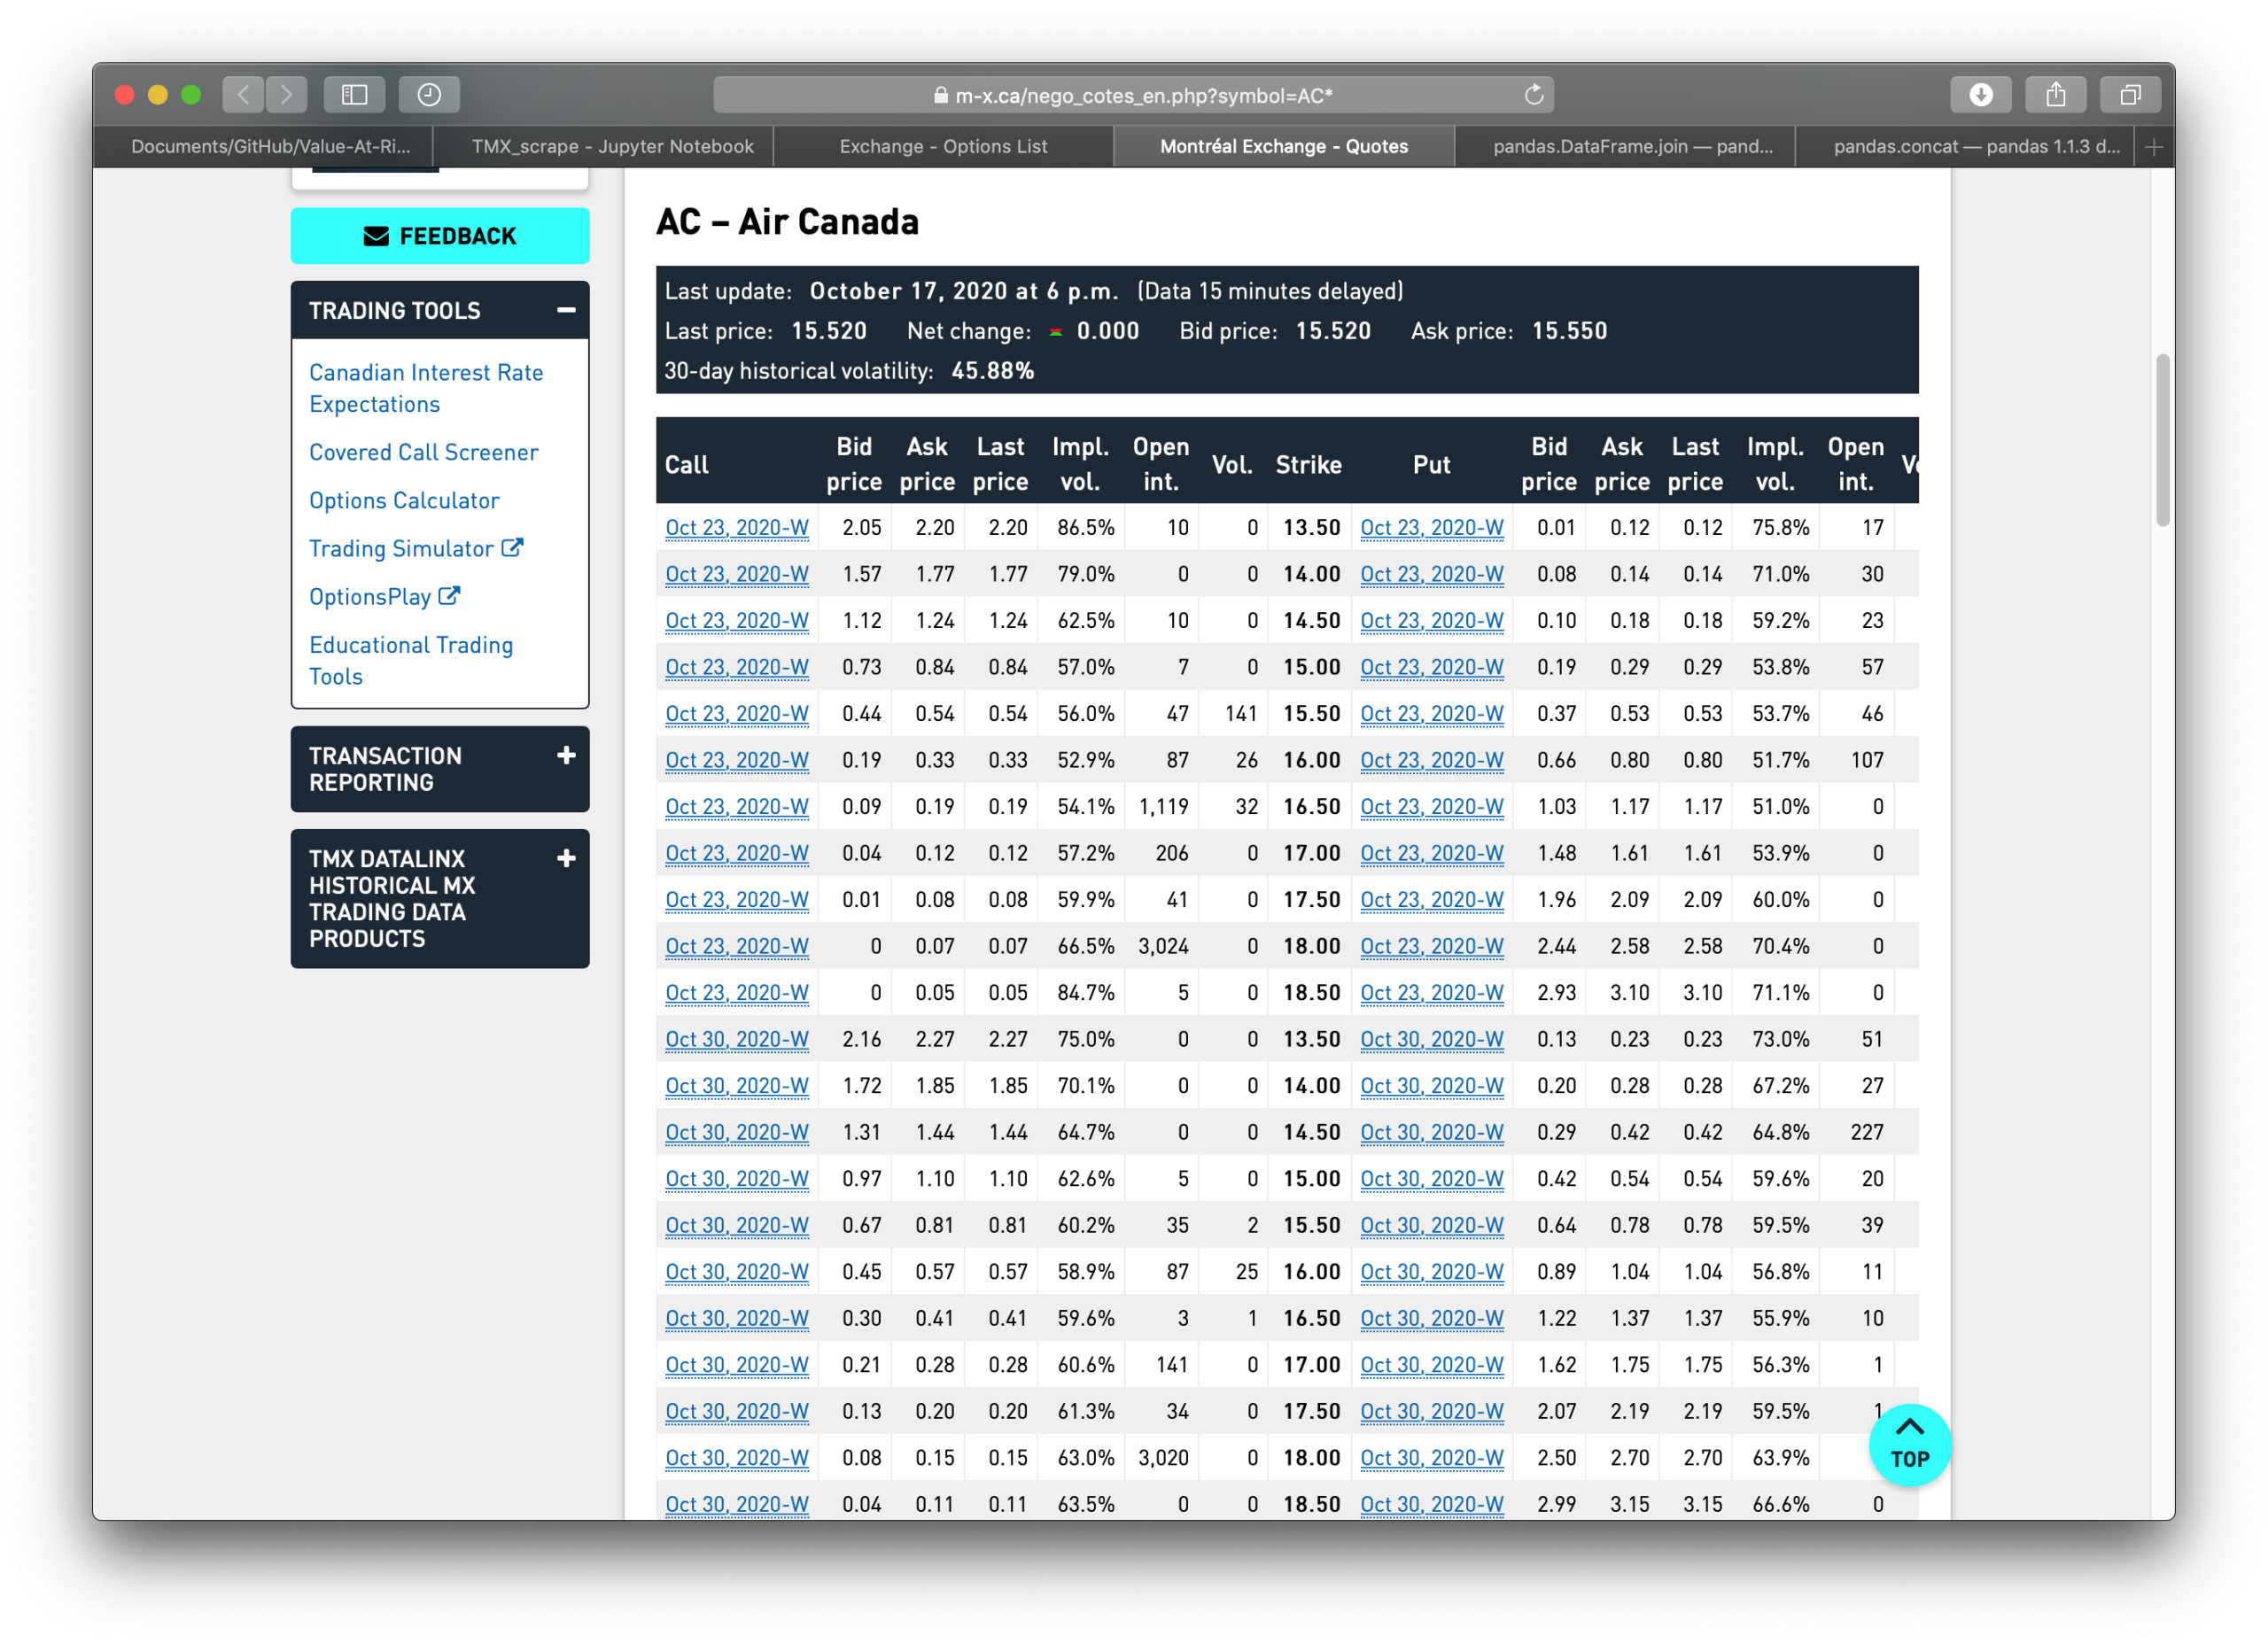
Finally, we obtain the a Pandas Dataframe of TMX stock options for Air Canada which comes from:
"""Get a list of options from https://m-x.ca/nego_liste_en.phpTMX websiteIndex and ETF optionsEquity optionsCurrency optionsWeekly options"""defget_list(market=str) ->pd.DataFrame:
tmx="https://m-x.ca/nego_liste_en.php"# TMX website, where data is taken from#check that parameter is of type stringis_str1=isinstance(market, str)
ifnotis_str1:
raiseTypeError("market parameter must be of type string")
try:
market=market.lower()
exceptExceptionase:
print(e)
else:
ifmarket=='index'ormarket=='etf':
market=0elifmarket=='equity':
market=1elifmarket=='currency':
market=2elifmarket=='weekly':
market=3else:
raiseException("Did not enter market type, choose from Index or ETF, Equity, Currency, Weekly.")
df=pd.read_html(tmx)
returndf[market]
"""Get options prices at predetermined dates from TMX websiteCall/Putsstrike priceBid/Ask spreadsopen interestimplied volatilityvolume"""defget(ticker_symbol=str) ->pd.DataFrame:
tmx="https://m-x.ca/nego_cotes_en.php"# TMX website, where data is taken fromis_str1=isinstance(ticker_symbol, str)
ifnotis_str1:
raiseTypeError("ticker_symbol parameter must be of type string")
try:
ticker_symbol=ticker_symbol.upper()
exceptExceptionase:
print(e)
else:
url=tmx+'?symbol='+ticker_symbol+'*'df=pd.read_html(url)
df[0].rename(columns={'Bid price.1':'Bid price_', 'Ask price.1':'Ask price_', 'Last Price.1':'Last Price_',
'Impl. vol..1':'Impl. vol_', 'Open int..1':'Open int_', 'Vol..1':'Vol_'}, inplace=True)
returndf[0].iloc[:-1] #do not include last row, rubbish information
"""Get stock price from TMX to compare to strike pricecan accept string or list of strings"""defget_stock(ticker_symbol=str) ->pd.DataFrame:
tmx="https://m-x.ca/nego_cotes_en.php"# TMX website, where data is taken from#check that parameter is of type stringis_str1=checktype(ticker_symbol)
ifnotis_str1:
raiseTypeError("market parameter must be of type string")
#download stock price, remember it is 15 minutes delayedtry:
symbols= []
forninticker_symbol:
symbols.append(n.upper())
exceptExceptionase:
print(e)
else:
price_dict= {}
is_list=isinstance(ticker_symbol, list)
ifis_list:
df_list= []
forminsymbols:
URL=tmx+'?symbol='+m+'*'response=requests.get(URL)
soup=BeautifulSoup(response.text, 'html.parser')
x=soup.find('div', class_='quote-info', attrs='ul')
y=x.ul.text.split('\n')[1:-2]
price_dict['TICKER'] =mforziny:
key, value=z.split(':')
price_dict[key] =valuetmp_df=pd.DataFrame.from_dict(price_dict, orient='index').Tdf_list.append(tmp_df)
returnpd.concat(df_list, ignore_index=True)
else:
ticker_symbol=ticker_symbol.upper()
URL=tmx+'?symbol='+ticker_symbol+'*'response=requests.get(URL)
soup=BeautifulSoup(response.text, 'html.parser')
x=soup.find('div', class_='quote-info', attrs='ul')
y=x.ul.text.split('\n')[1:-2]
price_dict['TICKER'] =ticker_symbolforziny:
key, value=z.split(':')
price_dict[key] =valuetmp_df=pd.DataFrame.from_dict(price_dict, orient='index').Treturntmp_df
Absurdum is a Javascript utility library built with a focus on providing idempotent side-effect free
functions and clear/readable modular source for tree shaking.
Features
Explores the flexibility of Reduce
Abstraction Free -> tree-shake friendly
Functional -> all operators are side-effect free
Polyfills -> includes operator polyfills for older browsers
Isomorphic -> works consistently across all JS runtimes
Typescript -> typings are provided for all operators
Use the CKY parsing algorithm (alternatively called CYK parsing algorithm) to parse a particular input string and check whether it is derivable by the grammar or not.
Project Description
Context Free Grammar(CFG) is converted into Chomsky Normal Form Grammar(CNFG).
CNFG so obtained is fed into the CKY parsing algorithm
Assumptions
The CFG used in the project is described in the section below. Any other CFG can also be used.
Conversion of CFG to CNFG is done manually. The program recognizes and accepts only CNFG and not CFG directly.
The program employs the lower-triangular form of the CKY parsing matrix. Both upper-triangular and lower-triangular matrix form yield the same answers.
Det -> The | the | a | the | send | reached | seven | they Noun -> parcel | weight | beautiful | document | feasible | discount | warehouse | for | away | location | belonged | little | beds Verb -> was | gave | gives | told | thought | slowly | found Pronoun -> There | it | he | the | expensive Proper Noun -> Snow-White | goods | heavy | big |cheap | timely | children Preposition -> in | named | and | to | into
CNFG
S -> NP VP S -> Verb NP S -> X2 PP S -> Verb PP S -> VP PP S -> was S -> gave S -> gives S -> told S -> slowly S -> found S -> thought S -> ordered NP -> There NP -> It NP -> big NP -> cheap NP -> goods NP -> He NP -> the NP -> her NP -> timely NP -> expensive NP -> children NP -> FedEx NP -> heavy NP -> Det Nominal Nominal -> Nominal Noun Nominal -> Nominal PP Nominal -> beautiful Nominal -> feasible Nominal -> parcel Nominal -> weight Nominal -> far Nominal -> location Nominal -> little Nominal -> belonged Nominal -> envelope Nominal -> important Nominal -> warehouse VP -> was VP -> gave VP -> gives VP -> told VP -> slowly VP -> found VP -> thought VP -> ordered VP -> Verb NP VP -> X2 PP X2 -> Verb NP VP -> Verb PP VP -> VP PP PP -> Preposition NP Verb -> was Verb -> gave Verb -> gives Verb -> told Verb -> slowly Verb -> found Verb -> thought Verb -> ordered Det -> a Det -> The Det -> the Det -> her Det -> send Det -> reached Det -> seven Det -> they Noun -> document Noun -> discount Noun -> away Noun -> beds Noun -> beautiful Noun -> feasible Noun -> parcel Noun -> weight Noun -> far Noun -> location Noun -> little Noun -> belonged Noun -> envelope Noun -> important Noun -> warehouse Preposition -> named Preposition -> and Preposition -> in Preposition -> into Preposition -> to Preposition -> send
Future Scope
Write documentation to use the program including clear instructions for users on how to specify grammar in the program input box / textarea with proper syntax rules.
Add functionality in program to do automatic conversion of CFG to CNFG. The program should be able to recognize and accept both CNFG and CFG.
Ask user to specify which triangular form to use to generate the CKY parsing matrix. The program should be able to employ both the lower-triangular and upper-triangular form of the CKY parsing matrix.
References
1. Original parser
Author: Martin Lazarov
Year published: 2017
Page title: CKY parsing algorithm demo
URL: http://lxmls.it.pt/2015/cky.html
Access date: 03 May 2017


