In this assignment I explore different strategies used in building and training a Language Translator. I use Seq2Seq learning to convert sequences from English to Hebrew. I also include techniques such as bi-directional learning and Attention mechanism which serve as the building blocks of advanced transformer-based NLP models such as GPT, Llama etc. .
Language Choice and Details
I initially wanted to build a model to translate English to Tamil which happens to be my Native Language so that I could work with the translations easily. But due to less number of available sentence pairs (207) on the https://www.manythings.org/anki/ website for this language (the website used in my class) , I picked Hebrew.
Though Hebrew has been a language of fascination for me for a while now, there are a few other important reasons I picked Hebrew for learning machine translation.
Hebrew is written from right to left, it will be interesting to see if Bi-LSTM and Attention produces better results.
English and Hebrew are from completely different language-families and roots. (https://webspace.ship.edu/cgboer/languagefamilies.html)
They are from completely different regions and time-periods and have isolated places of origins.
English -> Region: West Germany, Language family: Indo-European, Root: Germanic
Hebrew -> Region: Israel, Language family: Afro-Asiatic, Root: Semitic
Please do not fork this repository directly on GitHub.
Instead, please use GitHub’s importer following the instructions below
to create a website repository for your workshop.
Once you are done,
please send your repository’s URL to the Software Carpentry administrator.
We build the list of workshops on our websites from the data included in your index.html page.
We can only do that if you customize that page correctly
and send us a link to your workshop website.
If you run into problems,
or have ideas about how to make this process simpler,
please get in touch.
The pages on customizing your website,
the FAQ,
and the design notes have more detail on what we do and why.
And please note:
if you are teaching Git,
please create a separate repository
for your learners to practice in.
Creating a Repository
Log in to GitHub.
(If you do not have an account, you can quickly create one for free.)
You must be logged in for the remaining steps to work.
Select the owner for your new repository.
(This will probably be you, but may instead be an organization you belong to.)
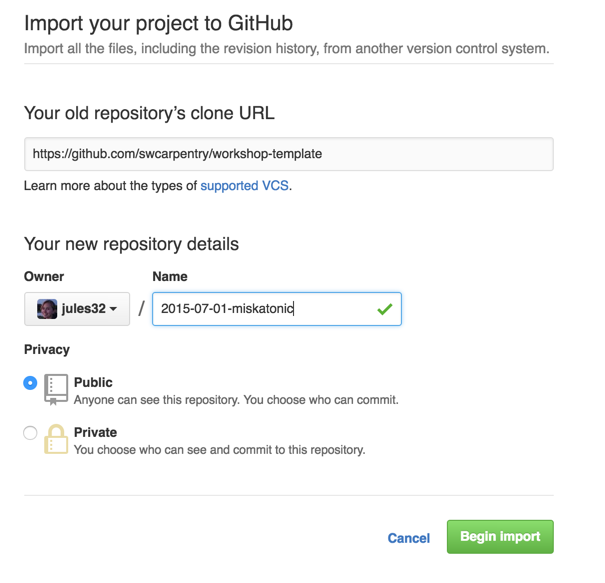
Choose a name for your workshop website repository.
This name should have the form YYYY-MM-DD-site-ttt,
e.g., 2016-12-01-miskatonic-ttt,
where YYYY-MM-DD is the start date of the workshop.
for online workshops, choose online as site
Make sure the repository is public.
At this point, you should have a page like this:
You can now click “Begin Import”.
When the process is done,
you will receive a message like
“Importing complete! Your new repository gvwilson/2016-12-01-miskatonic is ready.”
and you can go to the new repository by clicking on the name.
Note:
some people have had intermittent errors during the import process,
possibly because of the network timing out.
If you experience a problem, please re-try;
if the problem persists,
please get in touch.
Customizing Your Website
Go into your newly-created repository,
which will be at https://github.com/your_username/YYYY-MM-DD-site-ttt.
For example,
if your username is gvwilson,
the repository’s URL will be https://github.com/gvwilson/2016-12-01-miskatonic-ttt.
Edit the header of index.html to customize the list of instructors,
workshop venue, etc.
You can do this in the browser by clicking on it in the file view on GitHub
and then selecting the pencil icon in the menu bar:
Alternatively,
if you are already familiar with Git,
you can clone the repository to your desktop,
edit index.html there,
and push your changes back to the repository.
When you are done editing,
go to the GitHub Pages URL for your workshop and preview your changes.
In the example above, this is https://gvwilson.github.io/2016-12-01-miskatonic.
Note:
this template includes some files and directories that most workshops do not need,
but which provide a standard place to put extra content if desired.
See the design notes for more information about these.
If you want to preview your changes on your own machine before publishing them on GitHub,
you can do so as described below.
Install the software described below.
This may require some work,
so feel free to preview by pushing to the website.
Run the command:
$ jekyll serve
and go to http://0.0.0.0:4000 to preview your site.
You can also run this command by typing make serve
(assuming you have Make installed).
Run the command python bin/workshop_check.py index.html
to check for a few common errors in your workshop’s home page.
(You must have Python 3 installed to do this.)
If you have Make installed,
you can also run this command by typing make workshop-check.
Creating Extra Pages
In rare cases,
you may want to add extra pages to your workshop website.
You can do this by putting either Markdown or HTML pages in the website’s root directory
and styling them according to the instructions give in
the lesson template.
If you do this,
you must also edit _config.yml to set these three values:
carpentry is either “dc” (for Data Carpentry) or “swc” (for Software Carpentry).
This determines which logos are loaded.
title is the title of your workshop (typically the venue and date).
email is the contact email address for your workshop,
e.g., gvwilson@miskatonic.edu.
Note: carpentry and emailduplicate information that's inindex.html`,
but there is no way to avoid this
without requiring people to edit both files in the usual case
where no extra pages are created.
Installing Software
If you want to set up Jekyll
so that you can preview changes on your own machine before pushing them to GitHub,
you must install the software described below.
(Note: Julian Thilo has written instructions for
installing Jekyll on Windows.)
Ruby.
This is included with Linux and Mac OS X;
the simplest option on Windows is to use RubyInstaller.
You can test your installation by running ruby --version.
For more information,
see the Ruby installation guidelines.
RubyGems
(the package manager for Ruby).
You can test your installation by running gem --version.
Jekyll.
You can install this by running gem install jekyll.
You can check the formatting of your header by running bin/workshop_check.py
(which is invoked by make workshop-check).
You must have Python 3 installed in order to do this,
and you will also need the PyYAML module.
Setting Up a Separate Repository for Learners
If you are teaching Git,
you should create a separate repository for learners to use in that lesson.
You should not have them use the workshop website repository because:
your workshop website repository contains many files
that most learners don’t need to see during the lesson,
and
you probably don’t want to accidentally merge
a damaging pull request from a novice Git user
into your workshop’s website while you are using it to teach.
You can call this repository whatever you like,
and add whatever content you need to it.
Getting and Giving Help
We are committed to offering a pleasant setup experience for our learners and organizers.
If you find bugs in our instructions,
or would like to suggest improvements,
please file an issue
or mail us.
Using i686-w64-mingw32-gcc (cross compiling should work too):
# Download source
git clone https://github.com/xzn/d3d10-mmxlc.git
cd d3d10-mmxlc
git submodule update --init --recursive

# Create symlinks and patch files
make prep

# Build the dll
make -j$(nproc) dll
Some options to pass to make
# disable optimizations and prevents stripping
make o3=0 dll

# disable lto (keep -O3)
make lto=0 dll
Install
Copy dinput8.dll, interp-mod.ini, and the slang-shaders\ directory to your game folders, e.g.:
SteamLibrary\steamapps\common\Mega Man X Legacy Collection
SteamLibrary\steamapps\common\Mega Man X Legacy Collection 2
Configuration
interp-mod.ini contains options to configure the mod.
; Log API calls to interp-mod.log,; [logging]; enabled=true; hotkey_toggle=VK_CONTROL+O; hotkey_frame=VK_CONTROL+P; Change interpolation mode and set up custom slang shaders.[graphics]; Use linear instead of point upscaling for the 2D games.interp=true
; (WIP) Use linear scaling when possible for the 3D games.; linear=true; When using Type 1 filter, interp=true, and slang_shader* is not set,; apply Type 1 filter over and over until it reaches screen size.; enhanced=true; Custom shader for X1~X6, needs Type 1 filter set in-game.; slang_shader=slang-shaders/xbrz/xbr-lv2.slangpslang_shader_snes=slang-shaders/crt/crt-lottes-fast.slangp
slang_shader_psone=slang-shaders/xbrz/xbrz-freescale-multipass.slangp
; Custom shader for X7~X8.slang_shader_3d=slang-shaders/anti-aliasing/smaa.slangp
; (TODO) Custom render resolution for X7~X8; render_3d_width=; render_3d_height=; Custom display resolution, e.g. 4K and so-on,; Should be 16:9 as the mod currently does not correct for aspect ratio.display_width=
display_height=
If all goes well you should now be able to start the game and see the overlay on top-left of the screen showing the status of the mod.
interp-mod.ini can be edited and have its options applied while the game is running.
License
Source code for this mod, without its dependencies, is available under MIT. Dependencies such as RetroArch are released under GPL.
RetroArch is needed only for slang_shader support.
SPIRV-Cross and glslang are used for slang_shader support.
HLSLcc is used for debugging.
Other dependencies are more or less required:
minhook is used for intercepting calls to d3d10.dll.
imgui is used for overlay display.
smhasher is technically optional. Currently used for identifying the built-in Type 1 filter shader.
Smooth scrolling bottom refresh control for table view with some objects in array.
Just add some dummy data into array with custom referesh control cell in table view or handle response from web service and
populate the data into the array with smooth animation from table view top with this two methods
Make sure these given below methods are very important to show the cell at the end of the table view with your conditional array objects
so that you can show the load more cell in table view with concerned API call for loading more data to an array.
Please go through the demo once and let me know if any query regarding this demo of bottom referesh control.
These were the methods to focus on while loading more data into cell with load more custom cell in table view as below: