Category: Blog

  • Athena

    Athena

    Athena is a versatile C++ library designed for efficient binary file operations, allowing developers to directly write structs, classes, raw data, and arrays into a binary format. It combines high-performance compression with modular data management, making it an excellent tool/library for handling complex binary data storage needs.

    Key Features:

    1. LZ4 Compression
      Athena leverages the LZ4 compression algorithm, which is known for its speed and efficiency. This feature ensures that data can be compressed and decompressed rapidly, optimizing both storage space and access times.

    2. Modular Sections with Parallel Compression
      Files created with Athena are divided into independent sections, each of which is compressed separately. To enhance performance, Athena compresses each section in a different thread, allowing for faster processing, especially when working with large files. This modular and parallel approach enables selective decompression of individual sections, providing flexibility when accessing or modifying specific parts of a file without needing to handle the entire file.

    3. Raw Data and Array Handling
      In addition to structs and classes, Athena supports direct writing of raw data and arrays. This feature makes it easier to handle a wide range of binary data types, offering flexibility in how data is structured and stored.

    4. Backward and Forward Compatibility
      Athena ensures that Trivially Copyable Structs and Classes
      maintain compatibility across different versions, as long as changes (such as adding or removing fields) are performed in a stack-like order. This compatibility is crucial for maintaining data integrity and accessibility over time as the data structures evolve.

    Athena is ideal for developers who need a high-performance, flexible solution for managing binary data in C++, with robust support for various data types, parallel compression for improved performance, and backward compatibility.

    1. No Need for external LZ4 dependancies
      Athena contains the neccesary code to compress/decompress using LZ4 on the fly without any external library’s or programs!
      in other words install and go!

    1) build

    to build run BUILD.bat or BUILD.sh.
    this just runs the python build.py script for convenience.
    

    more info

    2) example:

    Athena File Stream Examples

    Below are examples demonstrating how to use the athena::fileStreamWriter and athena::fileStreamReader classes to write and read binary data. The examples use a simple example struct for clarity.

    Writing Data with athena::fileStreamWriter

    Use the fileStreamWriter class to write data to a binary file. This example shows how to write arrays of a custom struct to a file, including handling multiple sections:

    #include <athena.h>
    #include <iostream>
    #include <vector>
    #include <filesystem>
    
    struct ExampleStruct
    {
        int id;
        float value;
        char name[20];
    };
    
    int main()
    {
        // Specify the file path
        std::filesystem::path path = "./example.bin";
    
        // Create a fileStreamWriter instance
        athena::fileStreamWriter* streamWriter = new athena::fileStreamWriter(path);
    
        // Prepare data to write
        std::vector<ExampleStruct> data1(100);
        std::vector<ExampleStruct> data2(100);
    
        // Fill the vectors with example data
        for (int i = 0; i < 100; ++i)
        {
            data1[i] = { i, static_cast<float>(i) * 1.5f, "Data1" };
            data2[i] = { i + 100, static_cast<float>(i) * 2.0f, "Data2" };
        }
    
        // Write data to file
        streamWriter->writeArray(data1);        // Write the first array
        streamWriter->nextStreamSection();      // Move to the next section
        streamWriter->writeArray(data2);        // Write the second array
        streamWriter->flush();                  // Flush all data to the file
    
        // Clean up
        delete streamWriter;
    
        return 0;
    }
    

    Reading Data with athena::fileStreamReader

    Use the fileStreamReader class to read data from a binary file. Below is an example demonstrating how to read arrays of a custom struct from a file and handle multiple sections:

    #include <athena.h>
    #include <iostream>
    #include <vector>
    #include <filesystem>
    
    
    struct ExampleStruct
    {
        int id;
        float value;
        char name[20];
    };
    
    int main()
    {
        std::filesystem::path path = "./example.bin";
    
        // Create a fileStreamReader instance
        athena::fileStreamReader* streamReader = new athena::fileStreamReader(path);
    
        // Read data from the first section
        std::vector<ExampleStruct> data1 = streamReader->readArray<ExampleStruct>();
    
        // Move to the next section
        streamReader->nextStreamSection();
    
        // Read data from the second section
        std::vector<ExampleStruct> data2 = streamReader->readArray<ExampleStruct>();
    
        // Print some data to verify
        std::cout << "Data1[0]: id=" << data1[0].id << ", value=" << data1[0].value << ", name=" << data1[0].name << std::endl;
        std::cout << "Data2[0]: id=" << data2[0].id << ", value=" << data2[0].value << ", name=" << data2[0].name << std::endl;
    
        // Clean up
        delete streamReader;
    
        return 0;
    }

    Trivially Copyable Structs and Classes

    Trivially copyable structs or classes are those that can be copied with simple memory operations without needing special handling for copying. Here are the key characteristics:

    • Simple Memory Layout: The struct or class contains only data members that are themselves trivially copyable. This includes fundamental types (e.g., int, float, char) and other trivially copyable structs.

    • No User-Defined Copy Behavior: It does not define custom copy constructors, assignment operators, or destructors. The default implementations provided by the compiler are used.

    • No Virtual Functions or Base Classes: The struct or class does not contain virtual functions or inherit from other classes that might complicate copying.

    Trivially copyable types can be safely copied using standard memory functions like memcpy, which is essential for efficient data manipulation, serialization, and ensuring compatibility in binary file operations or inter-process communication. This characteristic is important for maintaining data integrity and performance in low-level data handling.

    Visit original content creator repository
    https://github.com/lolrobbe2/Athena

  • ScratchRadio

    Entry Level SDR Educational Tools For Raspberry Pi

    ScratchRadio

    This repository contains entry level educational tools for introducing SDR technology on the Raspberry Pi platform. A Raspberry Pi 3 Model B running Raspbian Stretch is the recommended host configuration.

    Installation and Setup

    The following installation steps assume an up to date installation of Raspbian Stretch is being used. In order to ensure that all the latest updates have been applied, the following commands may be used:

    sudo apt-get update sudo apt-get upgrade

    All the required package dependencies for building the various SDR components can be installed by running the ‘install_deps.sh’ script with superuser privileges. Note that it may be necessary to re-run this script if any of the package installation steps fail:

    sudo ./scripts/install_deps.sh

    The Raspbian Stretch distribution already contains pre-built packages for SoapySDR and LimeUtils, but these are out of date relative to the current repositories and they need to be built and installed from source instead. The ‘LimeSuite’ makefile target automates this process:

    make LimeSuite

    The main GNU Radio package from the Raspbian Stretch distribution is installed as one of the required dependencies. However, an up to date version of the gr-limesdr module needs to be compiled from source – together with the out of tree GNU Radio module from this repository which contains the dedicated Scratch Radio components:

    make GnuRadio

    Finally, the latest files for Scratch2 integration can be installed as follows:

    make ScratchRadio

    The default makefile target is ‘all’ which will run the builds for LimeSuite, GnuRadio and ScratchRadio in the required order. After running the build process, all the intermediate files can be removed by using the ‘clean’ target:

    make clean

    Running Scratch Radio

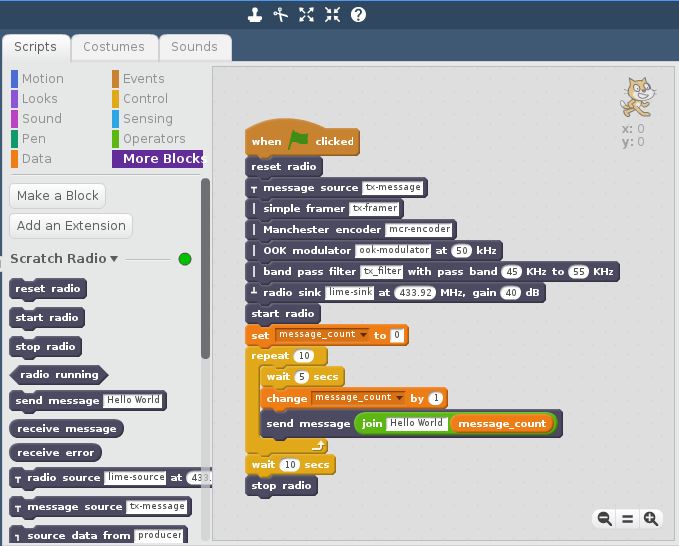
    In order to use the Scratch radio blocks, the corresponding GNU Radio wrapper script needs to be running. This occurs automatically on loading the Scratch Radio extension. The wrapper script currently runs in a new terminal window which can be useful for development and debugging purposes.
    It should now be possible to access the radio functions from Scratch by running Scratch2 from the Raspbian programming menu and selecting the ‘Add an Extension option under ‘More Blocks’.

    Removing Scratch Radio

    The Scratch Radio extension can be removed by using the ‘uninstall’ makefile target as follows:

    make uninstall

    This will remove the extension files from the Scratch2 installation directory but leaves the GNU Radio and LimeSuite installations intact.

    Online Documentation

    For further information about programming using Scratch Radio, please refer to the Scratch Radio Wiki.

    Visit original content creator repository https://github.com/myriadrf/ScratchRadio
  • async_retrial

    Retrial library for asyncio coroutines

    http://pushx.top/wp-content/uploads/2025/08/async_retrial.svg

    Easy to use retry library based on asyncio

    Requirements

    Installation

    To install via pip

    $ pip install async_retrial

    To install from source

    $ git clone https://github.com/nerandell/async_retrial
    $ cd async_retrial
    $ python setup.py install

    Examples

    You can either use RetryHandler or retry decorator

    retry decorator

    def retry(should_retry_for_result=_default_retry_for_result,
              should_retry_for_exception=_default_retry_for_exception,
              multiplier=2, timeout=None, max_attempts=None, strategy=None):
                """
        :param should_retry_for_result: A function that is called with argument as result to allow retrial for specific
                                        set of results. Must return a boolean value
        :param should_retry_for_exception: A function that is called if the function to be retried threw an exception
                                           allow retrial for specific set of exceptions. Must return a boolean value
        :param multiplier: Must be an integer value, If defined, the retrial would be exponential with this behind the
                           multiplier
        :param timeout: If defined, the function will be retried if no result was returned in this time.
        :param max_attempts: Max number of attempts to retry
        :param strategy: Must be a list of integers. If defined, retrial would follow this strategy. For ex. if strategy
                         is [1,3,5,8,11], function would be retried at 1, 3, 5, 8, 11, 11, 11, ... seconds
        :return:
        """

    To use the decorator:

    from retrial.retrial import retry

    Using different settings:

    @retry()
    def my_function(*args, **kwargs):
        '''Retry till successful. Default multiplier is 2'''
    
    @retry(multiplier=3)
    def my_function(*args, **kwargs):
        '''Retry at 0, 3, 9, 27, 81 ... seconds until successful'''
    
    @retry(strategy=[1, 1, 2, 3, 5, 8, 13])
    def my_function(*args, **kwargs):
        '''Retry at 1, 1, 2, 3, 5, 8, 13, 13, 13 ... seconds until successful'''
    
    @retry(max_attempts=3)
    def my_function(*args, **kwargs):
        '''Retry for a maximum of 3 times'''
    
    @retry(should_retry_for_result=lambda x: x < 0)
    def my_function(*args, **kwargs):
        '''Retry if result is negative value'''
    
    @retry(should_retry_for_exception=lambda x: isinstance(x, KeyError))
    def my_function(*args, **kwargs):
        '''Retry if exception was of type KeyError'''

    License

    async_retrial is offered under the MIT license.

    Source code

    The latest developer version is available in a github repository: https://github.com/nerandell/async_retrial

    Visit original content creator repository https://github.com/nerandell/async_retrial
  • pyjq

    pyjq

    A simple Python package to Query Json Data.

    Features

    • Supports pure json files
    • Supports multiple json objects in a file, delimited by newlines (/n)
    • Supports gzipped files
    • Supports customizabile filters
    • Supports pure datetime range filters

    Todo

    The filters could be extended easily, adopting Python3 stdlib operator.
    See pyjq.PyJQ.filter to extend ops mapping.
    Installation

    pip install pyjq-ng
    

    Example data

    See example/alerts.json.
    pyjq works on lines by lines (splitted by \n).
    It have been used for Wazuh alert json files and Django dumps.

    pyjq -j examples/django_dump.json -limit 2 -filter 'fields__original_url == https://google.com'
    pyjq -j examples/django_dump.json -limit 2 -filter 'model == urlshortener.urlshortener'
    

    Usage

    ‘agent__name’ it’s an example of the namespace used by pyjq to access to nested childs. It other word it means json['agent']['name'].
    It haven’t limits on number of nested elements.

    Apply some custom filters with AND and OR operators on Wazuh Alert file

    pyjq -j ../Scaricati/alerts.json -filter 'agent__ip == 172.16.16.102 and agent__name == telegram-gw or agent__ip == 172.16.16.108'
    

    Contains operator

    pyjq -j ../Scaricati/alerts.json -filter 'rule__description in iptables and agent__name == dev-bastion'
    

    Convert a specified filed to a pure datetime object and filter in a specified range

    pyjq -j ../Scaricati/alerts.json -start_datetime 2020-04-06T10:22:00 -end_datetime 2020-04-06T13:22:00 -datetime_field timestamp
    

    Realtime reading, it will only takes the latter entries, delimited by newline \n

    pyjq -j /var/ossec/logs/alerts/alerts.json -datetime_field timestamp -realtime
    

    Use a gzipped json file directly

    pyjq -j ../Scaricati/alerts.json.gzip
    

    Limit results to 2

    pyjq -j ../Scaricati/alerts.json  -limit 2
    

    Realtime monitoring of a specific entity

    pyjq -j /var/ossec/logs/alerts/alerts.json -realtime -filter 'agent__name == tinyurl and rule__level == 3'
    

    Custom callback, usefull for bot integration and other pub/sub APIs

    python3 pyjq -j examples/alerts.json -realtime -filter 'agent__name == tinyurl and rule__description in ssh' -callback 'examples.callback.things'
    

    Reading from stdin

    cat examples/alerts.json | python3 ./pyjq -filter 'rule__level > 3'
    
    # continous processing
    tail -f  /tmp/alerts.json | python3 ./pyjq -filter 'location != osquery'
    

    Author

    Giuseppe De Marco giuseppe.demarco@unical.it

    Credits

    Wazuh SIEM group @GarrLab

    Visit original content creator repository
    https://github.com/peppelinux/pyjq

  • releaser

    releaser

    A tool for Golang programs that automatically generate versions at build time.

    Quick Start

    Use in direct

    go build -ldflags="-X github.com/zc2638/releaser.ver=0.0.1" main.go

    Use in rely

    1. Code import

    package main
    
    import (
    	"fmt"
    
    	"github.com/zc2638/releaser"
    )
    
    func main() {
    	fmt.Printf("version: %s\n", releaser.Version.String())
    	fmt.Printf("gitCommit: %s\n", releaser.Version.Git.Commit)
    	fmt.Printf("goVersion: %s\n", releaser.Version.GoVersion)
    	fmt.Printf("compiler: %s\n", releaser.Version.Compiler)
    	fmt.Printf("platform: %s\n", releaser.Version.Platform)
    	fmt.Printf("buildDate: %s\n", releaser.Version.BuildDate)
    }

    2. Run Build

    go build -ldflags="-X $(releaser get)" main.go

    Install

    Install from source

    go install -v github.com/zc2638/releaser/cmd/releaser@latest

    Install from Docker

    docker run --rm -it zc2638/releaser:latest

    Build from source

    1. Clone

    git clone https://github.com/zc2638/releaser.git releaser && cd "$_"

    2. Build

    go build -ldflags="-X $(go run github.com/zc2638/releaser/cmd get)" -o releaser github.com/zc2638/releaser/cmd

    Commands

    init project

    releaser init <project name>

    create service

    releaser create <service name>

    set

    use for project

    releaser set --version 1.0.0 --meta status=ok --meta repo=github

    use for service

    releaser set <service name> --version 1.0.0 --meta status=ok --meta repo=github

    get

    use for project

    # get build info, output format `gobuild` is default
    releaser get [-o gobuild|json]
    # get version
    releaser get --filter version
    # get metadata field value
    releaser get --filter meta.status

    use for service

    # get build info, output format `gobuild` is default
    releaser get <service name> [-o gobuild|json]
    # get version
    releaser get <service name> --filter version
    # get metadata field value
    releaser get <service name> --filter meta.status

    delete

    releaser delete <service name>

    walk

    releaser walk --command 'echo "$name $version $meta_status"'

    Visit original content creator repository
    https://github.com/zc2638/releaser

  • caoguo

    功能

    • 微信小程序电商平台
    • 后台开发语言 Go gmsec
    • gormt 嵌入,自动数据库代码生成 gorm 自动构建(gormt)
    • 支持优惠券,物流系统
    • uniapp 小程序端

    安装

    • 进入到 server 目录
    • 安装 cmake 工具
    • 安装服务器
    git clone git@github.com:xxjwxc/caoguo.git
    
    cd caoguo
    git submodule update --init --recursive
    
    cd server
    make run
    
    • 客户端运行(hbuilder 直接导入 uniapp 即可)

    部署运行

    • 可直接运行程序
    • 安装服务方式
    sudo ./caoguo install
    sudo ./caoguo start
    

    or

    sudo ./caoguo stop
    sudo ./caoguo run
    

    proto配置新加接口

    • 修改目录apidoc/proto/caoguo/目录下相关proto文件
    • 进入到server目录 使用make gen生成相关接口

    配置说明

    • 服务配置
    base:
        serial_number: "v1" # 版本号
        service_name: "caoguo" # 服务名
        service_displayname: "caoguo" # 服务显示名
        sercice_desc: "caoguo" # 描述
        is_dev: true
    mysql_info:
        port : 3306 # 端口号
        username : root # 用户名
        host :  localhost # 地址
        password : 123456 # 密码
        # host : localhost
        # password : qwer
        database : caoguo_dev # 数据库名
    kdniao: # 快递鸟配置
        business_id : 1317777
        app_key : 111111-2222-3333-4444-555555555
    email: # 发邮件配置
        user: xie1xiao1jun@126.com
        password: pppppppppppppp
        host: smtp.126.com:25
    wx_info: # 微信相关配置
        app_id : wxc111111111111
        app_secret : 111111111111111111111
        api_key : 1111111111111111111111111
        mch_id : 1111111111111111
        notify_url : http://www.xxjwxc.cn
        shear_url : ""
    file_host: https://localhost/commcn/api/v1
    oauth2_url: http://localhost/oauth2/api/v1
    register_url: http://localhost/register/api/v1
    token_type: nomal
    app_id: wwwthings
    app_secret: 4EE0A9A43B9B911C067BEE5CC50A9972
    port : 8001
    • uniapp 配置 修改caoguo\uniapp\commcn\utils\server\def.jsserver.Host进行服务器配置

    • 数据库说明 详细请看mysql目录

    实际效果图

    show

    show

    show

    show

    show

    show

    show

    show

    show

    show

    show

    show

    show

    Visit original content creator repository https://github.com/xxjwxc/caoguo
  • forkify-app

    forkify-app

    App deployed to production

    https://agitated-murdock-72.netlify.app

    Description

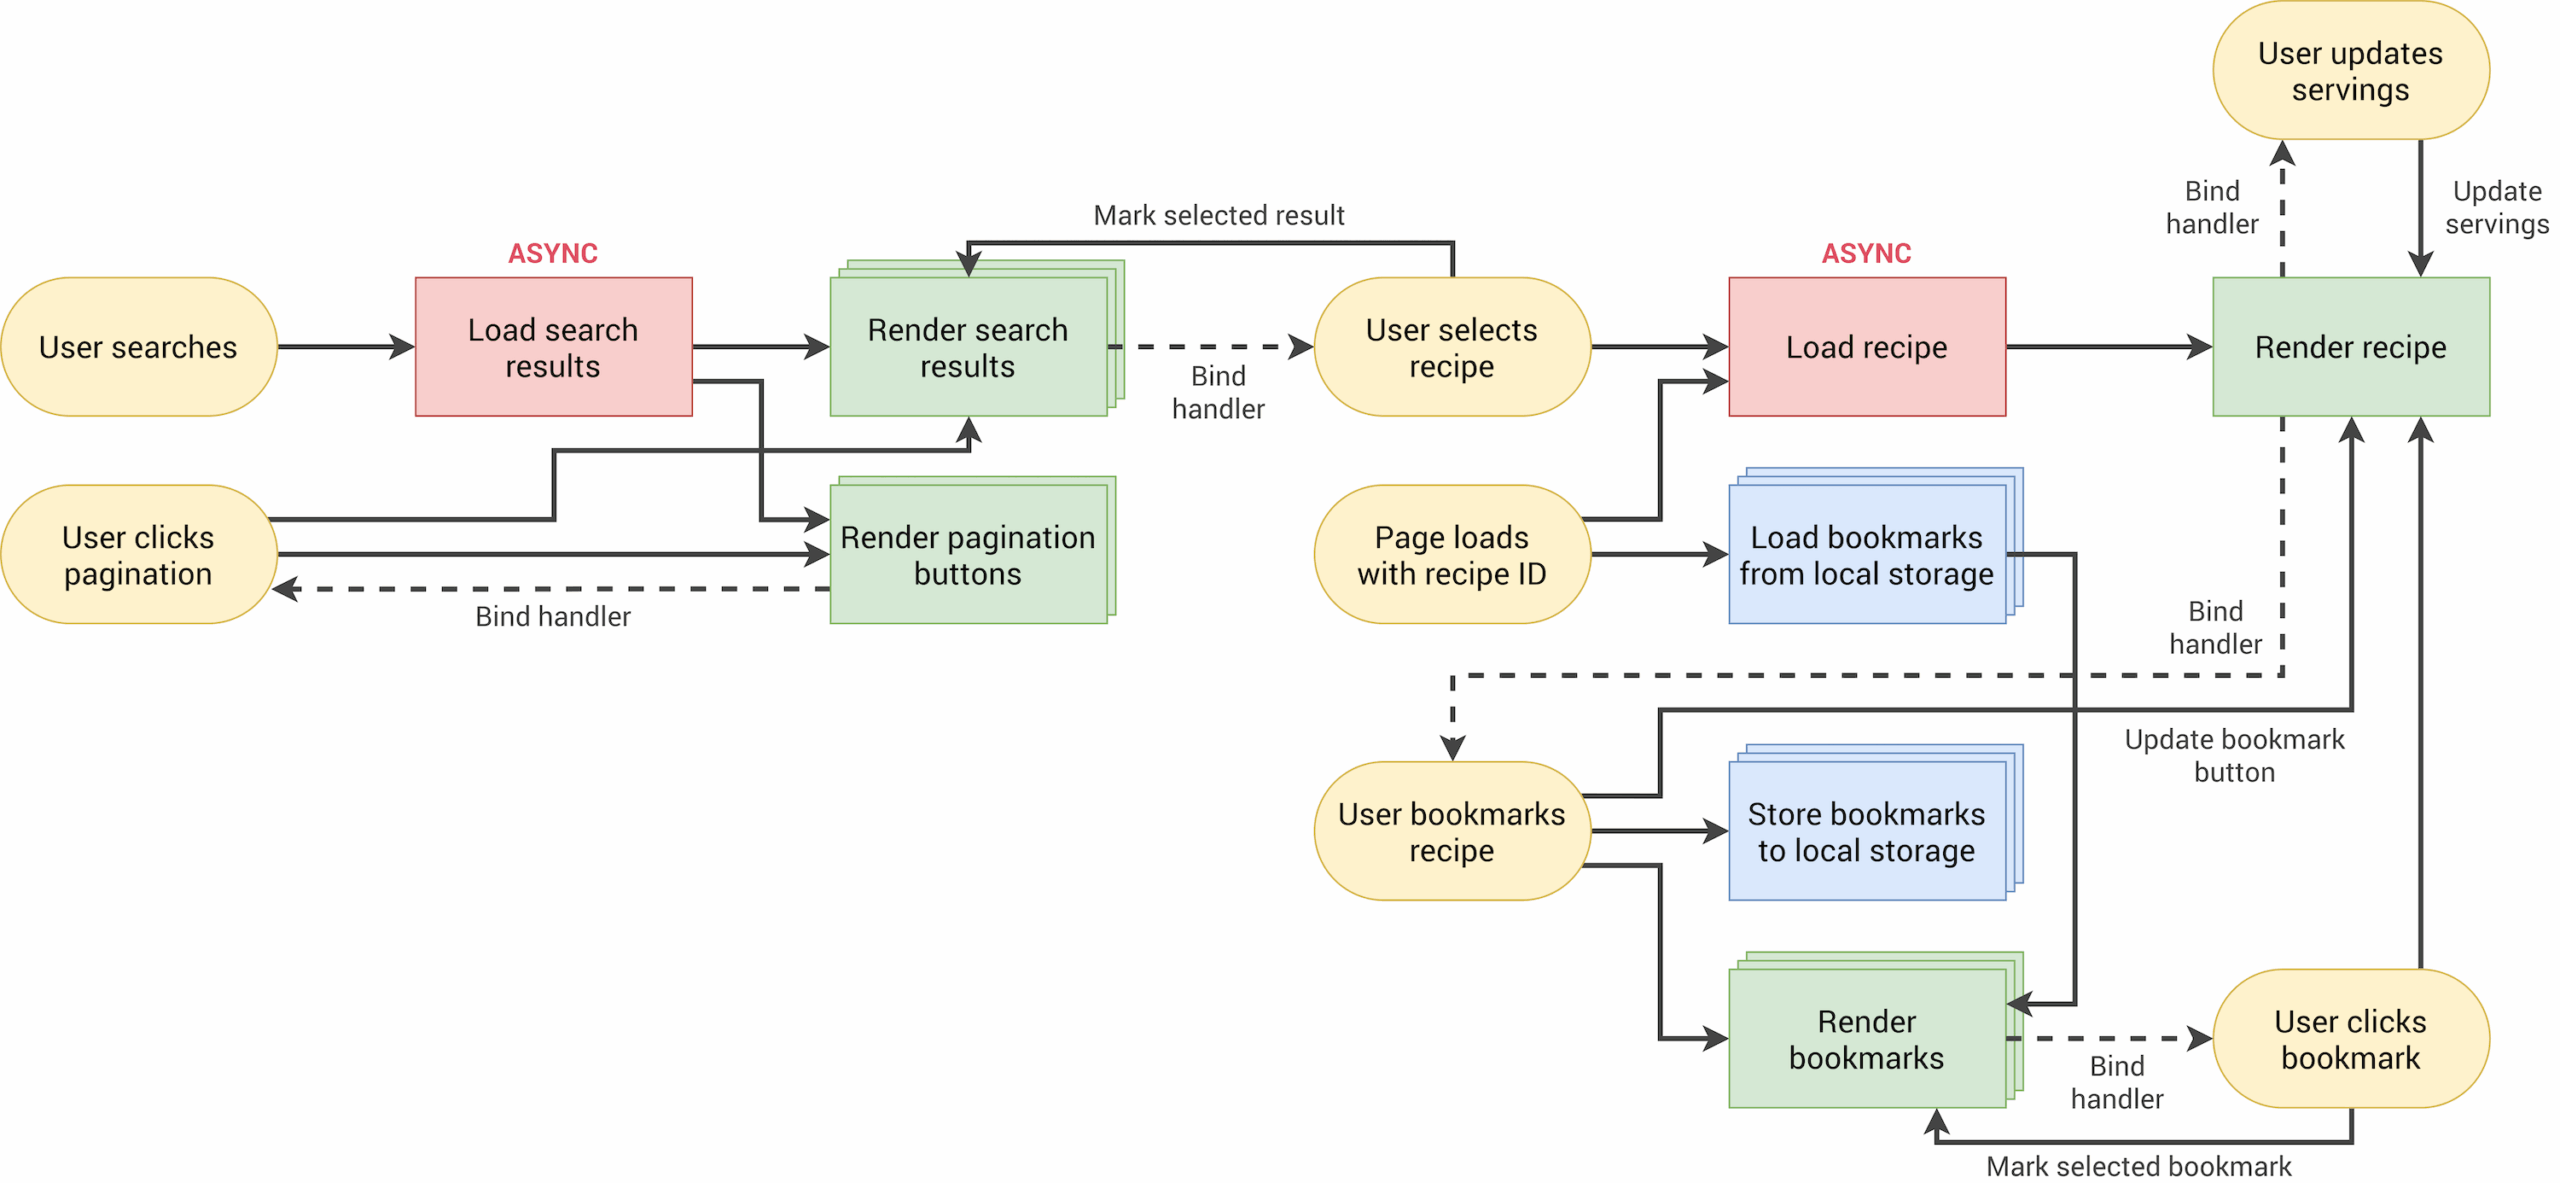
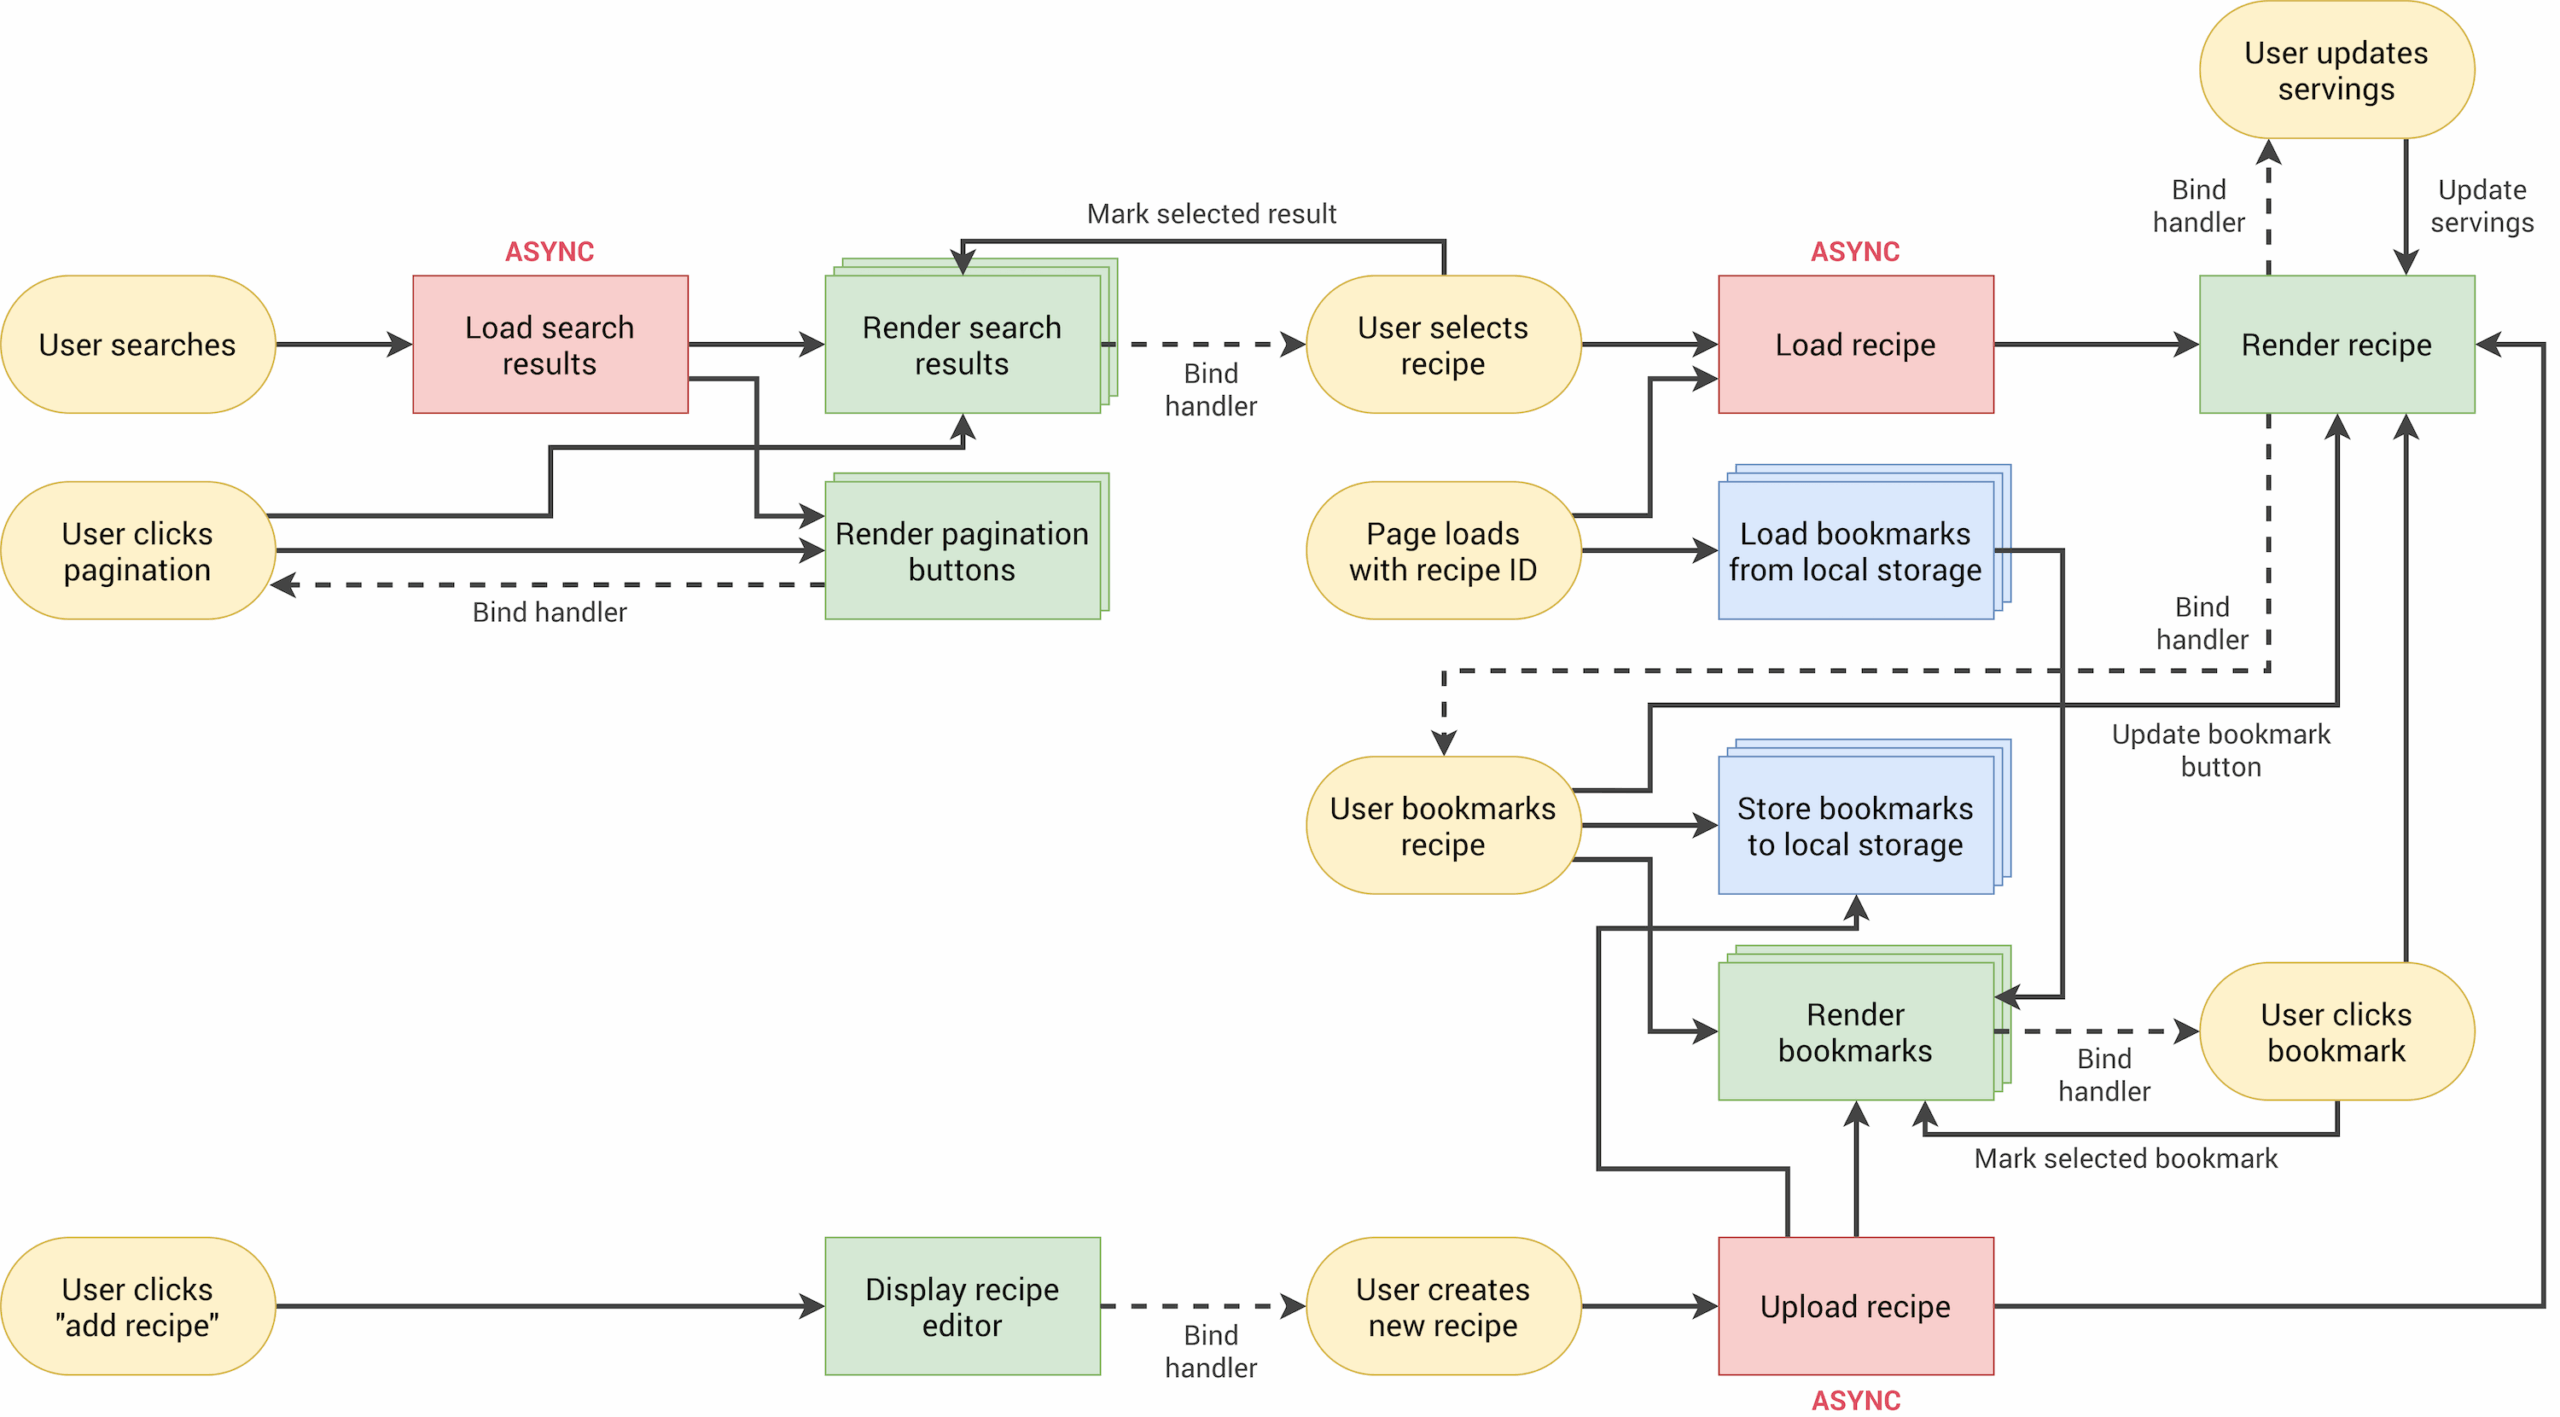
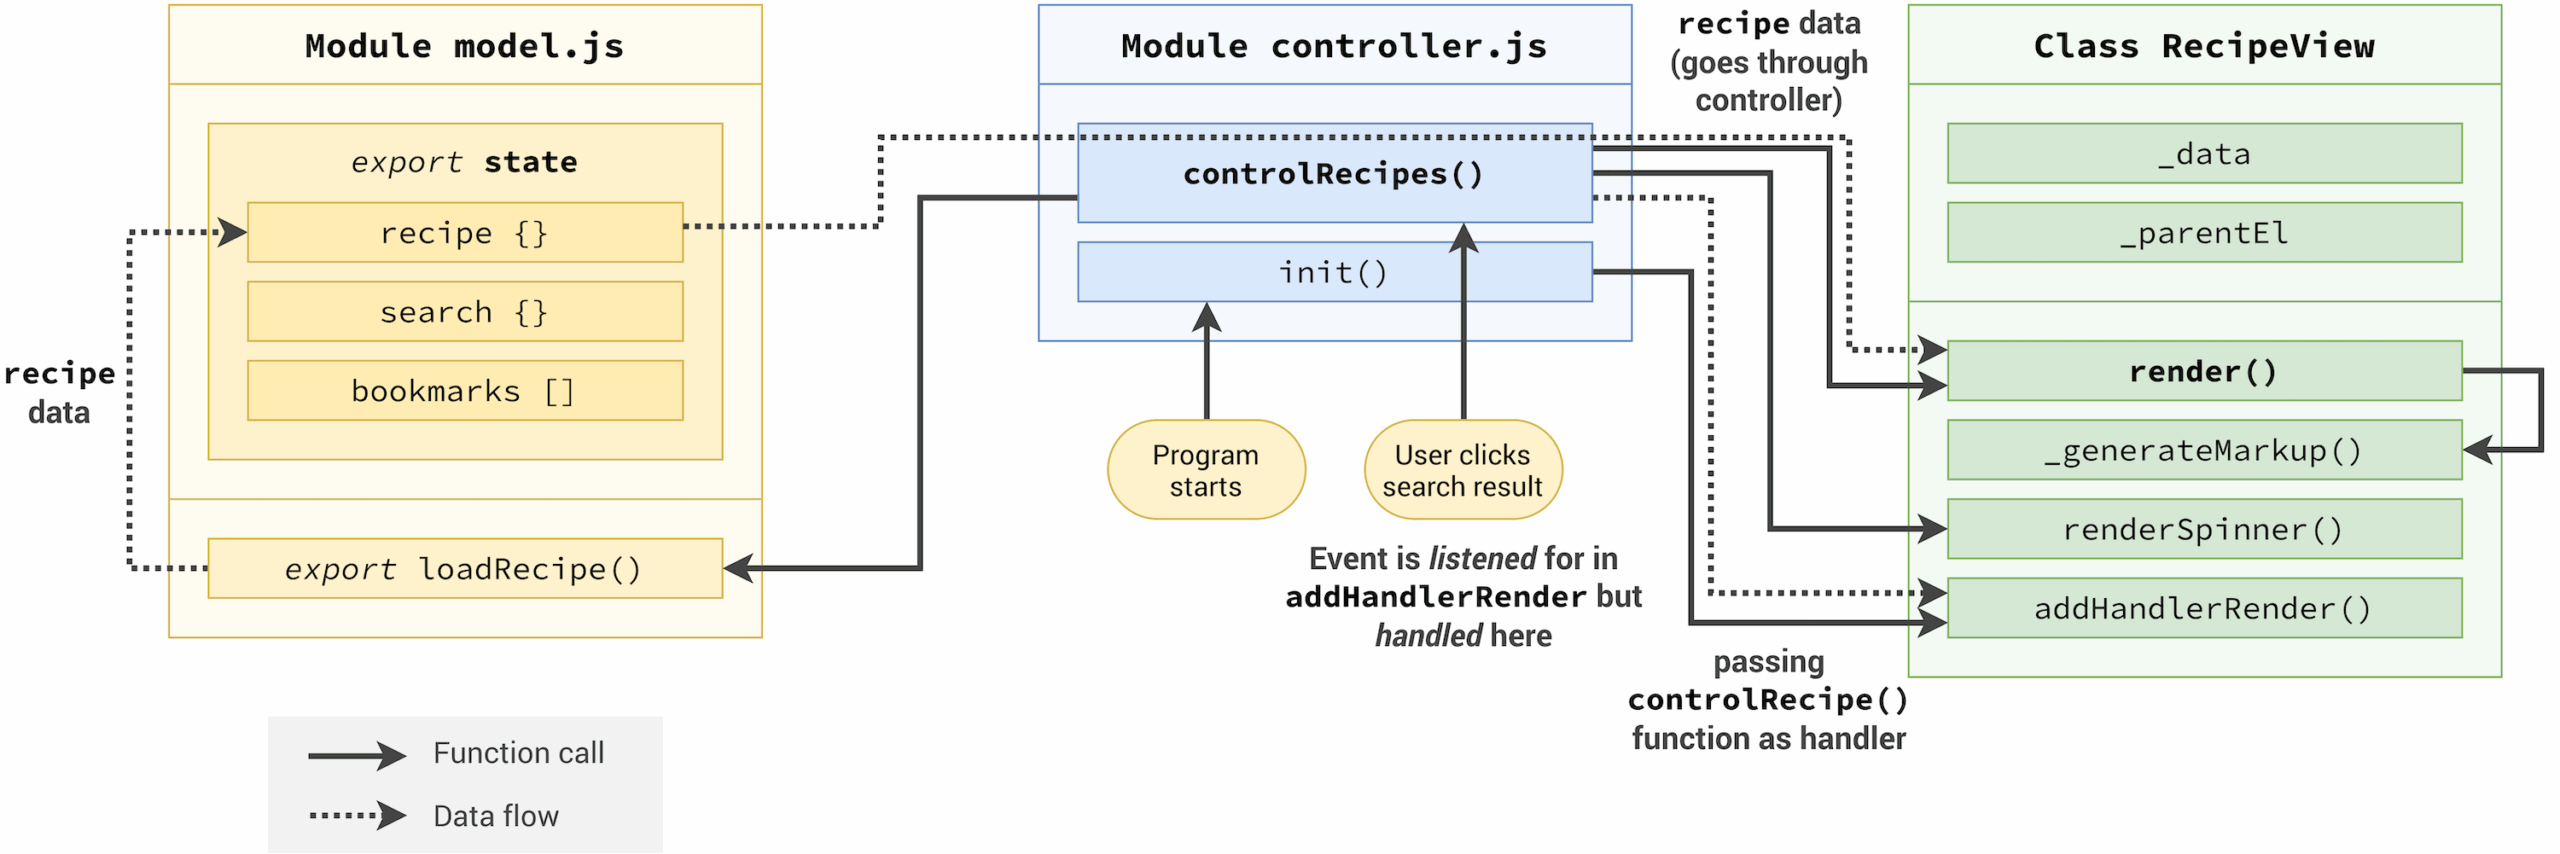
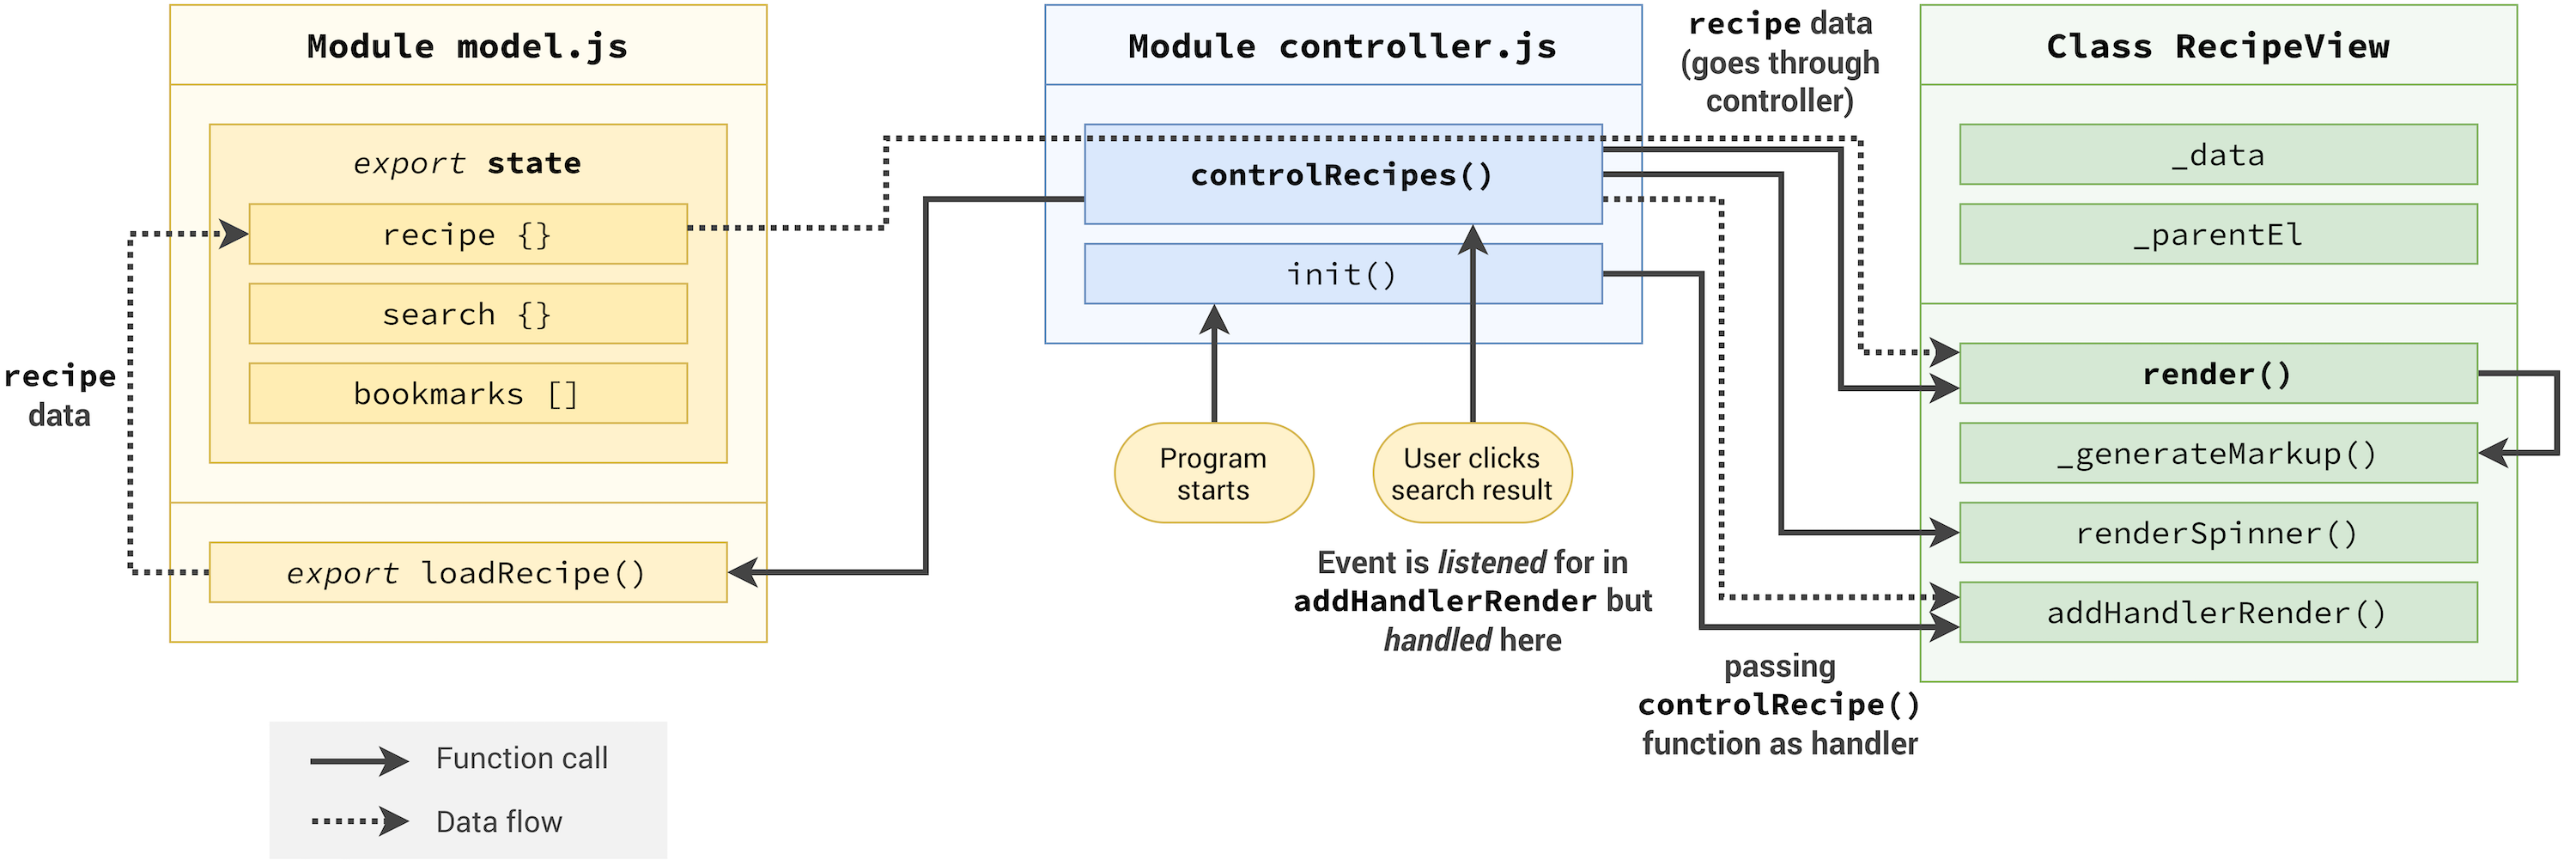
    A project I built for fun and learning, using classes, module, await, async, and modules likes parcel. To get started with this massive production application, I needed to use parcel which is a zero configuration build tool for the web. It combines a great out-of-the-box development experience with a scalable architecture that can take your project from just getting started to massive production application. I also used MVC pattern/ framework commonly used for developing user interfaces that divide the related program logic into three interconnected elements. This is done to separate internal representations of information (business logic) from the user interface presented to the user. The project is basically, a small web application that give the user ability to request/ fetch more than 1000000 recipes from an endpoint built and deployed using heroku. Then, it renders all those recipes in a user-friendly manner. We use a search and filter functionnality to load the recipe from the api.

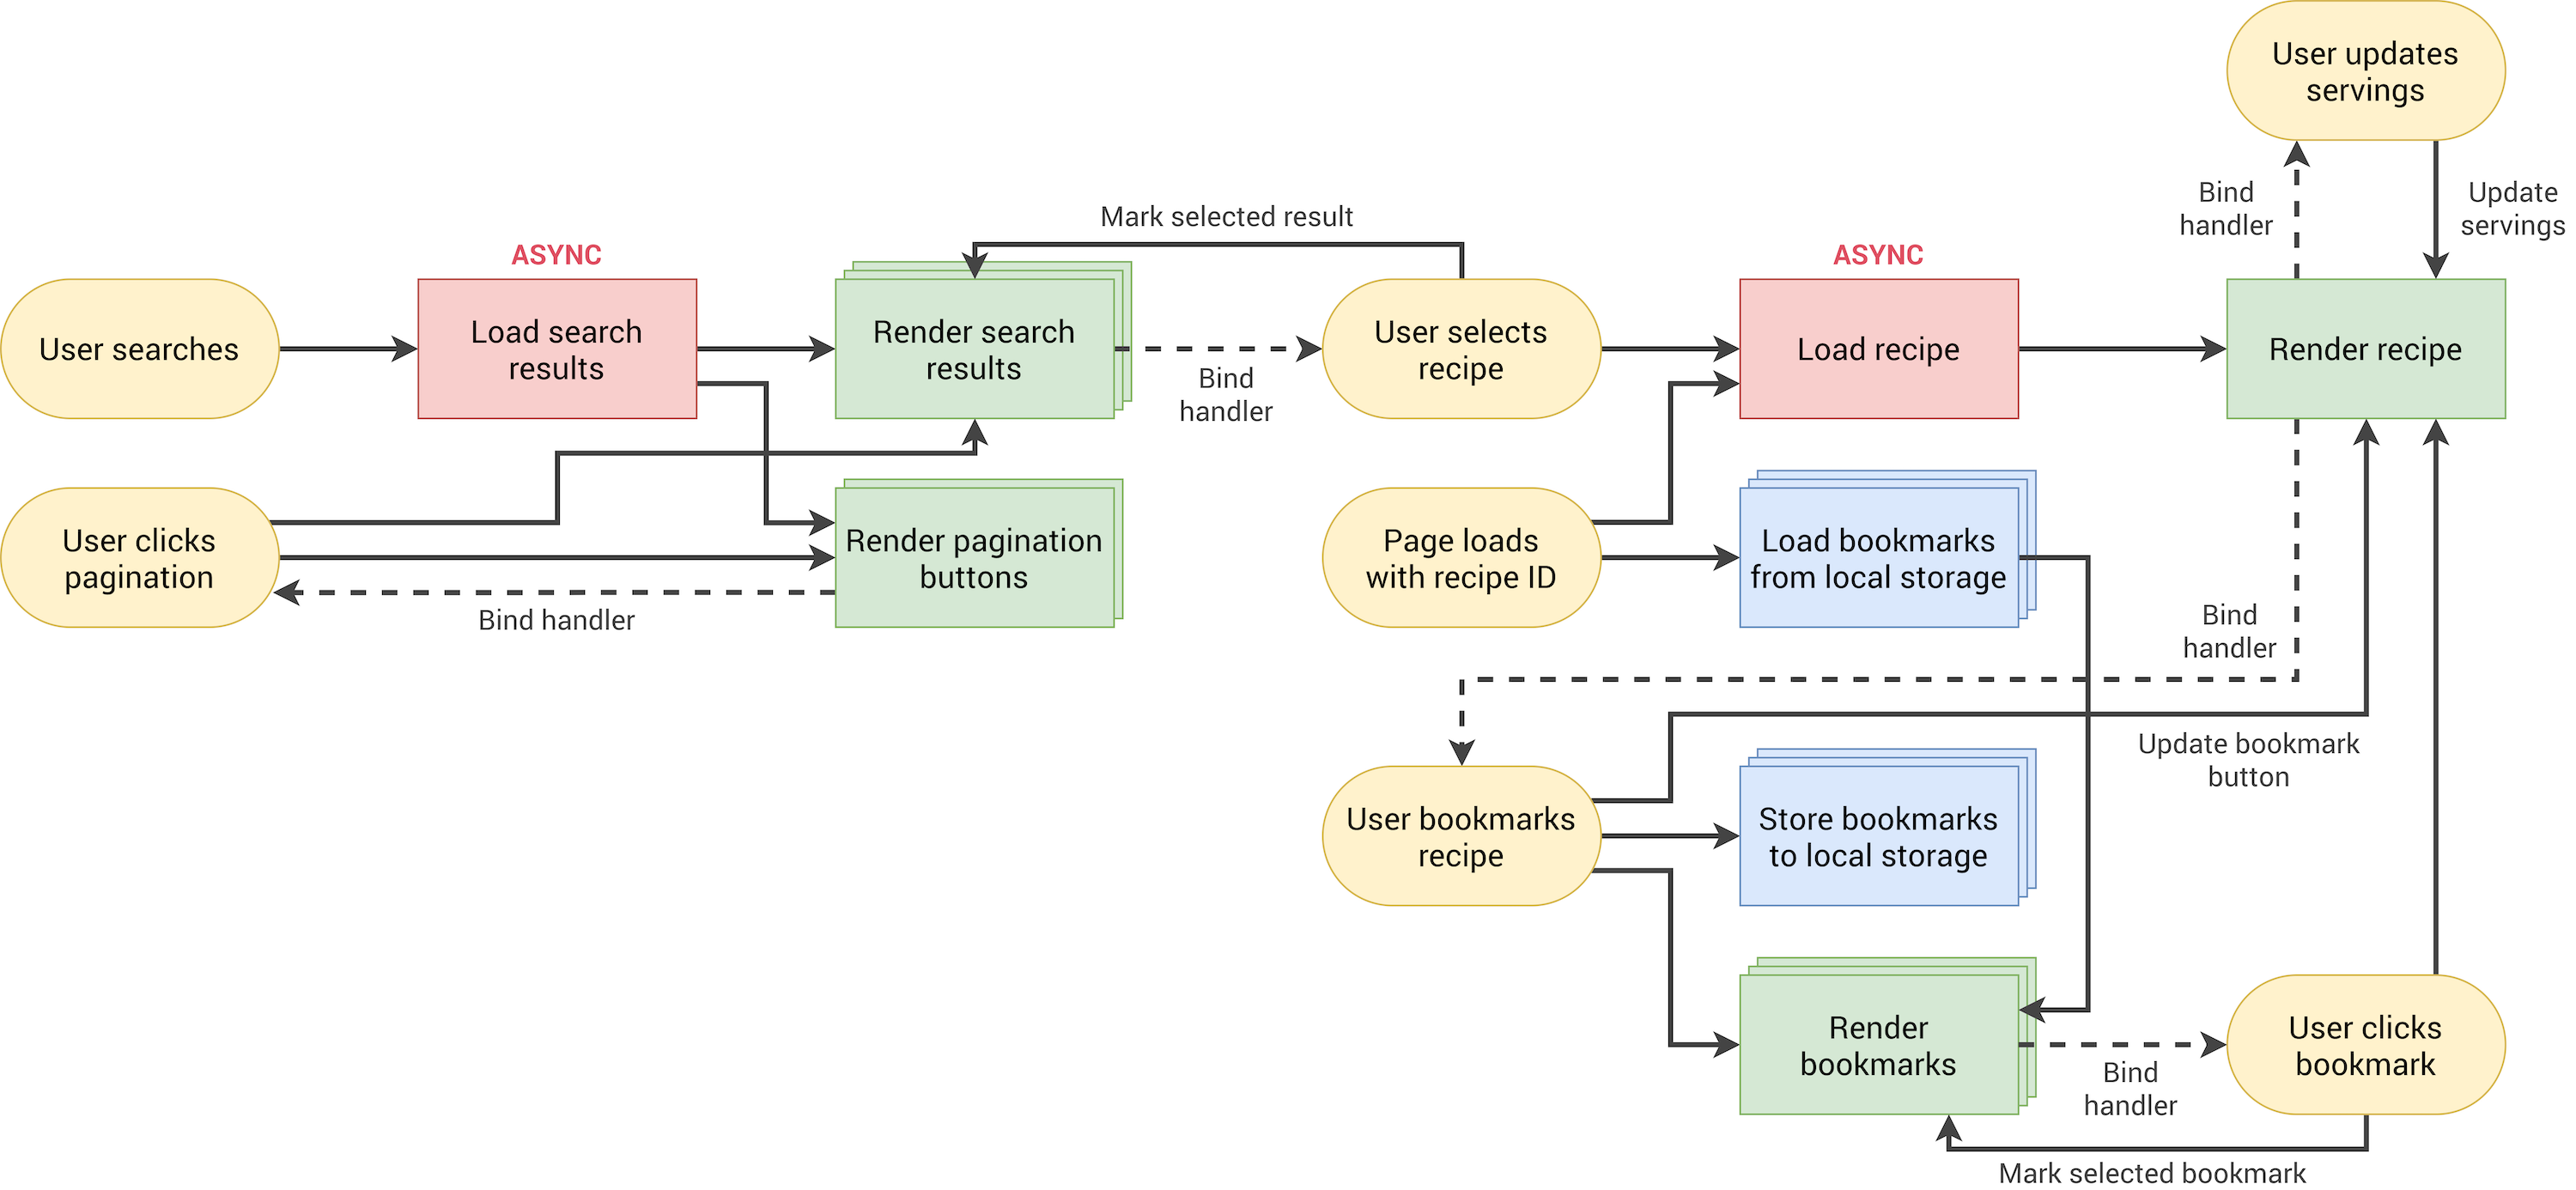
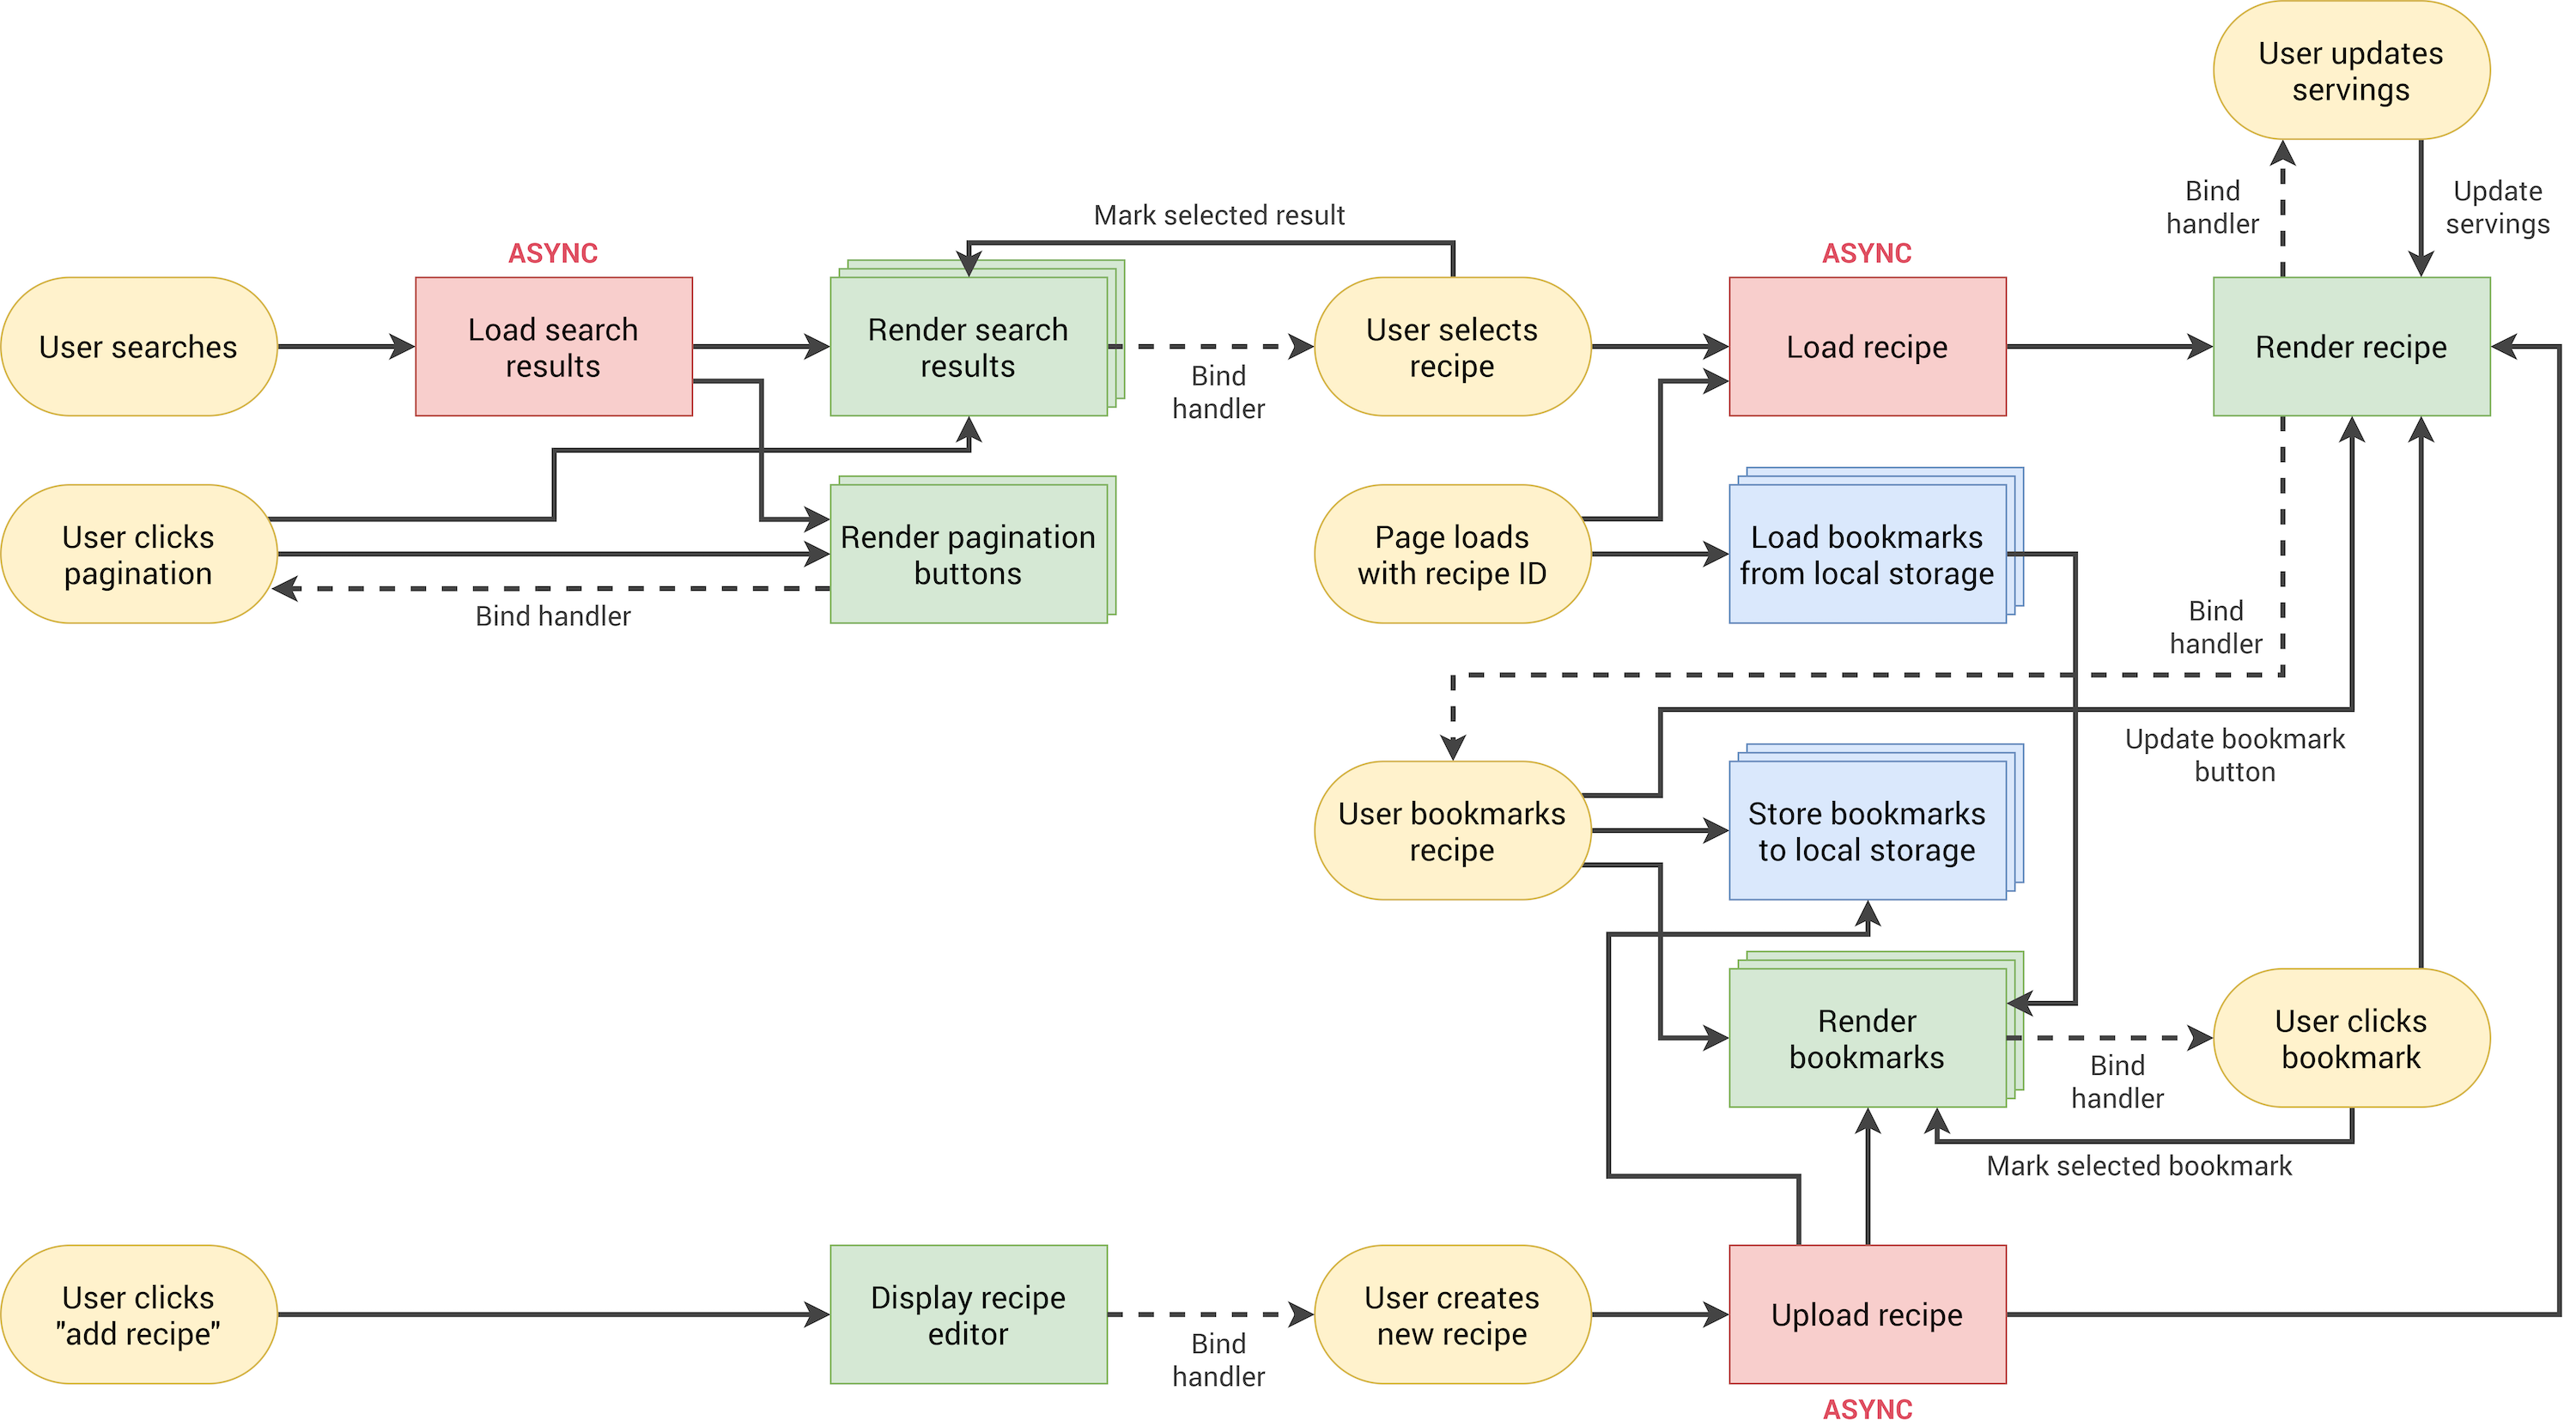
    • After we get the recipe from the api in the model, we render the found recipe results in the search recipe view
    • If a user selects a recipe, we render that recipe in the recipe view
    • If a user, wants to change the number of servings which will update the ingredients for the recipe, we allow that change in the recipe view, recipe servings view.
    • If a user wants to bookmark a recipe, and view it later, we allow to bookmark recipes store the state in bookmark and display a list of bookmarked recipes in the bookmarks view.

    Flow chat:

    forkify-flowchart-part-1 forkify-flowchart-part-2 forkify-flowchart-part-3 forkify-architecture-recipe-loading

    Visit original content creator repository https://github.com/seifedd/forkify-app
  • Blufo

    Blufo

    Cette page en français.

    Clear the ground for an unobstructed landing. That’s how Blufo works.
    In this game, you pilot a UFO and destroy the boxes placed on your landing zone. Only one missile at a time, but they’re very effective when aimed correctly.

    This video game is developed in Delphi. It runs on Windows, macOS, iOS and Android. Download it to play and test it before taking a look behind the scenes and delving into its source code.

    This code repository contains a project developed in Object Pascal language under Delphi. You don’t know what Delphi is and where to download it ? You’ll learn more on this web site.

    Using this video game

    Visit the Blufo website to download the compiled version, learn more about how it works, access videos and articles, find out about the different versions available and their features, contact user support…

    Talks and conferences

    Twitch

    Follow my development streams of software, video games, mobile applications and websites on my Twitch channel or as replays on Serial Streameur mostly in French.

    Source code installation

    To download this code repository, we recommend using “git”, but you can also download a ZIP file directly from its GitHub repository.

    This project uses dependencies in the form of sub-modules. They will be absent from the ZIP file. You’ll have to download them by hand.

    Documentation and support

    I use comments in XMLDOC format in Delphi to document my projects. They are recognized by Help Insight, which offers real-time input help in the code editor.

    I regularly use the DocInsight tool to enter them and check their formatting.

    Documentation is exported in HTML by DocInsight or PasDoc to the /docs folder of the repository. You can also access it online through the hosting offered by GitHub Pages.

    Further information (tutorials, articles, videos, FAQ, talks and links) can be found on the project website or the project devlog.

    If you need explanations or help in understanding or using parts of this project in yours, please contact me. I can either direct you to an online resource, or offer you assistance in the form of a paid or free service, depending on the case. You can also contact me at a conference or during an online presentation.

    Compatibility

    As an Embarcadero MVP, I benefit from the latest versions of Delphi and C++ Builder in RAD Studio as soon as they are released. I therefore work with these versions.

    Normally, my libraries and components should also run on at least the current version of Delphi Community Edition.

    There’s no guarantee of compatibility with earlier versions, even though I try to keep my code clean and avoid using too many of the new ways of writing in it (type inference, inline var and multiline strings).

    If you detect any anomalies on earlier versions, please don’t hesitate to report them so that I can test and try to correct or provide a workaround.

    License to use this code repository and its contents

    This source code is distributed under the AGPL 3.0 or later license.

    You are free to use the contents of this code repository anywhere provided :

    • you mention it in your projects
    • distribute the modifications made to the files provided in this AGPL-licensed project (leaving the original copyright notices (author, link to this repository, license) must be supplemented by your own)
    • to distribute the source code of your creations under the AGPL license.

    Some elements included in this repository may depend on third-party usage rights (images, sounds, etc.). They are not reusable in your projects unless otherwise stated.

    The source codes of this code repository as well as any compiled version are provided “as is” without warranty of any kind.

    How to ask a new feature, report a bug or a security issue ?

    If you want an answer from the project owner the best way to ask for a new feature or report a bug is to go to the GitHub repository and open a new issue.

    If you found a security issue please don’t report it publicly before a patch is available. Explain the case by sending a private message to the author.

    You also can fork the repository and contribute by submitting pull requests if you want to help. Please read the CONTRIBUTING.md file.

    Support the project and its author

    If you think this project is useful and want to support it, please make a donation to its author. It will help to maintain this project and all others.

    You can use one of those services :

    You can buy an end user license for my softwares and my video games or a developer license for my libraries if you use them in your projects.

    I’m also available as a service provider to help you use this or other projects, such as software development, mobile applications and websites. Contact me to discuss.

    Visit original content creator repository
    https://github.com/DeveloppeurPascal/Blufo

  • DigiDEC

    Main project logo

    DigiDEC – SAGE EAS Endec Serial/Telnet Logging Software with Discord Webhook integration

    DigiDEC is software written in Python to parse, log, and display emergency alerts recieved by the Sage EAS ENDEC model 1822 via local serial connection (WIP) or a remote serial server.

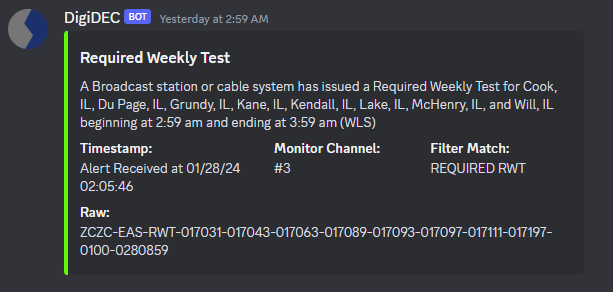
    Screenshot of an example discord webhook

    Features

    ✔️ Telnet based serial server support

    ✔️ MySQL database logging

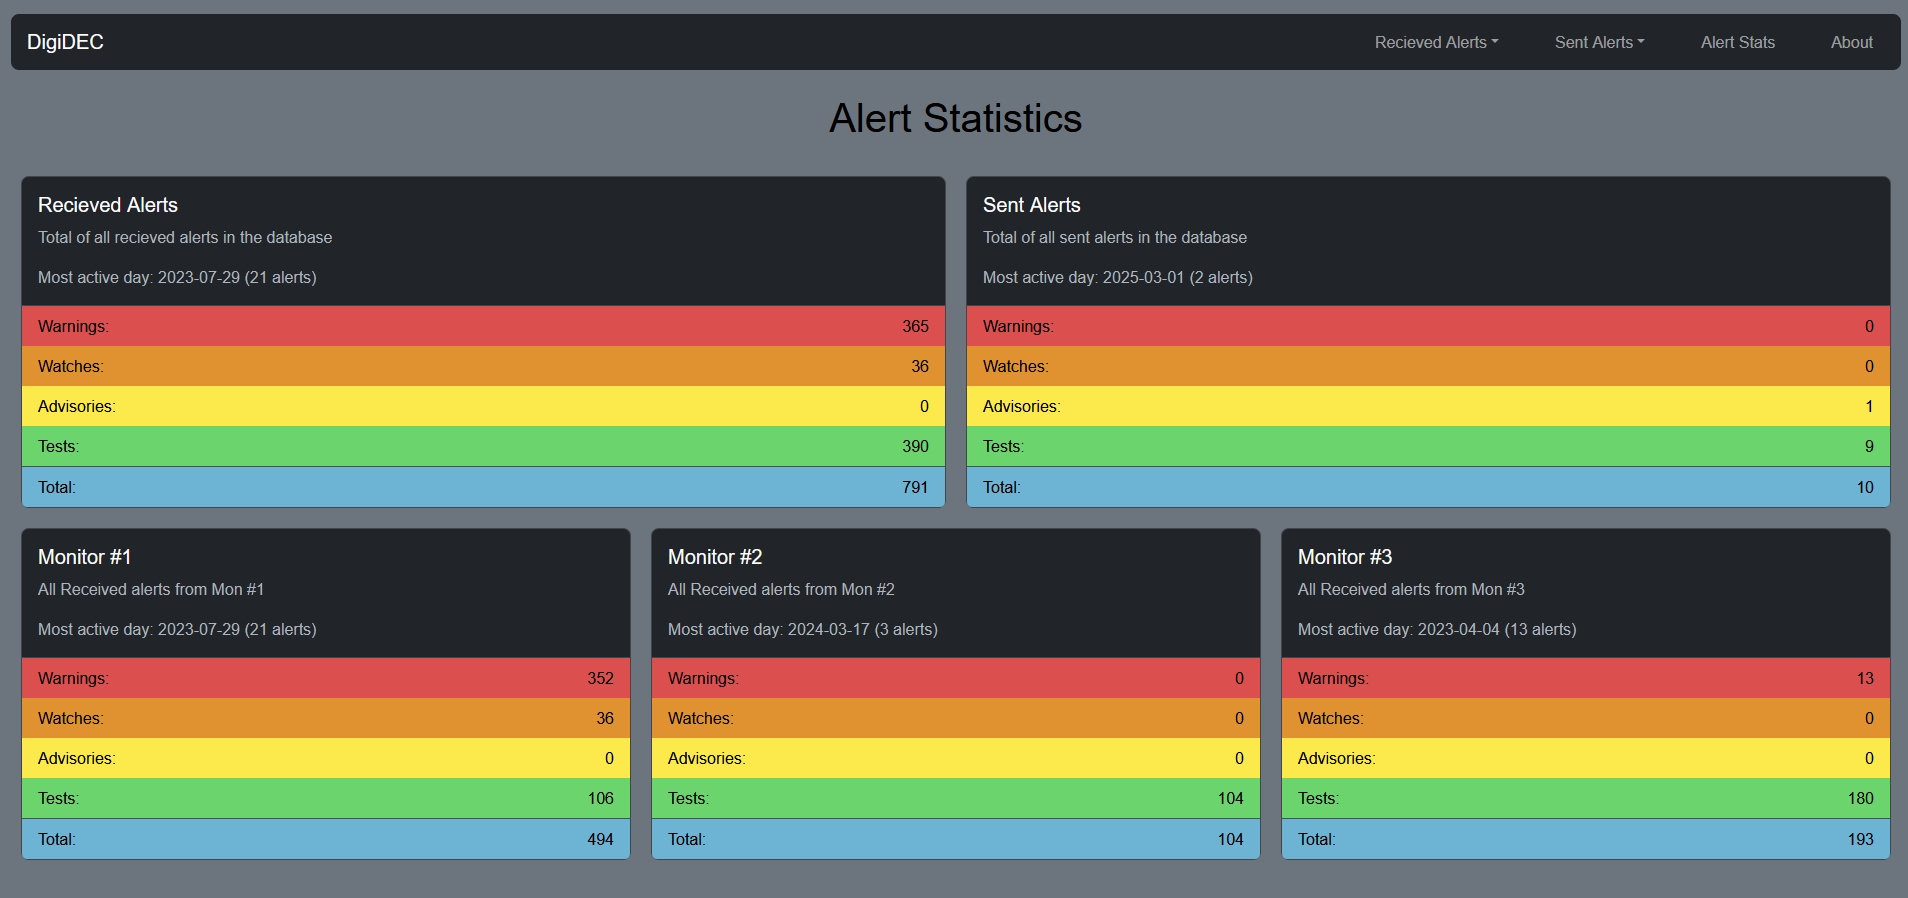
    ✔️ PHP, Bootstrap, and Popper based web front end pages to review alerts

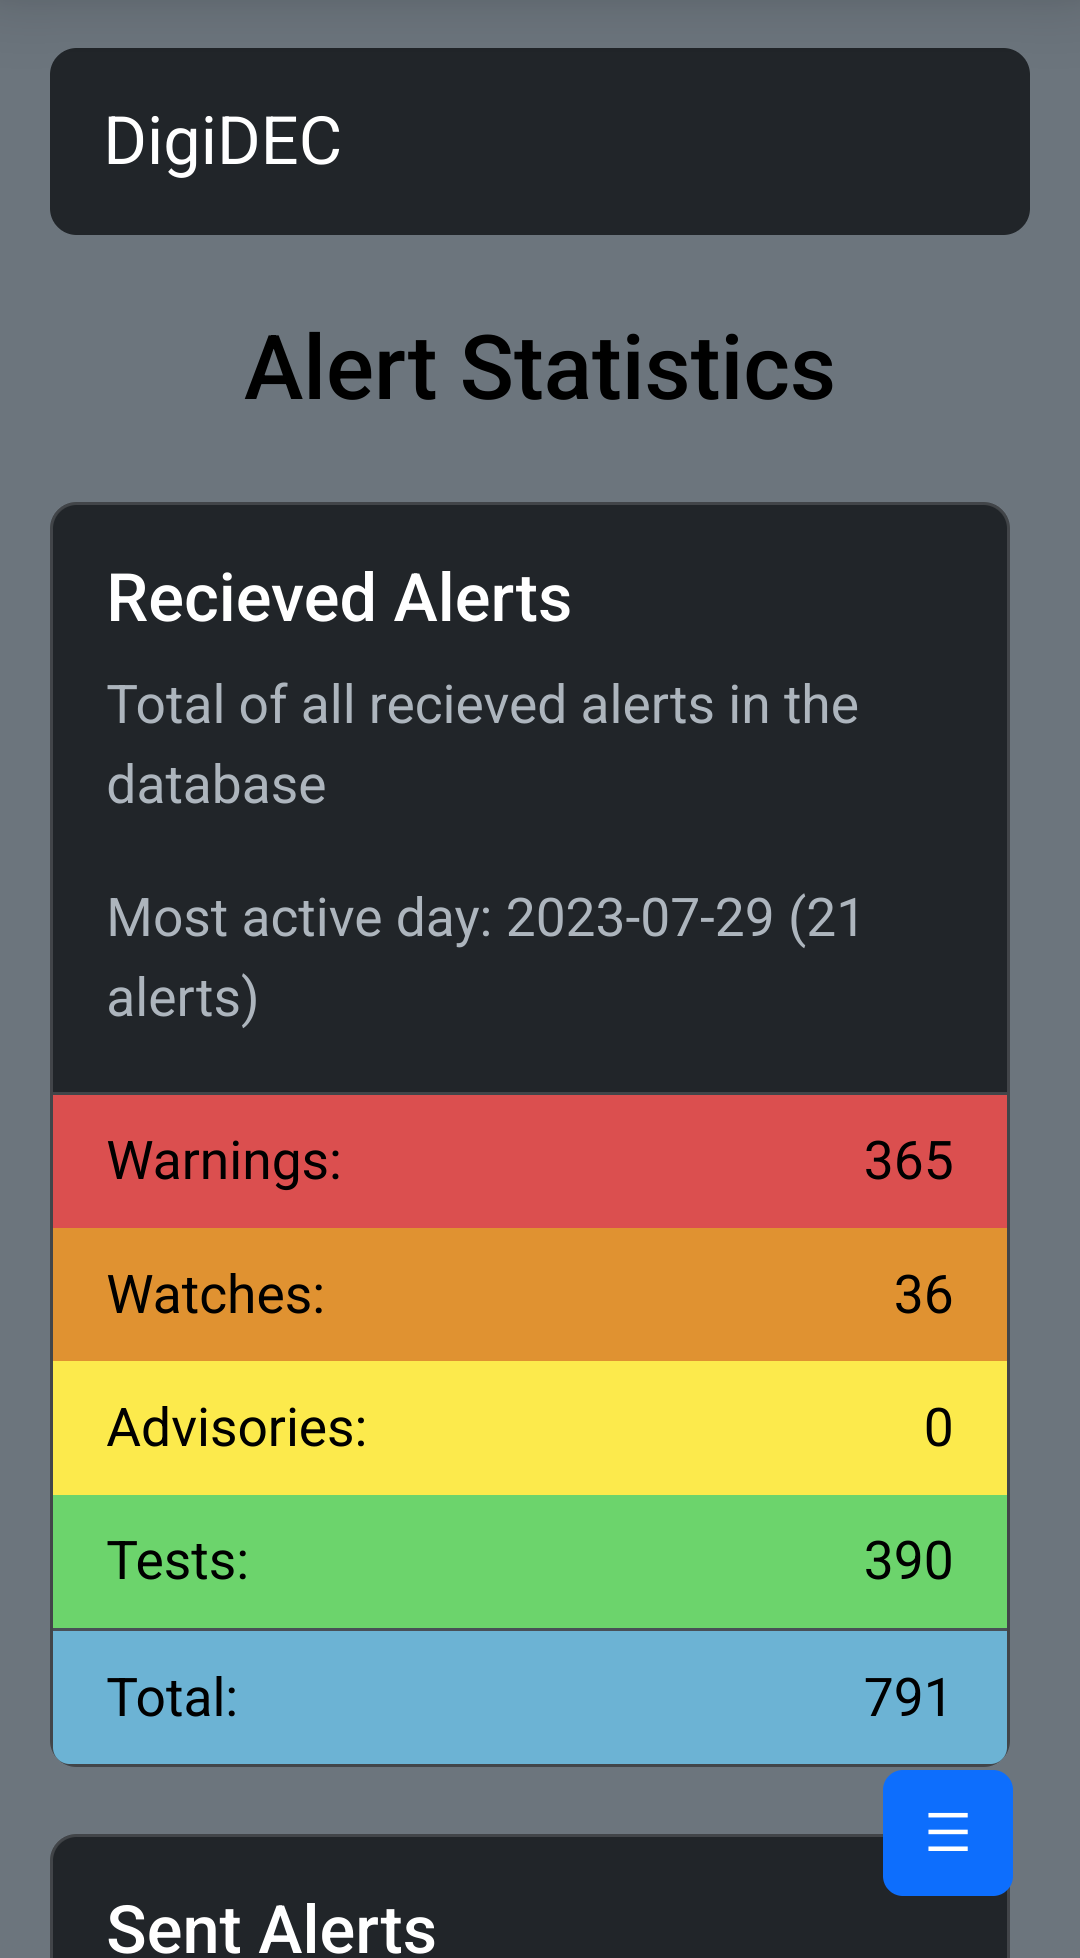
    ✔️ Basic alert statistics like most active day and alert count

    ✔️ Per-event code, category, and year/month data sorting

    ✔️ Discord webhook integration

    What’s needed to run

    • apache2
    • php8.1
    • php8.1-mysql
    • python 3.10 thru 3.12 (telnetlib is removed in >3.13, switch statements introduced 3.10)
    • python3-pip
      • mysql-connector-python
      • discord_webhook

    Database Schema

    CREATE DATABASE digidec_rx_log;
    CREATE DATABASE digidec_tx_log;
    
    USE digidec_rx_log;
    CREATE TABLE alerts(
        EVENT_TXT varchar(50), 
        EVENT_CODE char(3), 
        FILTER text, 
        MON tinytext, 
        DESCR text, 
        ZCZC_STR text,
        TYPE varchar(8),
        TIMESTP datetime
    );
    
    USE digidec_tx_log;
    CREATE TABLE digidec_tx_log(
        EVENT_TXT varchar(50), 
        EVENT_CODE char(3), 
        FILTER text, 
        MON tinytext, 
        DESCR text, 
        ZCZC_STR text,
        TYPE varchar(8),
        TIMESTP datetime
    );
    

    Installation

    1. Clone the repo into a suitable directory where you wish to run the main python scripts

    2. Install/ensure the python dependencies listed above are on your target system (Ubuntu server is recommended) and PHP is functional for your apache install

    3. Create the directory /var/www/html/digidec and copy the contents of html_front_end into it

    4. Copy the 10-digidec_web_config.conf file to your /etc/apache2/sites-available directory

      • Make sure to check the apache site configs if you are using a different webroot!
    5. Link the conf file from sites-available to sites-enabled using sudo ln /etc/apache2/sites-available/10-digidec_web_conf.conf /etc/apache2/sites-enabled to enable it in apache

      • Be sure to run sudo service apache2 reload to reload the configs after linking
    6. Rename DEFAULT_db_creds.ini to db_creds.ini and populate with the appropriate credentials and database names if different from default

    7. Run the core.py script with python3 to check functionality

    8. If everything functions as intended, copy the digidec.service file to /etc/systemd/system and run sudo systemctl daemon-reload and sudo systemctl enable digidec.service to enable running at startup. If the service isn’t already running, run sudo systemctl start digidec.service

    Configuration

    Before anything, if you are using a Lantronix serial server, read this!

    By default, the UDS200 (And 2000 I believe) cache unread bytes recieved on the serial ports and output them when the telnet interface is accessed. We dont want this! It can cause duplicates. To turn this feature off (to the best of my knowledge), do the following:

    • Telnet in on the configuration interface (usually port 9999)
    • press 1 or 2 to select which channel/port your endec is on
    • ensure your baudrate is matching the endec’s
    • keep pressing enter until you reach FlushMode and set the value to 11, which in the manual corresponds (in binary) to turning off the caching feature
    • once you are back at the main configuration screen, be sure to save your settings!

    Endec setup

    This part is easy, just go into the endec’s menu under the devices option and select a desired COM port. Set the device type to news feed. Make sure your baud rate is the same on the serial port as your serial server/server’s port.

    Configuration for the MySQL database and PHP database names are found within the DEFAULT_db_creds.ini file.

    • You MUST rename this to db_creds.ini and populate it with the appropriate values for your setup before the application will function!

    Configuration parameters for the base application are found within the settings.json file

    • embed

      • alert_colors Colors of the accent bar on the left hand side of Discord webhood messages, they default to the same colors as the UI cards.
    • webhook

      • ##_url – Your Discord webhook URL(s) goes here

      • zczc_str_enable – Enable or disable putting the ZCZC EAS message string in the Discord embed

      • enable_tx_alerts – Enable or disable webhook messages of alerts originated from the endec itself (ie, sent from the control panel)

      • enable_rx_alerts – Enable or disable webhook messages of alerts recieved via monitor ports on your endec. This is kinda the main feature so I’d leave this on…

      • mon_num_enable – Enable or disable displaying which monitor input the alert was recieved on in the webhook message

      • filter_display_enable – Enable or disable displaying which alert filter was matched when the alert was recieved in the webhook message

    • telnet

      • ip – IP of your Lantronix or similar serial server
      • port – Port that you can telnet into for access to the endec serial port
    • mysql

      • server_ip – IP of your MySQL server
      • user – Username of your MySQL user
      • pass – Password of your MySQL user
    • general

      • webui_url – URL of your DigiDEC web interface (for embed linking if enabled)

    Desktop Screenshots

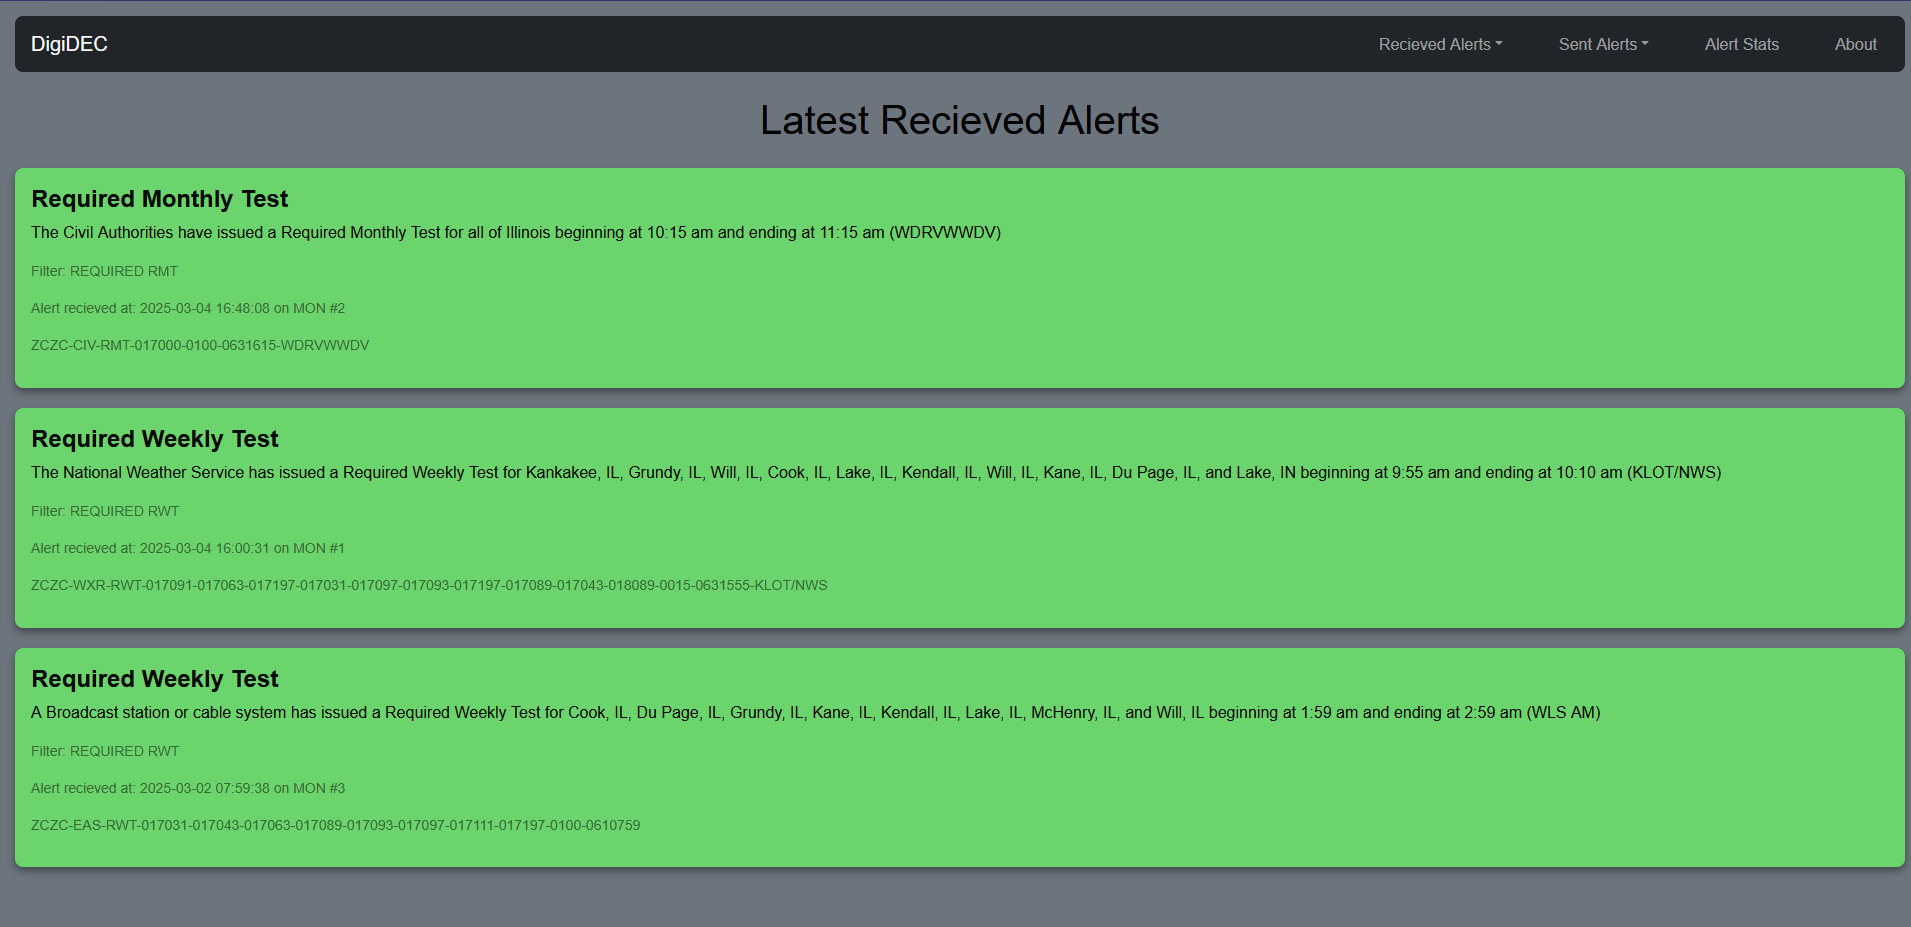
    Screenshot of the landing page UI (most recent) Screenshot of the landing page UI (3 most recent alerts)

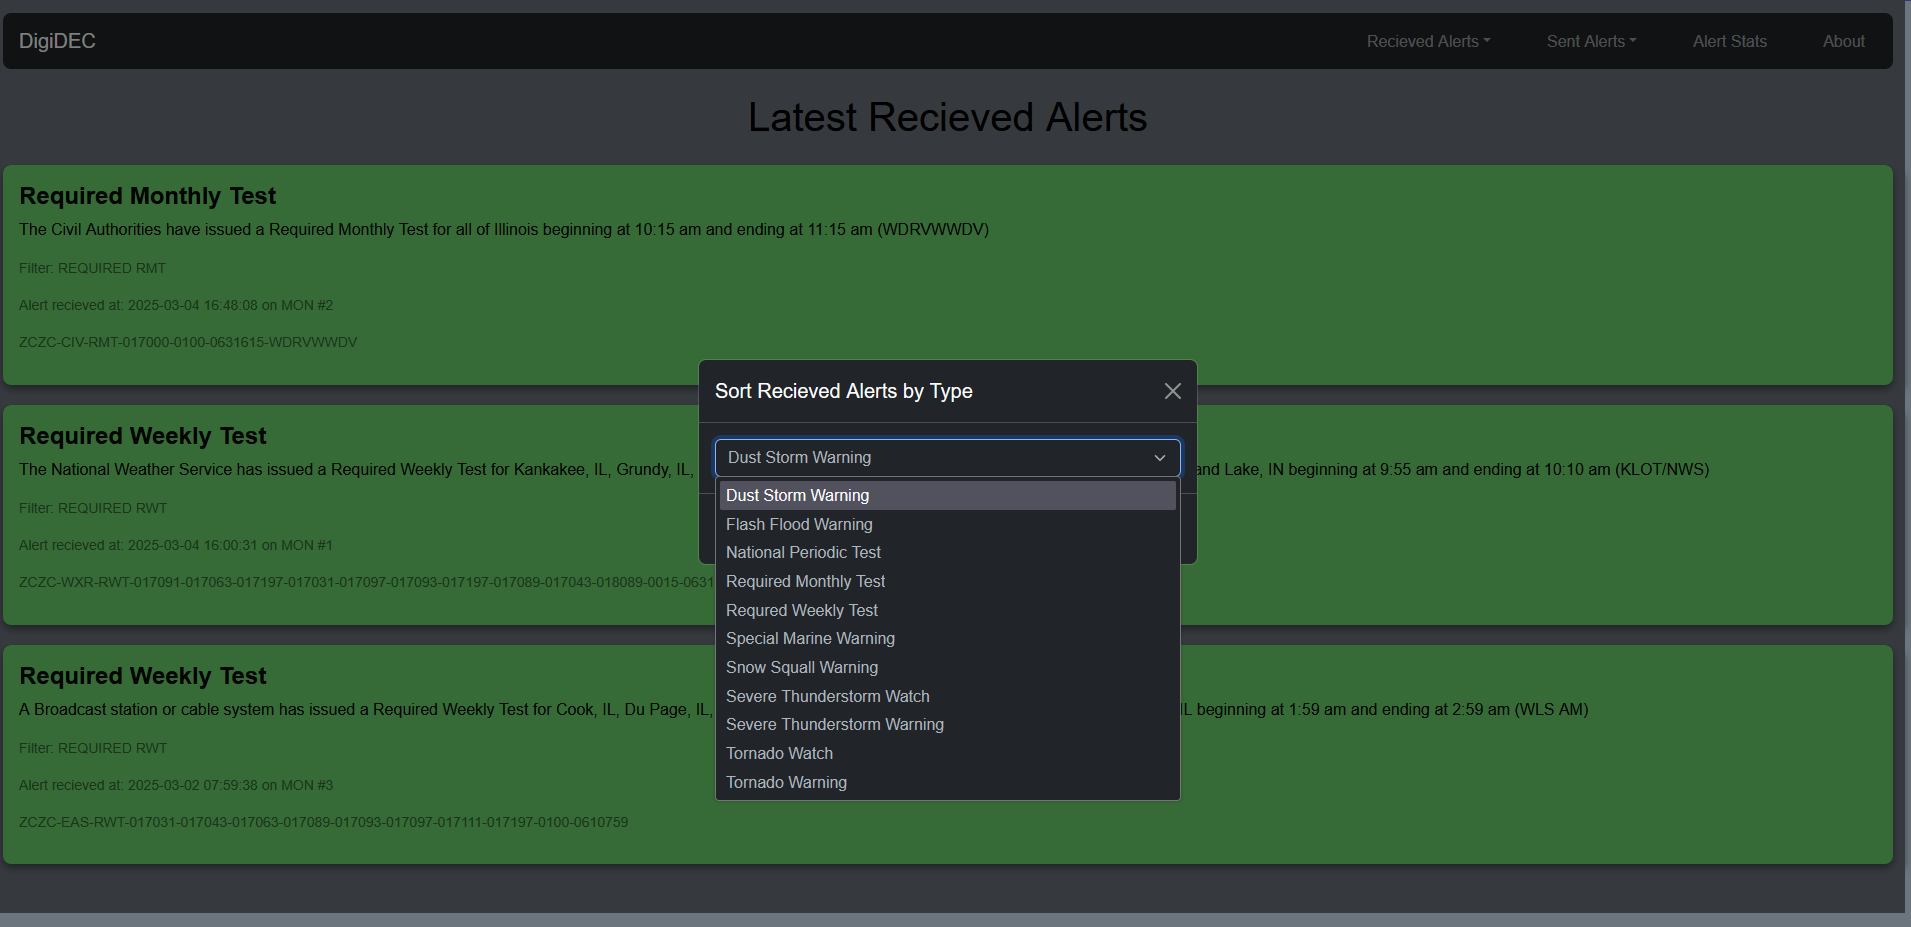
    Screenshot of the a sorting modal Screenshot of a sorting modal

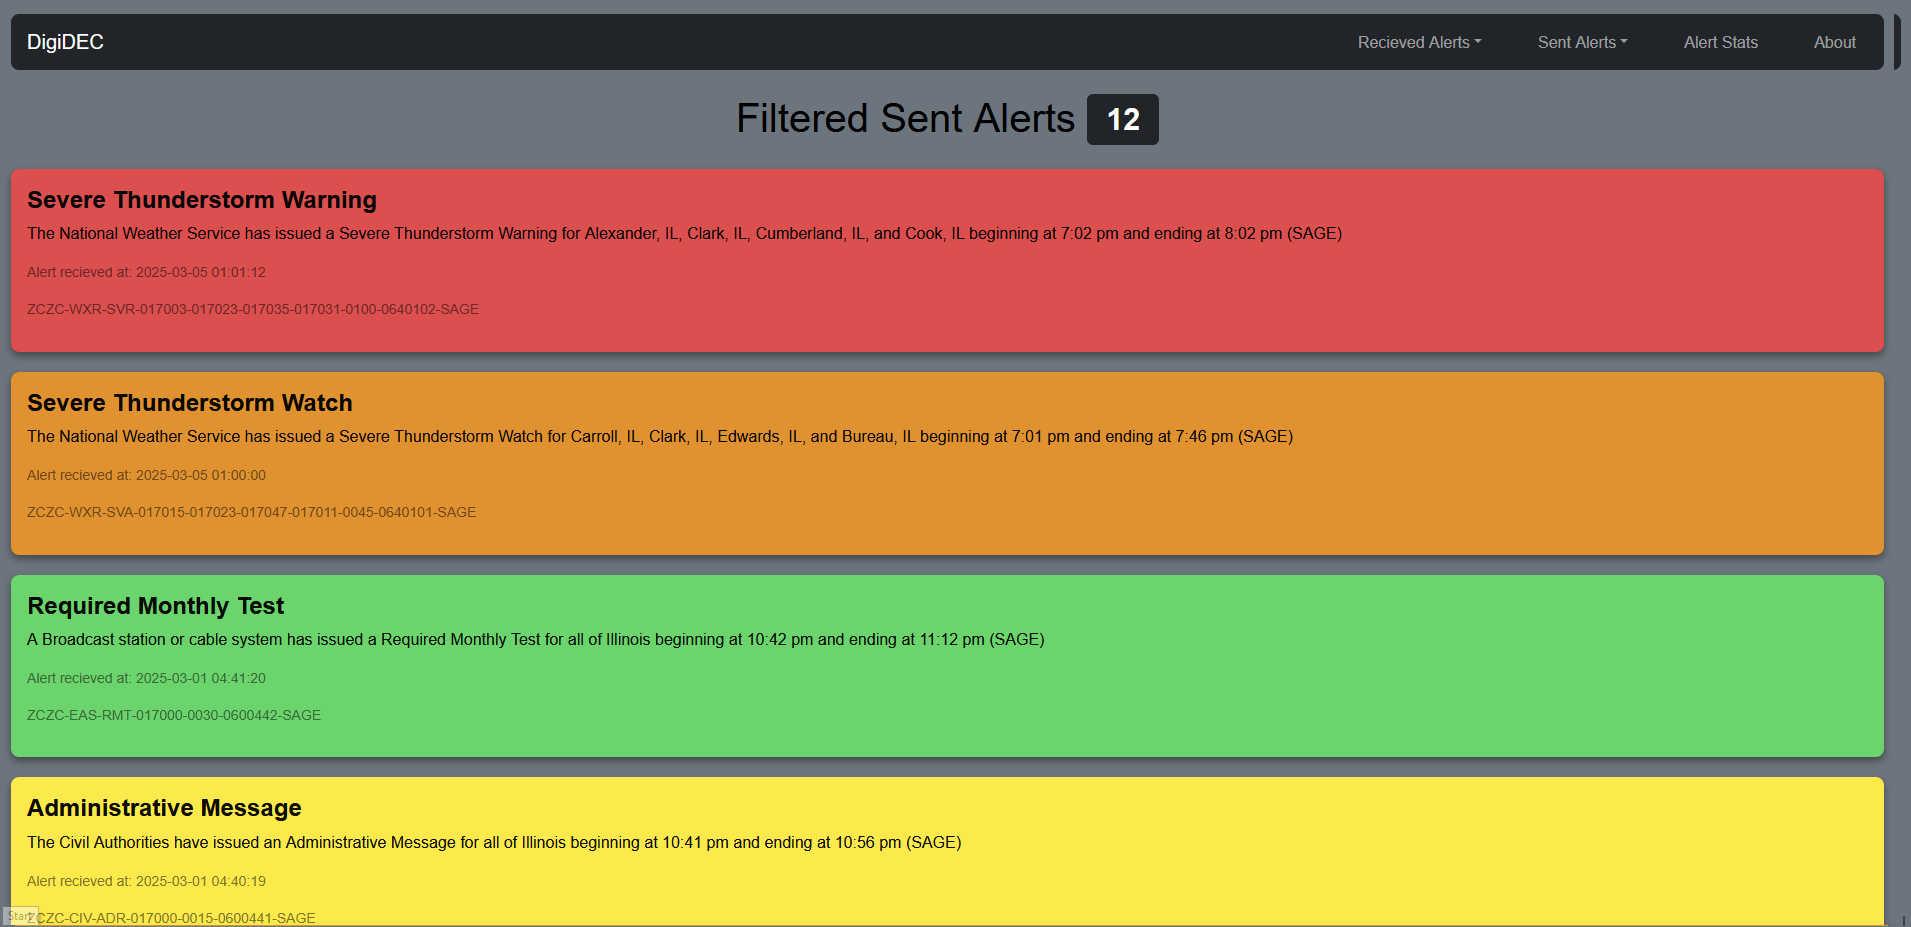
    Screenshot of the sent alerts page Screenshot of the sent alerts page (all alerts sent, no filtering)

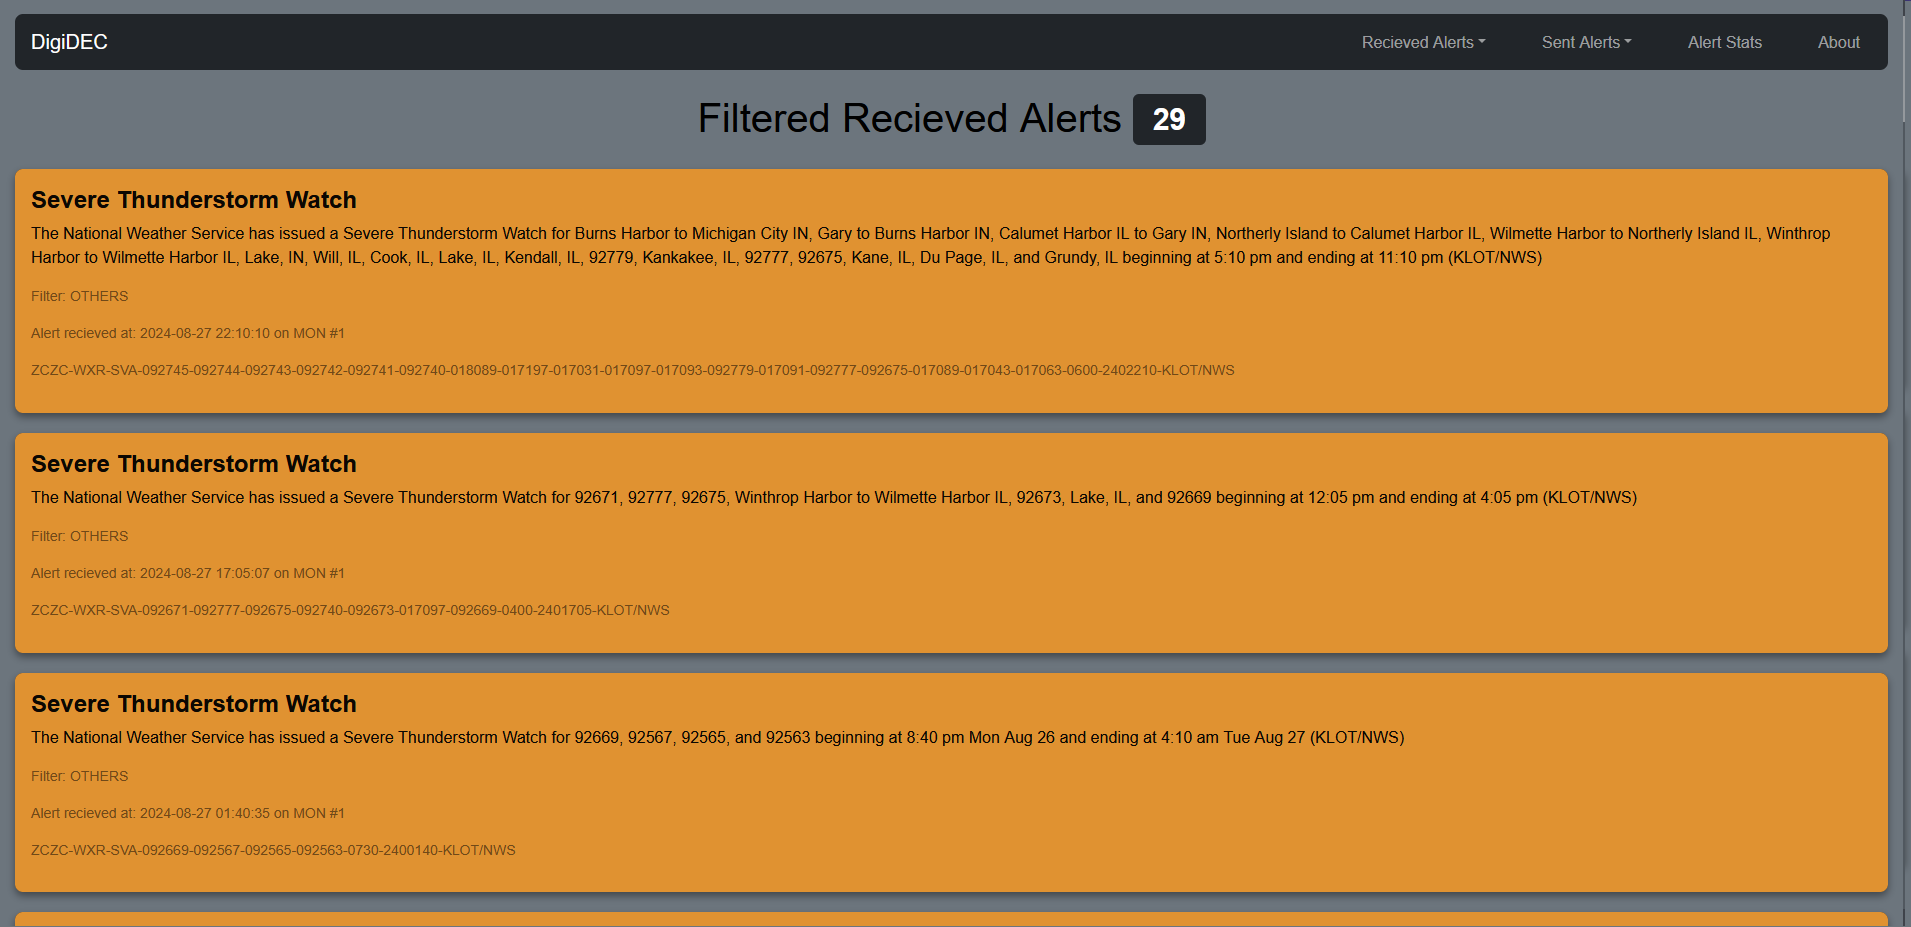
    Screenshot of the recieved alerts page Screenshot of the recieved alerts page, showing all Severe Thunderstorm Watches

    Screenshot of the stats page Screenshot of the stats page

    Mobile Screenshots

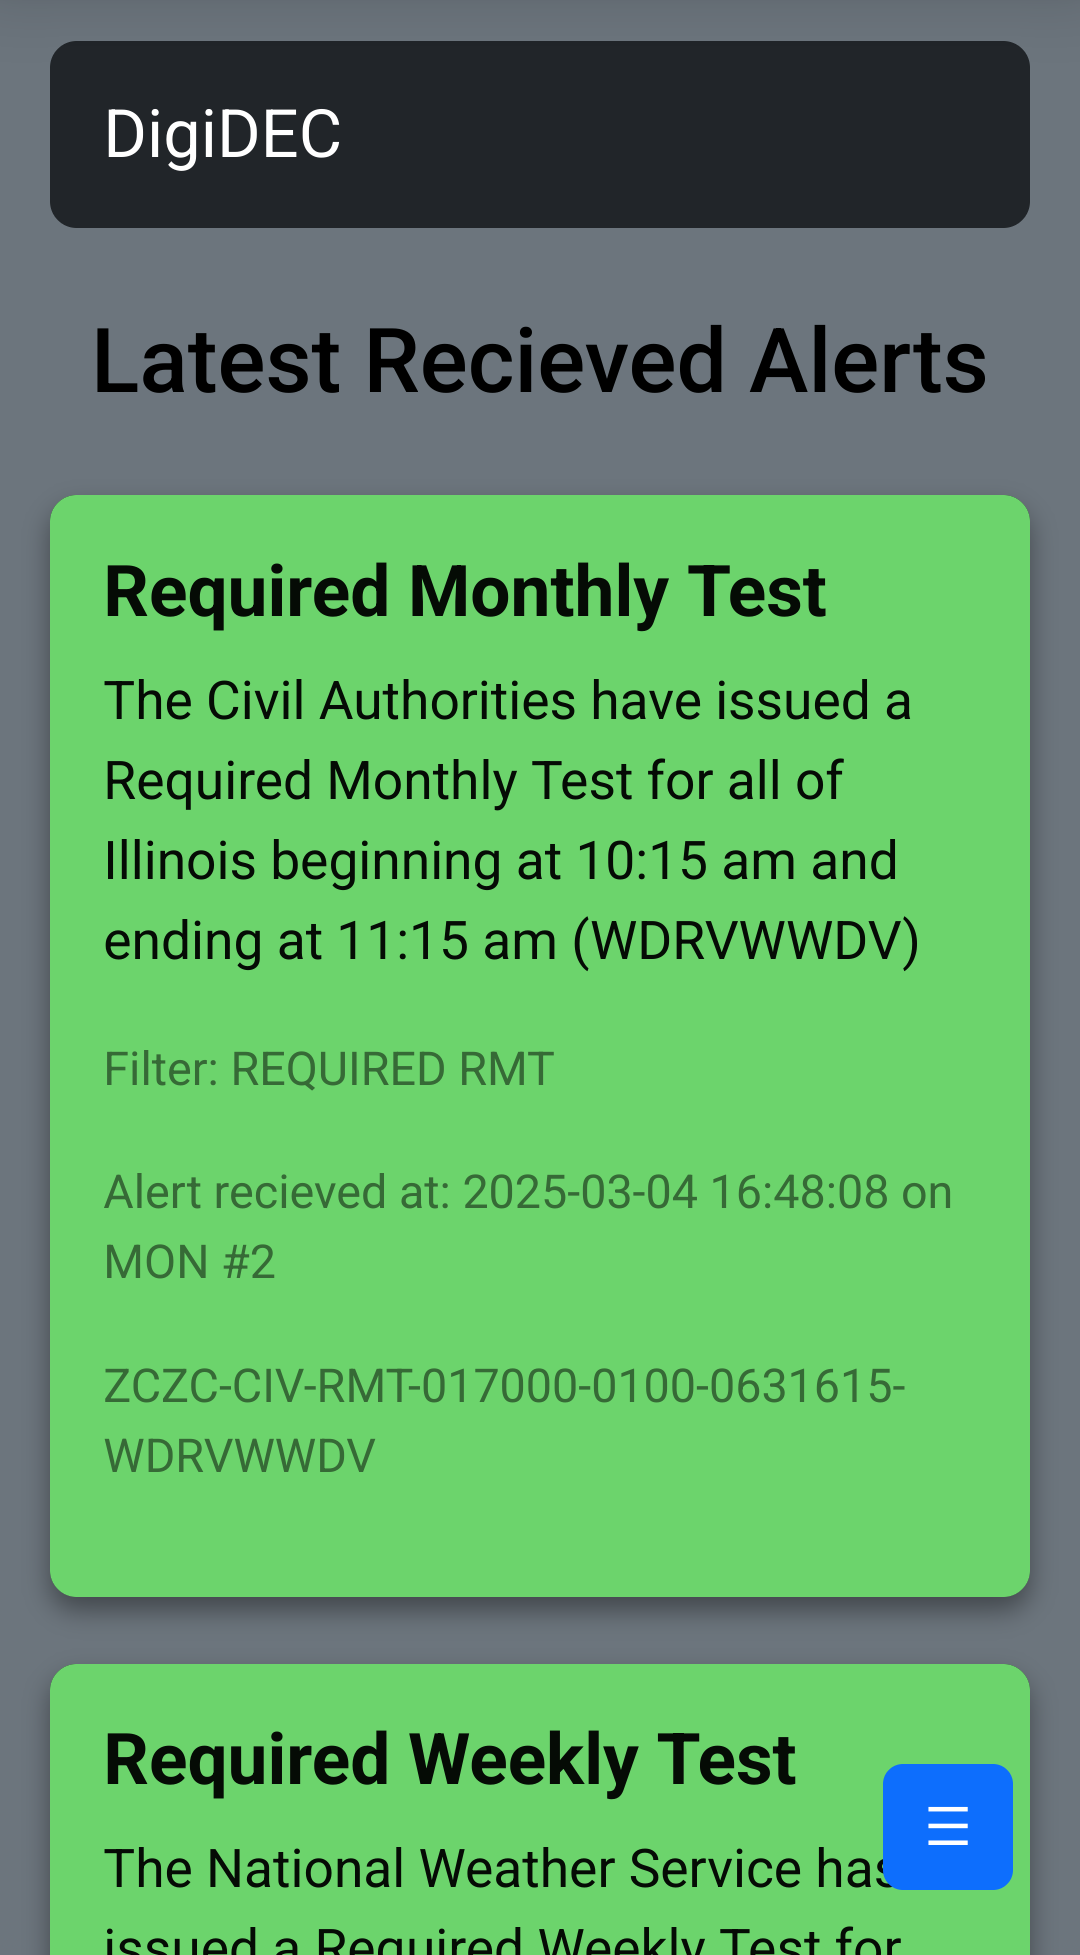
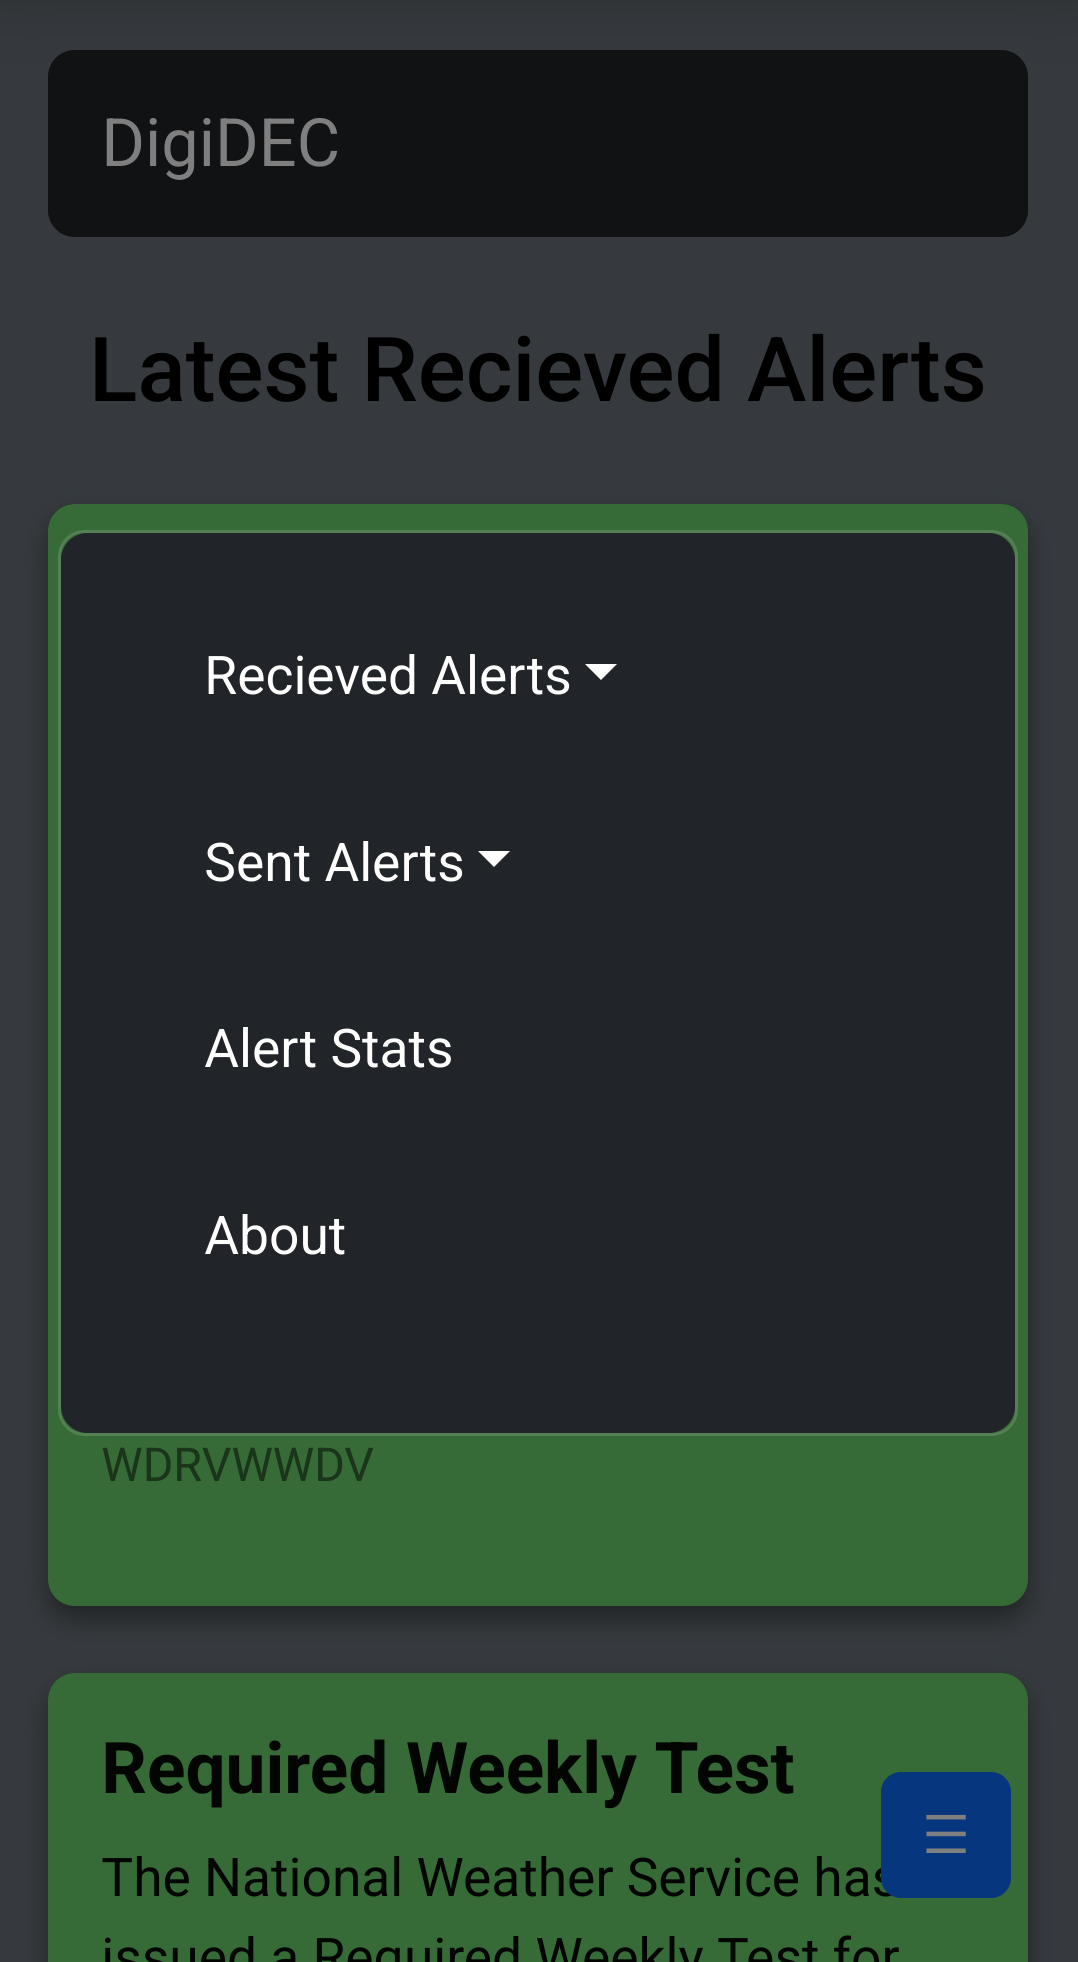
    Screenshot of the mobile landing page UI (3 most recent alerts) Screenshot of the mobile landing page UI (3 most recent alerts)

    Screenshot of the mobile hamburger menu Screenshot of the mobile hamburger menu

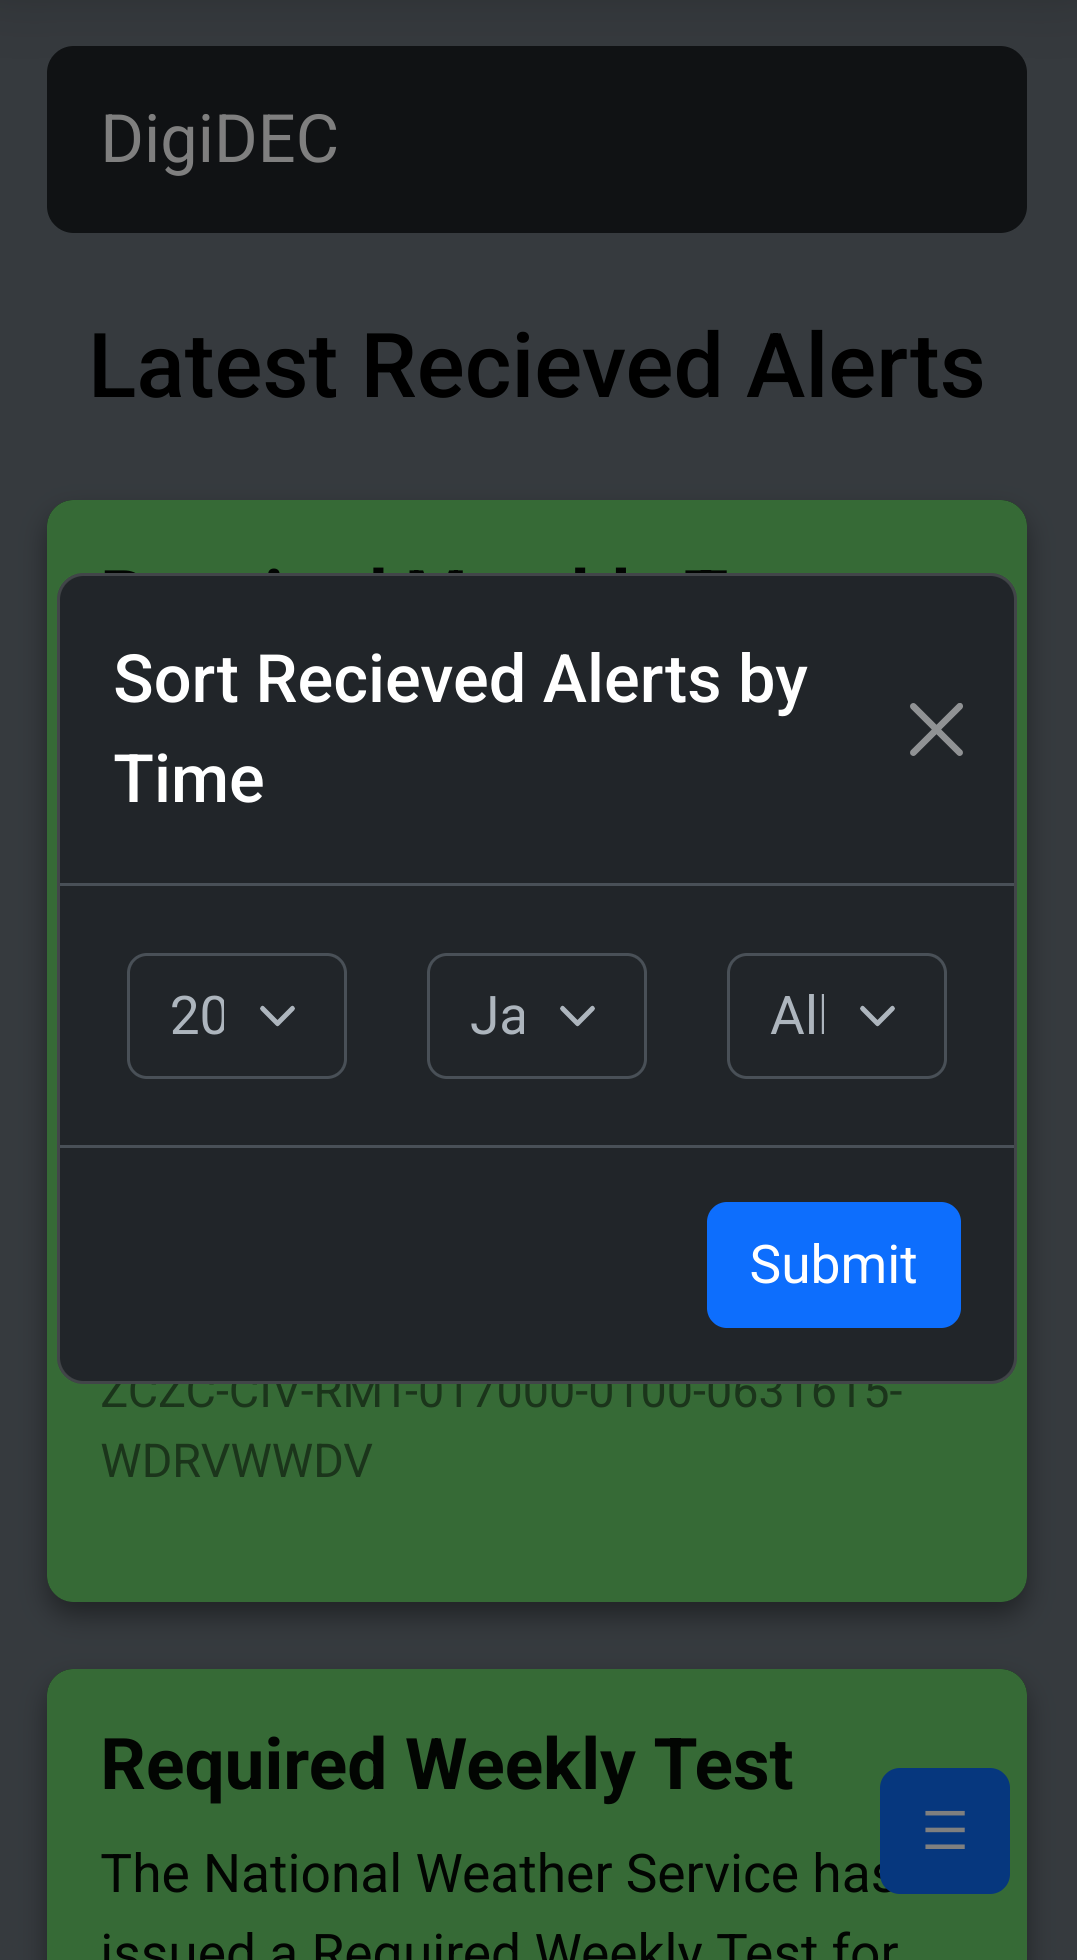
    Screenshot of the mobile hamburger menu Screenshot of a mobile sorting menu

    Screenshot of the mobile hamburger menu Screenshot of the stats page on mobile

    Visit original content creator repository https://github.com/trevor229/DigiDEC