This Python script demonstrates how to automate posting a tweet on Twitter using the Selenium web automation library. It opens a Chrome web browser, logs into a Twitter account, composes a tweet, and posts it.
Prerequisites
Before running the script, make sure you have the following prerequisites installed:
Wait for a specified time (e.g., 60 seconds) to ensure the tweet is posted:
time.sleep(60)
Quit the Chrome driver:
driver.quit()
Customize the script to meet your specific automation needs, such as logging in with your Twitter account and posting the desired content.
Notes
This script logs into Twitter using an existing account’s session data. Make sure to replace os.getcwd() with the appropriate directory path if needed.
Be cautious while automating actions on websites to comply with their terms of service.
You can customize the script and README.md file further to suit your specific requirements and ensure you have the correct WebDriver for Chrome installed.
Quick tutorial to setup a Cloud Server for multiple machines access, and VFX Pipeline on Windows, macOS and Linux.
This repository is based on Google Drive VFX Server, with loads of improvements.
Setup Server
First, you’ll need to mount your Cloud server on your system, using any software you like (rclone, Google Drive File Stream, etc.)
We can then start moving files around. The setup only relies on environment variables:
SERVER_ROOT: The root of the mounted Cloud server. This is the only value that needs to be changed depending on your setup
CONFIG_ROOT: The .config folder
ENVIRONMENT_ROOT: the .config/environment folder
PIPELINE_ROOT: the .config/pipeline folder
You can now download the code from this repository and extract its content to your SERVER_ROOT. Using Z:/My Drive as the mounted Cloud server path, it should look like this:
You will need to modify SERVER_ROOT in .zshrc (Unix) and/or dcc.bat (Windows) by your mounted Cloud server path:
In .zshrc: export SERVER_ROOT="Path/to/drive/linux" (Line 12, 17, 21)
In dcc.bat: setx SERVER_ROOT "Path\to\drive\windows" (Line 9)
Once the folder structure is created and the SERVER_ROOT value has been modified, you can now assign the environment variables:
Windows
Windows supports shell scripting after some manipulations but it’s way easier to “hard” write the environment variables by running dcc.bat.
To check that everything is working:
Type Win + I to open the Windows Settings
Scroll to the bottom of the page and click About
Navigate to Device Specifications and press Advanced System Settings
In the System Properties dialogue box, hit Environmental Variables
The freshly created variables should be under User
Check is SERVER_ROOT has been defined with the right path
Unix
macOS and Linux are both Unix based OS.
The simplest way is to migrate your shell to Zsh using chsh -s $(which zsh) in your terminal.
You can then symlink .zshrc in your $HOME folder.
To check that everything is working, restart your terminal and type echo $SERVER_ROOT: it should output your mounted Cloud server path.
Warning
.zshrc needs to be called exactly that way in $HOME to be picked up by the terminal: remove any alias or symlink added in the name.
Warning
The Make Alias command in macOS Finder won’t work properly. You should use this service instead to create proper Symlinks: Symbolic Linker
Software
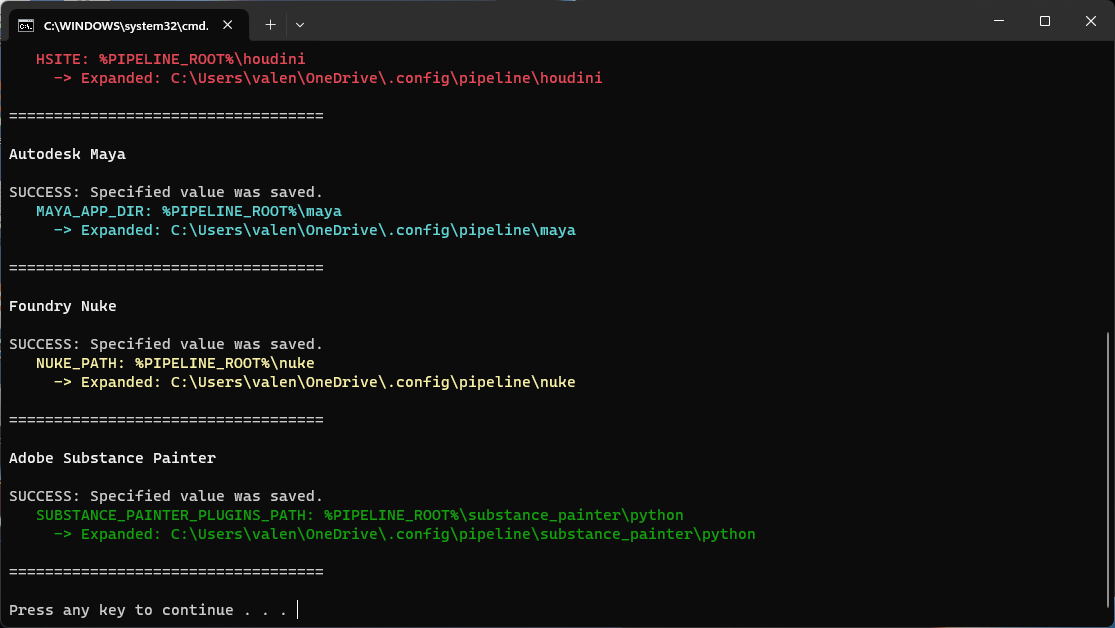
This setup automatically links the following DCCs, using this folder structure:
.
└── 📁 $SERVER_ROOT/
    └── 📁 .config/
        ├── 📁 environment
        └── 📁 pipeline/
            ├── 📁 houdini               ──> Using $HSITE
            ├── 📁 maya                  ──> Using $MAYA_APP_DIR
            ├── 📁 nuke                  ──> Using $NUKE_PATH
            ├── 📁 other
            └── 📁 substance_painter
                └── 📁 python            ──> Using $SUBSTANCE_PAINTER_PLUGINS_PATH
The DDCs can be launched normally on Windows if the dcc.bat file has been used to define the environment variables.
For macOS and Linux, you should start them from a terminal, in order to inherit the environment variables defined by .zshrc.
You can find an example script for Houdini just here: houdini.sh.
To access it quickly, we also defined an alias for houdini pointing to that script in aliases.sh. It will allow you to simply type this command to launch Houdini.
Houdini will automatically scan the folder defined by $HSITE for any folder being named houdini<houdini version>/<recognized folder> such as otls or packages and load the content of those folders at Houdini startup.
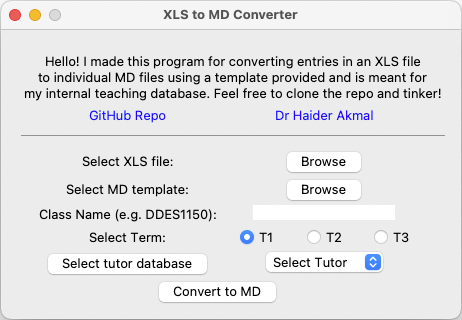
A quick (and rather specific) XLS to MD conversion tool for my local pedagogy management system.
I’m improving programming skills as I go so please feel free to fork this repo and contribute, you can also: Report a Bug / Request Feature
About this tool
I’ve made this tool to support my own pedagogy management system that uses a local database made of Markdown files. I wanted a quick way to import student data to track locally. The database keeps me in touch with student trajectories and also helps with understanding where they are coming from, i.e. what courses/skills they have already picked up. I’m hoping to use this for my own post-human pedagogy research but that’s another discussion 😄.
This tool is pretty barebones and is meant to give me a blank canvas for every student based off of their unique ID’s. I should mention that this tool is designed around the University of New South Wales’ (Australia) system where I work, and if you plan to use it you will need to make adjustments where necessary. That said, if you are from UNSW and find this useful, I’m glad I could have been of help!
Getting Started
This tool is made in Python and the code is open for scrutiny. Dependencies are required before you can use it from the CLI but installing a working copy of Python should be enough to run. To get a local copy up and running follow these simple example steps. I’m working on an executable for later
Prerequisites
Make sure you have Python installed in your system, if you’re on a Mac you can use Homebrew to install. The Homebrew webpage has instructions on how to install brew. Some dependencies are required and can be installed with both Homebrew and pip once you have Python setup.
pip install pandas openpyxl
pandas is needed for handling Excel files and openpyxl for working with .xlsx files, make sure both are included when installing.
Installation
There is no installation needed, you simply can clone the repo to a folder on your system.
git clone https://github.com/haakmal/xls2md.git
PS. I still haven’t gotten around to making an executable. If anyone with more experience in programming is willing to help, or explain how to reduce the file size I am all ears!
Usage
Please be advised that this tool is very specific for my needs and I would recommend if you are using this to tweak to your requirements.
Setup
I have a template MD file for all my students, this is where I collect information I need and add to for instance their weekly reports, discussions with them, etc
I have a spreadsheet of students with required information (name, class, email, etc) that is fetched from our LMS. The script extracts the heading of each column as YAML data for the MD files and each row becomes a separate student file. The filename for my database requirements is set as the first column which in this case is an ID number.
I have a list of tutors that are assigned to a student, I keep them also as MD files for my database and the script fetches the file names from a folder I pick so I can assign the tutor to the students record.
The data.xlsx is an example of how the spreadsheet should be prepared. In the template file there are sections for where data is added from the script. For my purposes I have it set in two places, you may need to tweak this to your requirements: {{YAML_DATA}} and {{TITLE_DATA}}.
How to use
Once I have everything collected i.e. spreadsheet, template, list of tutors in a folder, run the script using a terminal; currently it can only be initiated from CLI. Follow these steps:
Open a terminal
Navigate to repo folder
Depending on your version of Python start the program using one of these commands:
python main.py
python3 main.py
This should start the GUI which then becomes self explanatory. Follow instructions selecting appropriate options and click the convert button. Each row from the spreadsheet will be extracted as individual MD files ready for your database!
Contributing
Contributions are what make the open source community such an amazing place to learn, inspire, and create. Any contributions you make are greatly appreciated.
If you have a suggestion that would make this better, please fork the repo and create a pull request. You can also simply open an issue with the tag “enhancement”.
Don’t forget to give the project a star if you found this helpful! Thanks again!
Fork the Project
Create your Feature Branch (git checkout -b feature/AmazingFeature)
Commit your Changes (git commit -m 'Add some AmazingFeature')
Push to the Branch (git push origin feature/AmazingFeature)
Open a Pull Request
License
Distributed under the MIT License. See LICENSE.txt for more information.
Tools for reading and fusing live data streams from Polar OH1 (PPG) and H10 (ECG) sensors.
Requirements
If installing from the repo you need pygatttool (pip install pygatttool).
Installation
pip install polarpy
Usage
The following code starts the raw PPG and IMU streams on a Polar OH1, fuses the blocks pf data in the two streams at 135Hz, and provides a single output stream, each record having a timestamp, the PPG signal values for each of the 3 pairs of LEDs, and the corresponding accerelometer x, y and z readings.
from polarpy import OH1

OH1_ADDR = "A0:9E:1A:7D:3C:5D"
OH1_CONTROL_ATTRIBUTE_HANDLE = 0x003f
OH1_DATA_ATTRIBUTE_HANDLE = 0x0042

def callback(type: str, timestamp: float, payload: dict):
    print(f'{timestamp} {payload}')

if '__main__' == __name__:
    device = OH1(address=OH1_ADDR,
                 control_handle=OH1_CONTROL_ATTRIBUTE_HANDLE,
                 data_handle=OH1_DATA_ATTRIBUTE_HANDLE,
                 callback=callback)

    if device.start():
        while device.run():
            pass
The callback is used (rather than returning data from run()) because the blocks of PPG, ECG and IMU data arrive with different lengths and at different speeds. The individual samples from each channel must be buffered and interleaved, timestamps interpolated, then delivered asynchronously through the callback.
The address and attribute handles for your particular device can be found using gatttool or another BLE tool such as nRF Connect.
The application is intended to be deployed upon the MicroApps framework and it operates on a DynamoDB Table created by the MicroApps framework. Thus, it is required that there be a deployment of MicroApps that can receive this application. Deploying the MicroApps framework and general application deployment instructions are covered by the MicroApps documentation.
The application is packaged for deployment via AWS CDK and consists of a single Lambda function that reads/writes the MicroApps DynamoDB Table.
It has a lot of issues, chief of which is that vertical scrolling with the keys does not seem to work, so I haven’t re-worked it as an installable userscript but it could serve as the basis of one.
In this assignment I explore different strategies used in building and training a Language Translator. I use Seq2Seq learning to convert sequences from English to Hebrew. I also include techniques such as bi-directional learning and Attention mechanism which serve as the building blocks of advanced transformer-based NLP models such as GPT, Llama etc. .
Language Choice and Details
I initially wanted to build a model to translate English to Tamil which happens to be my Native Language so that I could work with the translations easily. But due to less number of available sentence pairs (207) on the https://www.manythings.org/anki/ website for this language (the website used in my class) , I picked Hebrew.
Though Hebrew has been a language of fascination for me for a while now, there are a few other important reasons I picked Hebrew for learning machine translation.
Hebrew is written from right to left, it will be interesting to see if Bi-LSTM and Attention produces better results.
English and Hebrew are from completely different language-families and roots. (https://webspace.ship.edu/cgboer/languagefamilies.html)
They are from completely different regions and time-periods and have isolated places of origins.
English -> Region: West Germany, Language family: Indo-European, Root: Germanic
Hebrew -> Region: Israel, Language family: Afro-Asiatic, Root: Semitic
Please do not fork this repository directly on GitHub.
Instead, please use GitHub’s importer following the instructions below
to create a website repository for your workshop.
Once you are done,
please send your repository’s URL to the Software Carpentry administrator.
We build the list of workshops on our websites from the data included in your index.html page.
We can only do that if you customize that page correctly
and send us a link to your workshop website.
If you run into problems,
or have ideas about how to make this process simpler,
please get in touch.
The pages on customizing your website,
the FAQ,
and the design notes have more detail on what we do and why.
And please note:
if you are teaching Git,
please create a separate repository
for your learners to practice in.
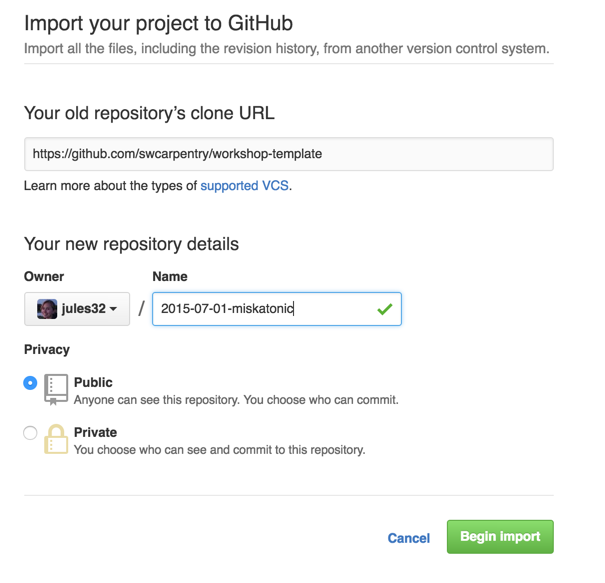
Creating a Repository
Log in to GitHub.
(If you do not have an account, you can quickly create one for free.)
You must be logged in for the remaining steps to work.
Select the owner for your new repository.
(This will probably be you, but may instead be an organization you belong to.)
Choose a name for your workshop website repository.
This name should have the form YYYY-MM-DD-site-ttt,
e.g., 2016-12-01-miskatonic-ttt,
where YYYY-MM-DD is the start date of the workshop.
for online workshops, choose online as site
Make sure the repository is public.
At this point, you should have a page like this:
You can now click “Begin Import”.
When the process is done,
you will receive a message like
“Importing complete! Your new repository gvwilson/2016-12-01-miskatonic is ready.”
and you can go to the new repository by clicking on the name.
Note:
some people have had intermittent errors during the import process,
possibly because of the network timing out.
If you experience a problem, please re-try;
if the problem persists,
please get in touch.
Customizing Your Website
Go into your newly-created repository,
which will be at https://github.com/your_username/YYYY-MM-DD-site-ttt.
For example,
if your username is gvwilson,
the repository’s URL will be https://github.com/gvwilson/2016-12-01-miskatonic-ttt.
Edit the header of index.html to customize the list of instructors,
workshop venue, etc.
You can do this in the browser by clicking on it in the file view on GitHub
and then selecting the pencil icon in the menu bar:
Alternatively,
if you are already familiar with Git,
you can clone the repository to your desktop,
edit index.html there,
and push your changes back to the repository.
When you are done editing,
go to the GitHub Pages URL for your workshop and preview your changes.
In the example above, this is https://gvwilson.github.io/2016-12-01-miskatonic.
Note:
this template includes some files and directories that most workshops do not need,
but which provide a standard place to put extra content if desired.
See the design notes for more information about these.
If you want to preview your changes on your own machine before publishing them on GitHub,
you can do so as described below.
Install the software described below.
This may require some work,
so feel free to preview by pushing to the website.
Run the command:
$ jekyll serve
and go to http://0.0.0.0:4000 to preview your site.
You can also run this command by typing make serve
(assuming you have Make installed).
Run the command python bin/workshop_check.py index.html
to check for a few common errors in your workshop’s home page.
(You must have Python 3 installed to do this.)
If you have Make installed,
you can also run this command by typing make workshop-check.
Creating Extra Pages
In rare cases,
you may want to add extra pages to your workshop website.
You can do this by putting either Markdown or HTML pages in the website’s root directory
and styling them according to the instructions give in
the lesson template.
If you do this,
you must also edit _config.yml to set these three values:
carpentry is either “dc” (for Data Carpentry) or “swc” (for Software Carpentry).
This determines which logos are loaded.
title is the title of your workshop (typically the venue and date).
email is the contact email address for your workshop,
e.g., gvwilson@miskatonic.edu.
Note: carpentry and emailduplicate information that's inindex.html`,
but there is no way to avoid this
without requiring people to edit both files in the usual case
where no extra pages are created.
Installing Software
If you want to set up Jekyll
so that you can preview changes on your own machine before pushing them to GitHub,
you must install the software described below.
(Note: Julian Thilo has written instructions for
installing Jekyll on Windows.)
Ruby.
This is included with Linux and Mac OS X;
the simplest option on Windows is to use RubyInstaller.
You can test your installation by running ruby --version.
For more information,
see the Ruby installation guidelines.
RubyGems
(the package manager for Ruby).
You can test your installation by running gem --version.
Jekyll.
You can install this by running gem install jekyll.
You can check the formatting of your header by running bin/workshop_check.py
(which is invoked by make workshop-check).
You must have Python 3 installed in order to do this,
and you will also need the PyYAML module.
Setting Up a Separate Repository for Learners
If you are teaching Git,
you should create a separate repository for learners to use in that lesson.
You should not have them use the workshop website repository because:
your workshop website repository contains many files
that most learners don’t need to see during the lesson,
and
you probably don’t want to accidentally merge
a damaging pull request from a novice Git user
into your workshop’s website while you are using it to teach.
You can call this repository whatever you like,
and add whatever content you need to it.
Getting and Giving Help
We are committed to offering a pleasant setup experience for our learners and organizers.
If you find bugs in our instructions,
or would like to suggest improvements,
please file an issue
or mail us.
Using i686-w64-mingw32-gcc (cross compiling should work too):
# Download source
git clone https://github.com/xzn/d3d10-mmxlc.git
cd d3d10-mmxlc
git submodule update --init --recursive

# Create symlinks and patch files
make prep

# Build the dll
make -j$(nproc) dll
Some options to pass to make
# disable optimizations and prevents stripping
make o3=0 dll

# disable lto (keep -O3)
make lto=0 dll
Install
Copy dinput8.dll, interp-mod.ini, and the slang-shaders\ directory to your game folders, e.g.:
SteamLibrary\steamapps\common\Mega Man X Legacy Collection
SteamLibrary\steamapps\common\Mega Man X Legacy Collection 2
Configuration
interp-mod.ini contains options to configure the mod.
; Log API calls to interp-mod.log,; [logging]; enabled=true; hotkey_toggle=VK_CONTROL+O; hotkey_frame=VK_CONTROL+P; Change interpolation mode and set up custom slang shaders.[graphics]; Use linear instead of point upscaling for the 2D games.interp=true
; (WIP) Use linear scaling when possible for the 3D games.; linear=true; When using Type 1 filter, interp=true, and slang_shader* is not set,; apply Type 1 filter over and over until it reaches screen size.; enhanced=true; Custom shader for X1~X6, needs Type 1 filter set in-game.; slang_shader=slang-shaders/xbrz/xbr-lv2.slangpslang_shader_snes=slang-shaders/crt/crt-lottes-fast.slangp
slang_shader_psone=slang-shaders/xbrz/xbrz-freescale-multipass.slangp
; Custom shader for X7~X8.slang_shader_3d=slang-shaders/anti-aliasing/smaa.slangp
; (TODO) Custom render resolution for X7~X8; render_3d_width=; render_3d_height=; Custom display resolution, e.g. 4K and so-on,; Should be 16:9 as the mod currently does not correct for aspect ratio.display_width=
display_height=
If all goes well you should now be able to start the game and see the overlay on top-left of the screen showing the status of the mod.
interp-mod.ini can be edited and have its options applied while the game is running.
License
Source code for this mod, without its dependencies, is available under MIT. Dependencies such as RetroArch are released under GPL.
RetroArch is needed only for slang_shader support.
SPIRV-Cross and glslang are used for slang_shader support.
HLSLcc is used for debugging.
Other dependencies are more or less required:
minhook is used for intercepting calls to d3d10.dll.
imgui is used for overlay display.
smhasher is technically optional. Currently used for identifying the built-in Type 1 filter shader.
Smooth scrolling bottom refresh control for table view with some objects in array.
Just add some dummy data into array with custom referesh control cell in table view or handle response from web service and
populate the data into the array with smooth animation from table view top with this two methods
Make sure these given below methods are very important to show the cell at the end of the table view with your conditional array objects
so that you can show the load more cell in table view with concerned API call for loading more data to an array.
Please go through the demo once and let me know if any query regarding this demo of bottom referesh control.
These were the methods to focus on while loading more data into cell with load more custom cell in table view as below: