Blog

  • nano-graphrag

    Shows the MemoDB logo

    A simple, easy-to-hack GraphRAG implementation

    ๐Ÿ˜ญ GraphRAG is good and powerful, but the official implementation is difficult/painful to read or hack.

    ๐Ÿ˜Š This project provides a smaller, faster, cleaner GraphRAG, while remaining the core functionality(see benchmark and issues ).

    ๐ŸŽ Excluding tests and prompts, nano-graphrag is about 1100 lines of code.

    ๐Ÿ‘Œ Small yet portable(faiss, neo4j, ollama…), asynchronous and fully typed.

    If you’re looking for a multi-user RAG solution for long-term user memory, have a look at this project: memobase ๐Ÿ™‚

    Install

    Install from source (recommend)

    # clone this repo first
    cd nano-graphrag
    pip install -e .

    Install from PyPi

    pip install nano-graphrag

    Quick Start

    Tip

    Please set OpenAI API key in environment: export OPENAI_API_KEY="sk-...".

    Tip

    If you’re using Azure OpenAI API, refer to the .env.example to set your azure openai. Then pass GraphRAG(...,using_azure_openai=True,...) to enable.

    Tip

    If you’re using Amazon Bedrock API, please ensure your credentials are properly set through commands like aws configure. Then enable it by configuring like this: GraphRAG(...,using_amazon_bedrock=True, best_model_id="us.anthropic.claude-3-sonnet-20240229-v1:0", cheap_model_id="us.anthropic.claude-3-haiku-20240307-v1:0",...). Refer to an example script.

    Tip

    If you don’t have any key, check out this example that using transformers and ollama . If you like to use another LLM or Embedding Model, check Advances.

    download a copy of A Christmas Carol by Charles Dickens:

    curl https://raw.githubusercontent.com/gusye1234/nano-graphrag/main/tests/mock_data.txt > ./book.txt

    Use the below python snippet:

    from nano_graphrag import GraphRAG, QueryParam
    
    graph_func = GraphRAG(working_dir="./dickens")
    
    with open("./book.txt") as f:
        graph_func.insert(f.read())
    
    # Perform global graphrag search
    print(graph_func.query("What are the top themes in this story?"))
    
    # Perform local graphrag search (I think is better and more scalable one)
    print(graph_func.query("What are the top themes in this story?", param=QueryParam(mode="local")))

    Next time you initialize a GraphRAG from the same working_dir, it will reload all the contexts automatically.

    Batch Insert

    graph_func.insert(["TEXT1", "TEXT2",...])
    Incremental Insert

    nano-graphrag supports incremental insert, no duplicated computation or data will be added:

    with open("./book.txt") as f:
        book = f.read()
        half_len = len(book) // 2
        graph_func.insert(book[:half_len])
        graph_func.insert(book[half_len:])

    nano-graphrag use md5-hash of the content as the key, so there is no duplicated chunk.

    However, each time you insert, the communities of graph will be re-computed and the community reports will be re-generated

    Naive RAG

    nano-graphrag supports naive RAG insert and query as well:

    graph_func = GraphRAG(working_dir="./dickens", enable_naive_rag=True)
    ...
    # Query
    print(rag.query(
          "What are the top themes in this story?",
          param=QueryParam(mode="naive")
    )

    Async

    For each method NAME(...) , there is a corresponding async method aNAME(...)

    await graph_func.ainsert(...)
    await graph_func.aquery(...)
    ...

    Available Parameters

    GraphRAG and QueryParam are dataclass in Python. Use help(GraphRAG) and help(QueryParam) to see all available parameters! Or check out the Advances section to see some options.

    Components

    Below are the components you can use:

    Type What Where
    LLM OpenAI Built-in
    Amazon Bedrock Built-in
    DeepSeek examples
    ollama examples
    Embedding OpenAI Built-in
    Amazon Bedrock Built-in
    Sentence-transformers examples
    Vector DataBase nano-vectordb Built-in
    hnswlib Built-in, examples
    milvus-lite examples
    faiss examples
    Graph Storage networkx Built-in
    neo4j Built-in(doc)
    Visualization graphml examples
    Chunking by token size Built-in
    by text splitter Built-in
    • Built-in means we have that implementation inside nano-graphrag. examples means we have that implementation inside an tutorial under examples folder.

    • Check examples/benchmarks to see few comparisons between components.

    • Always welcome to contribute more components.

    Advances

    Some setup options
    • GraphRAG(...,always_create_working_dir=False,...) will skip the dir-creating step. Use it if you switch all your components to non-file storages.
    Only query the related context

    graph_func.query return the final answer without streaming.

    If you like to interagte nano-graphrag in your project, you can use param=QueryParam(..., only_need_context=True,...), which will only return the retrieved context from graph, something like:

    # Local mode
    -----Reports-----
    ```csv
    id,	content
    0,	# FOX News and Key Figures in Media and Politics...
    1, ...
    ```
    ...
    
    # Global mode
    ----Analyst 3----
    Importance Score: 100
    Donald J. Trump: Frequently discussed in relation to his political activities...
    ...
    

    You can integrate that context into your customized prompt.

    Prompt

    nano-graphrag use prompts from nano_graphrag.prompt.PROMPTS dict object. You can play with it and replace any prompt inside.

    Some important prompts:

    • PROMPTS["entity_extraction"] is used to extract the entities and relations from a text chunk.
    • PROMPTS["community_report"] is used to organize and summary the graph cluster’s description.
    • PROMPTS["local_rag_response"] is the system prompt template of the local search generation.
    • PROMPTS["global_reduce_rag_response"] is the system prompt template of the global search generation.
    • PROMPTS["fail_response"] is the fallback response when nothing is related to the user query.
    Customize Chunking

    nano-graphrag allow you to customize your own chunking method, check out the example.

    Switch to the built-in text splitter chunking method:

    from nano_graphrag._op import chunking_by_seperators
    
    GraphRAG(...,chunk_func=chunking_by_seperators,...)
    LLM Function

    In nano-graphrag, we requires two types of LLM, a great one and a cheap one. The former is used to plan and respond, the latter is used to summary. By default, the great one is gpt-4o and the cheap one is gpt-4o-mini

    You can implement your own LLM function (refer to _llm.gpt_4o_complete):

    async def my_llm_complete(
        prompt, system_prompt=None, history_messages=[], **kwargs
    ) -> str:
      # pop cache KV database if any
      hashing_kv: BaseKVStorage = kwargs.pop("hashing_kv", None)
      # the rest kwargs are for calling LLM, for example, `max_tokens=xxx`
    	...
      # YOUR LLM calling
      response = await call_your_LLM(messages, **kwargs)
      return response

    Replace the default one with:

    # Adjust the max token size or the max async requests if needed
    GraphRAG(best_model_func=my_llm_complete, best_model_max_token_size=..., best_model_max_async=...)
    GraphRAG(cheap_model_func=my_llm_complete, cheap_model_max_token_size=..., cheap_model_max_async=...)

    You can refer to this example that use deepseek-chat as the LLM model

    You can refer to this example that use ollama as the LLM model

    Json Output

    nano-graphrag will use best_model_func to output JSON with params "response_format": {"type": "json_object"}. However there are some open-source model maybe produce unstable JSON.

    nano-graphrag introduces a post-process interface for you to convert the response to JSON. This func’s signature is below:

    def YOUR_STRING_TO_JSON_FUNC(response: str) -> dict:
      "Convert the string response to JSON"
      ...

    And pass your own func by GraphRAG(...convert_response_to_json_func=YOUR_STRING_TO_JSON_FUNC,...).

    For example, you can refer to json_repair to repair the JSON string returned by LLM.

    Embedding Function

    You can replace the default embedding functions with any _utils.EmbedddingFunc instance.

    For example, the default one is using OpenAI embedding API:

    @wrap_embedding_func_with_attrs(embedding_dim=1536, max_token_size=8192)
    async def openai_embedding(texts: list[str]) -> np.ndarray:
        openai_async_client = AsyncOpenAI()
        response = await openai_async_client.embeddings.create(
            model="text-embedding-3-small", input=texts, encoding_format="float"
        )
        return np.array([dp.embedding for dp in response.data])

    Replace default embedding function with:

    GraphRAG(embedding_func=your_embed_func, embedding_batch_num=..., embedding_func_max_async=...)

    You can refer to an example that use sentence-transformer to locally compute embeddings.

    Storage Component

    You can replace all storage-related components to your own implementation, nano-graphrag mainly uses three kinds of storage:

    base.BaseKVStorage for storing key-json pairs of data

    • By default we use disk file storage as the backend.
    • GraphRAG(.., key_string_value_json_storage_cls=YOURS,...)

    base.BaseVectorStorage for indexing embeddings

    • By default we use nano-vectordb as the backend.
    • We have a built-in hnswlib storage also, check out this example.
    • Check out this example that implements milvus-lite as the backend (not available in Windows).
    • GraphRAG(.., vector_db_storage_cls=YOURS,...)

    base.BaseGraphStorage for storing knowledge graph

    • By default we use networkx as the backend.
    • We have a built-in Neo4jStorage for graph, check out this tutorial.
    • GraphRAG(.., graph_storage_cls=YOURS,...)

    You can refer to nano_graphrag.base to see detailed interfaces for each components.

    FQA

    Check FQA.

    Roadmap

    See ROADMAP.md

    Contribute

    nano-graphrag is open to any kind of contribution. Read this before you contribute.

    Benchmark

    Projects that used nano-graphrag

    • Medical Graph RAG: Graph RAG for the Medical Data
    • LightRAG: Simple and Fast Retrieval-Augmented Generation
    • fast-graphrag: RAG that intelligently adapts to your use case, data, and queries
    • HiRAG: Retrieval-Augmented Generation with Hierarchical Knowledge

    Welcome to pull requests if your project uses nano-graphrag, it will help others to trust this repoโค๏ธ

    Issues

    • nano-graphrag didn’t implement the covariates feature of GraphRAG
    • nano-graphrag implements the global search different from the original. The original use a map-reduce-like style to fill all the communities into context, while nano-graphrag only use the top-K important and central communites (use QueryParam.global_max_consider_community to control, default to 512 communities).
    Visit original content creator repository https://github.com/gusye1234/nano-graphrag
  • FunctionIntegrator

    Function Integrator for iOS

    Second Page

    This project were created for the educational purposes of the course “Specialized Computers” (Vladimir State University, specialty ID is 230101).

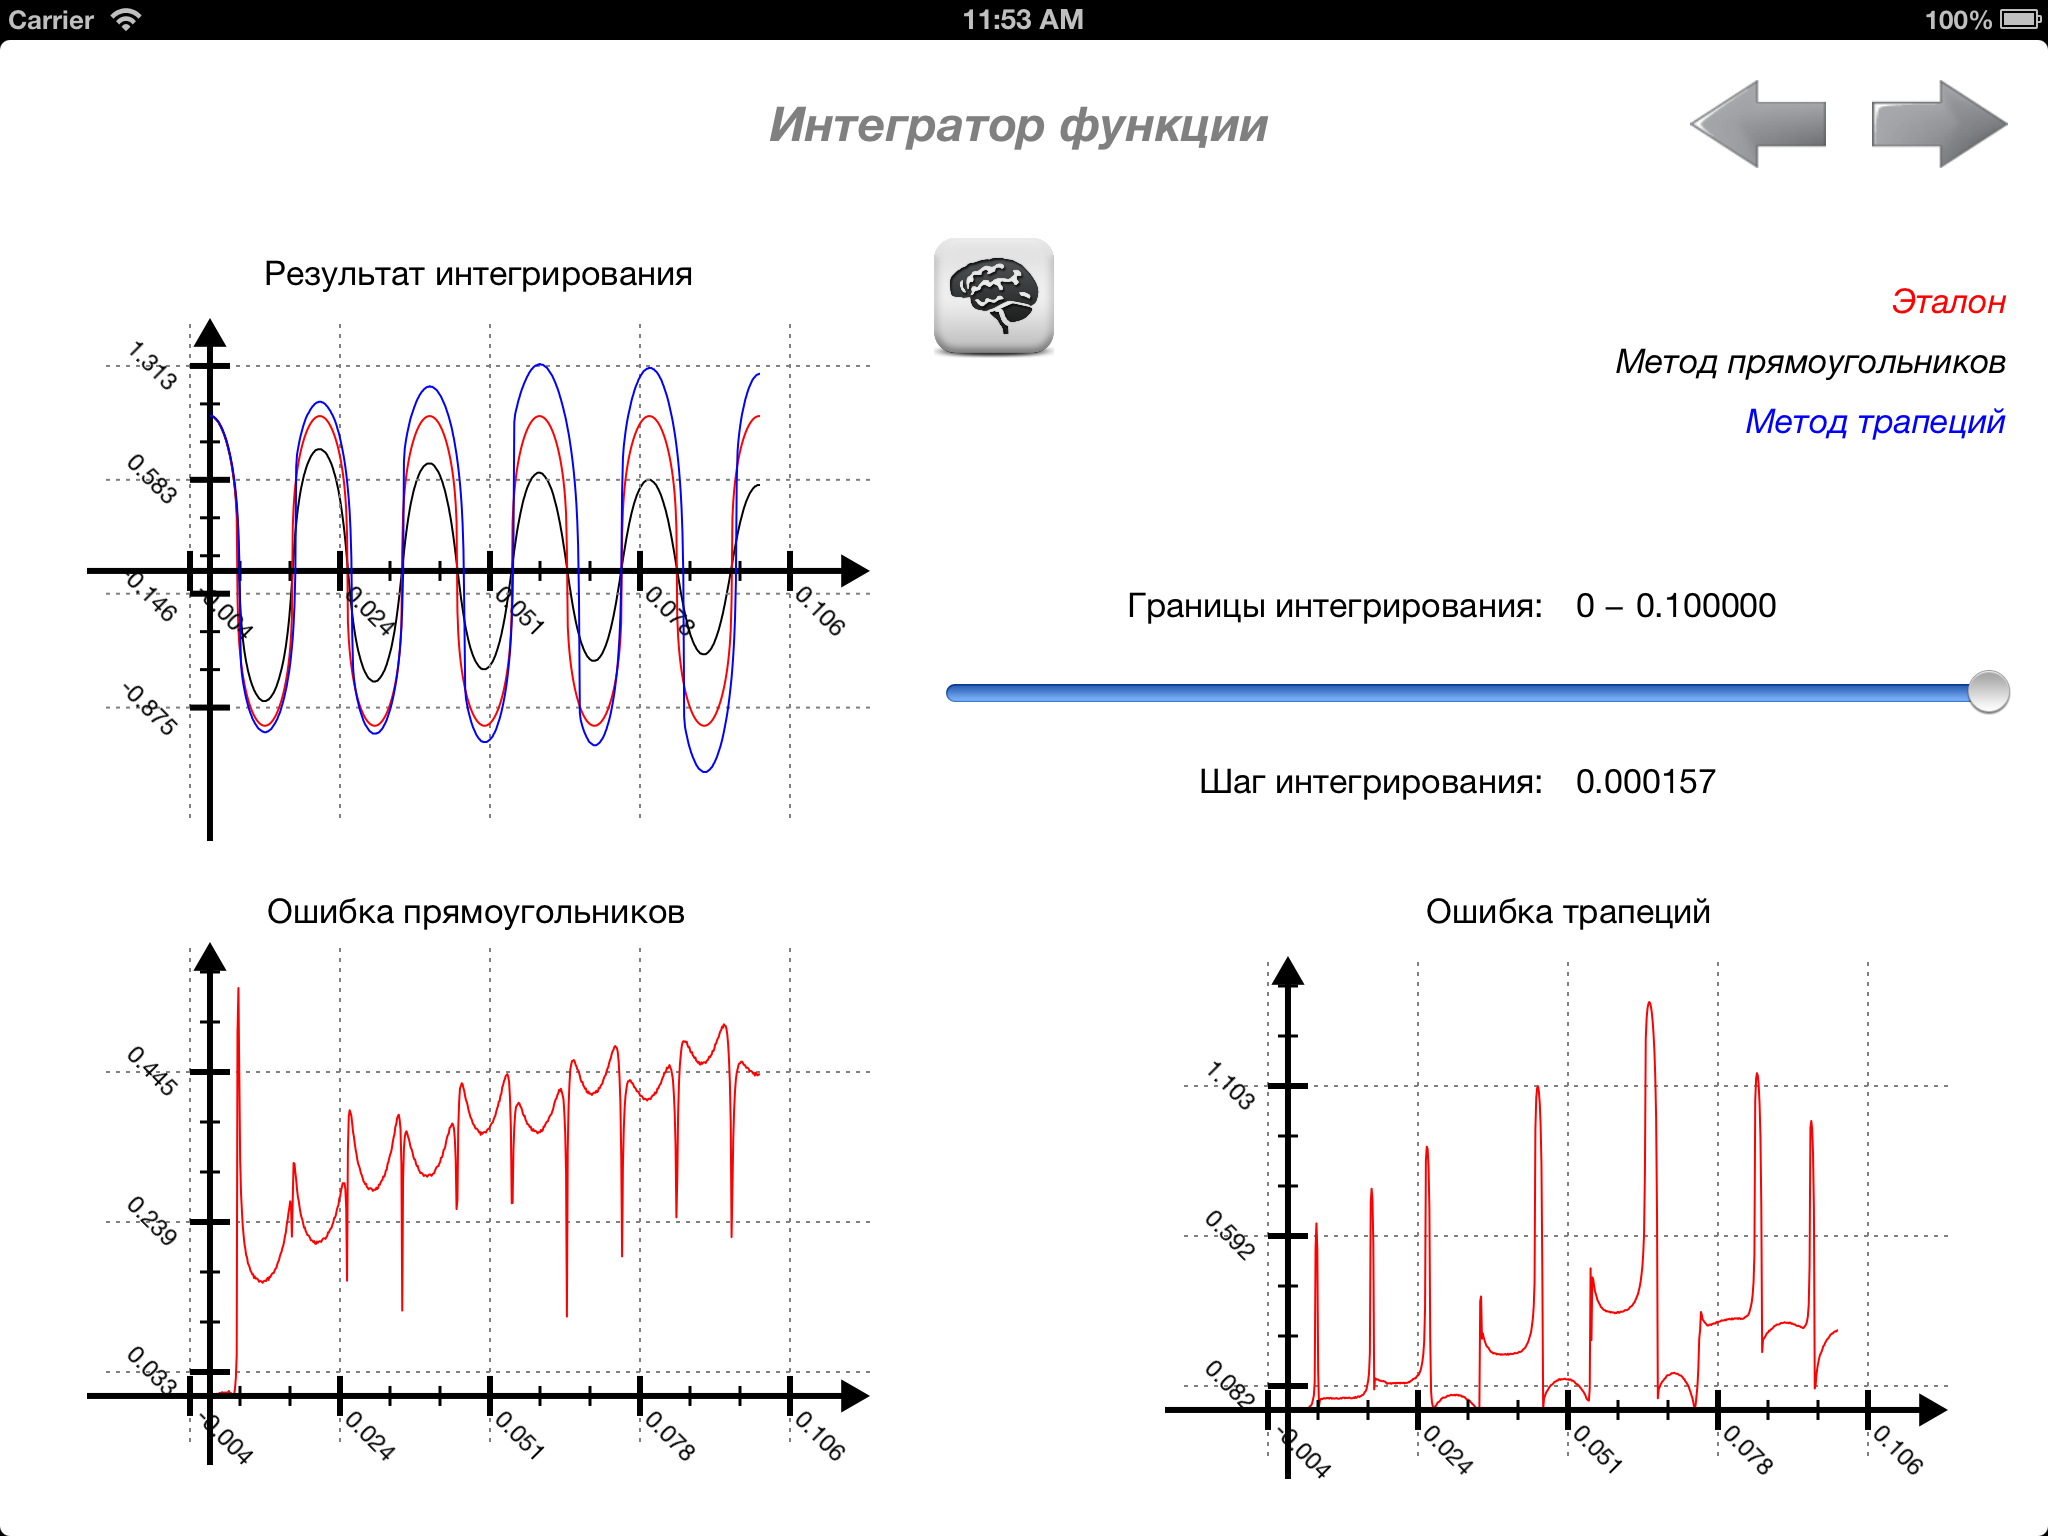
    It is a function integrator for iOS with the variable accuracy. Requires XCode 4.5 and iOS 6 iPad. Project runs on the device or simulator.

    Requirements

    • Xcode 4.5 or higher
    • Apple LLVM compiler
    • iOS 6.0 or higher
    • ARC

    Main Idea

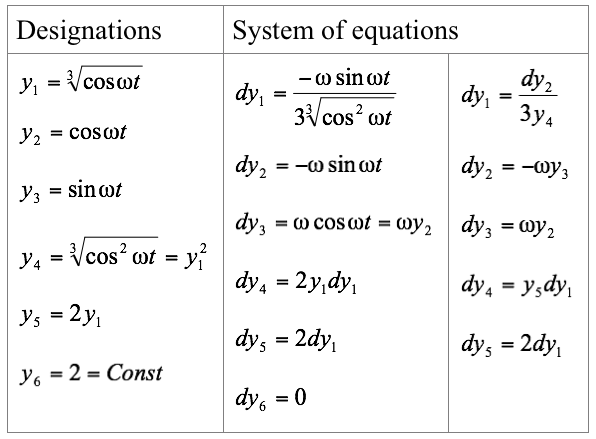
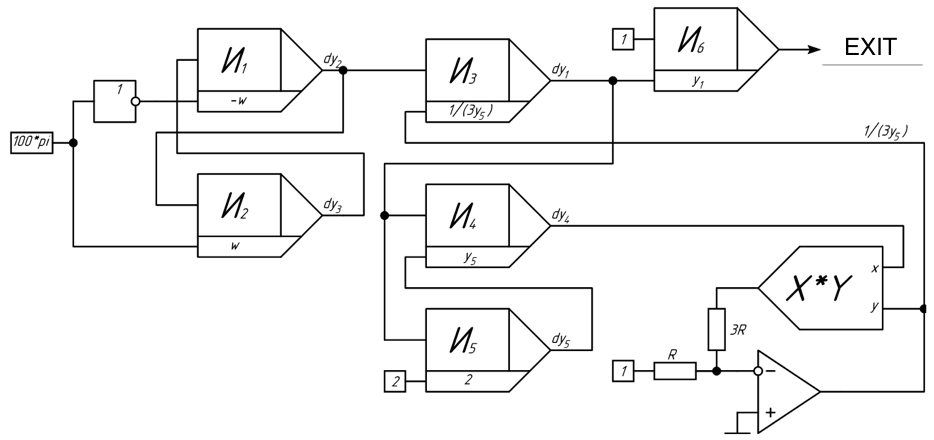
    For a given function Origin Func make SES (System of Equations Shannon) in symmetrical form and write a block diagram of a parallel DIS (Digital Integration System) simulating its work process.

    Perform calculations estimated parameters of DIS:

    • integration step
    • bit variables and increments for numerical integration formulas rectangles (m = 0) and trapezoids (m = 1) for the requirements of computing functions
    • produce comparative performance evaluation for parallel DIS symmetric and asymmetric forms of SES.

    System of Equations ShannonDigital Integration System

    License

    Function Integrator is available under the MIT license.

    Copyright ยฉ 2013 Ildar Sibagatov.

    Permission is hereby granted, free of charge, to any person obtaining a copy of this software and associated documentation files (the “Software”), to deal in the Software without restriction, including without limitation the rights to use, copy, modify, merge, publish, distribute, sublicense, and/or sell copies of the Software, and to permit persons to whom the Software is furnished to do so, subject to the following conditions:

    The above copyright notice and this permission notice shall be included in all copies or substantial portions of the Software.

    THE SOFTWARE IS PROVIDED “AS IS”, WITHOUT WARRANTY OF ANY KIND, EXPRESS OR IMPLIED, INCLUDING BUT NOT LIMITED TO THE WARRANTIES OF MERCHANTABILITY, FITNESS FOR A PARTICULAR PURPOSE AND NONINFRINGEMENT. IN NO EVENT SHALL THE AUTHORS OR COPYRIGHT HOLDERS BE LIABLE FOR ANY CLAIM, DAMAGES OR OTHER LIABILITY, WHETHER IN AN ACTION OF CONTRACT, TORT OR OTHERWISE, ARISING FROM, OUT OF OR IN CONNECTION WITH THE SOFTWARE OR THE USE OR OTHER DEALINGS IN THE SOFTWARE.

    Visit original content creator repository https://github.com/siggb/FunctionIntegrator
  • small-business-cms

    APPLICATION DEPLOYMENT STEPS ON LOCAL DEVELOPMENT SERVER

    1. COMPOSER INSTALLATION

    Source:

    Composer is a popular dependency management tool for PHP, created mainly to facilitate installation and updates for project dependencies.
    It allows you to declare the libraries your project depends on and it will manage(install/update) them for you in a directory (e.g. ‘vendor’
    inside your project).

    1. Re-synchronize the package index files from their sources.

      sudo apt-get update

    2. Run the following commands on current/appropriate directory.

      a. Install composer.

      sudo apt-get install composer

      b. NOTE: The following command did not work.

      curl -sS https://getcomposer.org/installer -o composer-setup.php

      See Github Issue

      c. Check installation

      composer --version should give something similar as Composer 1.10.1 2020-03-13 20:34:27

      d. Checking the location of Composer’s global packages.

      php /usr/bin/composer config --list --global should display something similar as

       [repositories.packagist.org.type] composer
       [repositories.packagist.org.url] https?://repo.packagist.org
       [repositories.packagist.org.allow_ssl_downgrade] true
       [process-timeout] 300
       [use-include-path] false
       [preferred-install] auto
       [notify-on-install] true
       [github-protocols] [https, ssh]
       [vendor-dir] vendor (/home/sandeep/vendor)
       [bin-dir] {$vendor-dir}/bin (/home/sandeep/vendor/bin)
       [cache-dir] /home/sandeep/.cache/composer
       [data-dir] /home/sandeep/.local/share/composer
       [cache-files-dir] {$cache-dir}/files (/home/sandeep/.cache/composer/files)
       [cache-repo-dir] {$cache-dir}/repo (/home/sandeep/.cache/composer/repo)
       [cache-vcs-dir] {$cache-dir}/vcs (/home/sandeep/.cache/composer/vcs)
       [cache-ttl] 15552000
       [cache-files-ttl] 15552000
       [cache-files-maxsize] 300MiB (314572800)
       [bin-compat] auto
       [discard-changes] false
       [autoloader-suffix]
       [sort-packages] false
       [optimize-autoloader] false
       [classmap-authoritative] false
       [apcu-autoloader] false
       [prepend-autoloader] true
       [github-domains] [github.com]
       [bitbucket-expose-hostname] true
       [disable-tls] false
       [secure-http] true
       [cafile]
       [capath]
       [github-expose-hostname] true
       [gitlab-domains] [gitlab.com]
       [store-auths] prompt
       [archive-format] tar
       [archive-dir] .
       [htaccess-protect] true
       [use-github-api] true
       [lock] true
       [home] /home/sandeep/.config/composer     
      

      The [home] line refers to the default value of $COMPOSER_HOME.

    2. LARAVEL INSTALLATION

    Source:

    Laravel is a free, open-source PHP web framework, created by Taylor Otwell and intended for the development of web applications following the
    modelโ€“viewโ€“controller architectural pattern and based on Symfony. Laravel utilizes Composer to manage its dependencies. So, before using Laravel,
    make sure you have Composer installed on your machine.

    NOTE: An account creation at Packagist may be required.

    1. Download the Laravel installer using Composer.

      composer global require laravel/installer

    NOTE:

    • The global parameter allows running commands in the global composer dir ($COMPOSER_HOME).

    • The following error message may come up on executing composer global require laravel/installer

    "https://repo.packagist.org/packages.json" file could not be downloaded: failed to open stream: Connection refused
    

    FIX:
    sudo vim /etc/resolv.conf and add the following lines:

    nameserver 8.8.8.8
    nameserver 8.8.4.4`
    

    Save the file and restart the network.

    3. Node.jsยฎ INSTALLATION

    Source:

    Node.jsยฎ is a JavaScript runtime built on Chrome’s V8 JavaScript engine. As an asynchronous
    event-driven JavaScript runtime, Node.js is designed to build scalable network applications.

    1. Install Node.js

      sudo apt-get install nodejs

    2. Check installation.

      nodejs -v should display something similar to v10.19.0

    4. npm INSTALLATION

    Source:

    npm is the package manager for the Node JavaScript platform. It puts modules in place so that
    node can find them, and manages dependency conflicts intelligently.

    1. Install npm
    sudo apt-get install npm
    
    1. Check installation

    npm -v should display something similar to 6.14.4

    1. See npm-config for much much more information.

    5. PROJECT DEPLOYMENT AND APPLICATION RUN ON SERVER

    COMMANNDS TO RUN:

    1. git clone https://github.com/cadentic/business_landing_v1.git

    Clone this repository locally on an appropriate path.

    1. composer install

    Installs the project dependencies from the composer.lock file if present, or falls back on the composer.json.

    1. npm install

    npm install downloads a package and it’s dependencies. When run without arguments,npm install downloads dependencies
    defined in a package(a folder containing a program described by a package.json file)

    1. php artisan route:clear

    To clear route cache of the Laravel application. This will display : Route cache cleared!

    1. php artisan config:clear

    To clear config cache of the Laravel application. This will display : Configuration cache cleared!

    1. php artisan cache:clear

    To clear application cache of Laravel application. This will display : Application cache cleared!

    1. npm run watch

    Combines all Vue components and other JavaScript files into a browser-friendly combined file.
    Then it stays active and “watches” for updates to all .vue and .js files. If it detects a
    change, it’ll re-build the browser-friendly file so you can just refresh the page.

    1. php artisan serve

    To run this application on the development server.

    Visit original content creator repository
    https://github.com/cadentic/small-business-cms

  • literate_programming_toolsuite

    Literate programming toolsuite

    literate programming toolsuite?style=flat square rust bleeding?label=docker&style=flat square status

    Basic design decisions

    This software is written in rust. It uses itโ€™s own tools to gererate the rust sourcecode.

    Every logical part is seperated in its own subcrate. Most of those subcrates define a cmdline util of the same name in this crate. In everey subcrate folder we have a <name>.adoc file which is the main source for that subcrate.

    The subrates are:

    asciidoctrine

    An extensible asciidoc interpreter. It isnโ€™t very mature right now.

    lisi

    A flexible literate programming tool for both tangle and weave. It has some basic functionality right now.

    ansicht

    A visual programming tool primerily meant to use in conjunction with literate programming tools. Currently just a draft.

    dolmetscher

    A translation helper tool. Currently just a draft.

    I think asciidoc is superior to markdown so we use this as our basic input format.

    Install

    To install and use this software there are some different options:

    Download precompiled binaries

    For windows you can download latest Windows binaries built through github actions

    Use the docker image

    You can use the precompiled image lammermann/lisi from Dockerhub. If you want to modify the code for the Dockerfile itself you can find the code in a seperate section.

    Install from cargo

    run cargo install --force --path lisi

    Build from source

    This makes most sense if you want to contribute to the project or otherwise modify the code for personal use. You can the find instructions later in this document.

    NixOS/nix
    install

    nix-env -i -f lisi.nix

    build locally

    nix-build lisi.nix

    Build from source

    If you want to modify how the programs work to suit your usecase you will need build and compile the code.

    There are a few steps to build the toolsuite.

    build.sh
    set -e # (4)
    
    <<check_generated_sources_are_vcs_clean>> # (1)
    
    <<generate_sources>>
    <<build_and_test>>
    <<update_docs>>
    
    <<ask_for_vcs_check_in>> # (2)
    
    <<publish_on_crates_io>>
    
    <<ask_for_local_install>> # (3)
    1. If we have edited some of the generated sources by hand we may donโ€™t want them to be overwritten by our build process before we merged them back into the asciidoc source.

    2. Once our build succeds there is a good chance we want to save the changes to our vcs.

    3. If everything went good we may want to install our new version of the toolsuite locally.

    4. When a step fails we want the script to end

    Prerequisites

    There must be some programms installed on your computer to release a version of the literate programming toolsuite.

    git

    It is currently published on github so we need git.

    rust, cargo, etc

    These porgramms are written in rust therefore we need the rust toolchain.

    asciidoctor

    Right now we need asciidcotor to build the docs. In future versions it is planned to use our own asciidoctrine programm. There are some additional dependencies for our doc generation process.

    asciidcotor-diagram

    For our diagrams.

    ditaa

    For our diagrams.

    pygments

    For source code highlighting.

    Check if generated files are untouched in VCS

    Maybe we have edited some of our generated source files by hand. In that case we would like to be warned before generating the files. This way we could check if we want to put our changes into our asciidoc sources or donโ€™t care if they are overwritten.

    We assume that all changed files that are not asciidoc files are potentially in danger to be overwritten.

    changed_files=`git diff --name-only | grep --invert-match '\.adoc$'`
    if [[ ! -z "$changed_files" ]]; then
      while true; do
          echo "some files are modified"
          echo "$changed_files"
          read -p "Do you wish continue anyway? [yes|no] " yn
          case $yn in
              [Yy]* ) break;;
              [Nn]* ) exit;;
              * ) echo "Please answer yes or no.";;
          esac
      done
    fi

    Generate source files

    echo "Start generating source files ..."
    
    cd asciidoctrine/
    lisi -o ../docs/asciidoctrine/asciidoctrine.lisi.html asciidoctrine.adoc \
      || echo "lisi is currenty not installed"
    cd ..
    
    cd lisi
    lisi -o /dev/null lisi.adoc || echo "lisi is currenty not installed" # (1)
    # The new generated source must be able to
    # generate itself
    cargo run --manifest-path ../Cargo.toml --bin lisi -- -o lisi.html lisi.adoc
    cd ..
    
    cargo run --bin lisi -- -o /dev/null README.adoc # (2)
    
    echo "Generating source files done!"
    1. We use a preinstalled version of lisi to build the sources. This helps us if theres a bug in our generated sources. If we have no version of lisi installed yet theres no problem the script will just give us a warning and generate the sources in the next step.

    2. Since lisi is currently unable to evaluate scripts with user cmdline input we need to refresh the build script regulary.

    Build and test

    cargo test

    Build websites for github pages

    TODO later we want to do this with asciidoctrine alone.

    echo "Start generating html files ..."
    
    asciidoctor \
                <<asciidoctor-styles>>
                -D docs \
                README.adoc -o index.html
    asciidoctor \
                <<asciidoctor-styles>>
                -D docs/lisi \
                lisi/lisi.adoc
    asciidoctor \
                <<asciidoctor-styles>>
                -D docs/asciidoctrine \
                asciidoctrine/asciidoctrine.adoc
    asciidoctor \
                <<asciidoctor-styles>>
                -D docs/ansicht \
                ansicht/ansicht.adoc
    asciidoctor \
                <<asciidoctor-styles>>
                -D docs/dolmetscher \
                dolmetscher/dolmetscher.adoc
    
    echo "Generating html files done!"

    We have some general styles that should be equal in all of our files:

    -r asciidoctor-diagram \
    -a source-highlighter=pygments \
    -a toc=left \
    -a icons=font \
    -a toclevels=4 \
    -a data-uri \
    -a reproducible \

    Hacking Guide

    If you want to modify the code to fit your own needs you could follow this describes my process of doing it:

    Changing the sources

    This is a literate program so the source of truth here is the asciidoc document. However I often consider the literate document and the generated source code as to differnt views on the same programm. To keep them both in sync I make sure to commit any changes I make at the generated source code to the VCS before I regenerate the source code from the literate source. Than I can view the diff between the generated source and my own modified version and change the literate sources accodingly until the generated code does not differ anymore from the one in VCS.
    When the two sources are in sync, than I can modify the literate sources however I like and direkty regenerate the source code.

    Compile

    I compile and test in a loop during the whole modification process. For this I use watchexec as my own poor mans ci.

    Commit

    When the bug is fixed or the feature is implemented etc I commit my modifications to VCS.

    Check

    After some time I reach a point where I want to release. Here I do the following: Check the literate and generated sources are in sync. Rerender the docs. Push to github. Let the ci do his work.

    Poor mans ci

    Whenever the rust files change we want to rebuild and test the program.

    auto_build_loop.sh
    watchexec -w . -c -e rs,toml --no-vcs-ignore -- "<<build_and_test>>"

    Whenever the asciidoc files change we want to regenerate the source files. But before we can do that we have to make sure the aktual source files and the generated source files are in sync.

    TODO This isnโ€™t easy because when the asciidoc files are moified they generate “dirty” source files (from the perspective of the VCS). So we have to stash the changes somehow so that it is seen, that the sources are in sync.

    Ask for checkin into the VCS

    while true; do
        git diff; # (1)
        read -p "Do you wish to commit your changes to git? [yes|no] " yn
        case $yn in
            [Yy]* )
              git add .; # (2)
              git commit; # (2)
              break;;
            [Nn]* ) exit;;
            * ) echo "Please answer yes or no.";;
        esac
    done
    1. Before we commit everything we should do a last review.

    2. Normally we know what we do and can just add everything and go on, but if we saw something in the commit that we donโ€™t want to include we should stop before we submit the commit (by letting the commit message empty or by changing the included chunks in another shell).

    Install the tools on our computer

    while true; do
        read -p "Do you wish to install this program? [yes|no] " yn
        case $yn in
            [Yy]* )
              <<install_with_nix>>;
              break;;
            [Nn]* ) exit;;
            * ) echo "Please answer yes or no.";;
        esac
    done

    Review process

    Whenever the code is updated on the master branch or via pull request it will be reviewed. The main part of that review follows the guidelines documented in this section.

    TODO github actions

    Release

    When everything goes well itโ€™s time to think about releasing.

    cargo publish --dry-run -p asciidoctrine
    
    while true; do
        read -p "Do you wish to publish asciidoctrine? [yes|no] " yn
        case $yn in
            [Yy]* )
              cargo login;
              cargo publish --dry-run -p asciidoctrine;
              break;;
            [Nn]* ) exit;;
            * ) echo "Please answer yes or no.";;
        esac
    done
    
    cargo publish --dry-run -p lisi
    
    while true; do
        read -p "Do you wish to publish lisi? [yes|no] " yn
        case $yn in
            [Yy]* )
              cargo login;
              cargo publish --dry-run -p lisi;
              break;;
            [Nn]* ) exit;;
            * ) echo "Please answer yes or no.";;
        esac
    done

    Dockerfile

    To use lisi in ci-scripts (at least thats my usecase) it is very handy to have a docker image at hand. However when it comes to docker images size is key. For this reason we use to multiple different stages in our Dockerfile:

    • one that builds our software and has all the build dependencies

    • one that only holds our final binaries and minimal runtime dependencies to enable a small image size.

    Dockerfile
    <<docker_build_step>>
    
    <<docker_final_image_step>>

    To build binaries that later have minimal runtime dependencies we use the musl target which lets us build statically compiled binaries. To do this we use the rust docker image based on alpine

    FROM rust:alpine AS builder
    
    RUN apk --no-cache add g++ # (1)
    
    WORKDIR /home/rust/
    COPY . .
    RUN cargo test
    RUN cargo build --release
    
    RUN strip target/release/lisi # (2)
    1. We can only compile on this system if we have g++ installed for some weird reason I donโ€™t understand (see the related bug here).

    2. After building the binaries we can shrink down the size significantly by striping them.

    After we build our program we take a fresh image based on alpine (becase itโ€™s small) and copy only our binaries over.

    FROM alpine:latest
    WORKDIR /home/lisi
    COPY --from=builder /home/rust/target/release/lisi .
    ENV PATH="${PATH}:/home/lisi"

    TODO github actions for docker image

    Visit original content creator repository https://github.com/kober-systems/literate_programming_toolsuite
  • weather-app

    Weather app

    This is a minimalist weather app

    Taking into account the proposed development time (less than 48 hours), the application is simple. The best principle of software engineering used here was “simplicity”, if I donโ€™t need to use, I donโ€™t need to implement or import unnecessary libs

    Client side

    • The client side was implemented without libs or frameworks, pure javascript

    Server side

    • For the server side I used Express to speed up the development of translation routes
    • There is a memory cache that checks if a request has already been made in less than two hours with the same coordinate
      • If it was done in less than two hours, the system does not make the request and returns the cached response. Otherwise, a new request is made to the external APIs

    Wather application

    Table of contents

    Prerequisites

    Installation

    Project structure

    Technologies used

    Prerequisites

    Make sure you have these requirements installed on your machine

    • Node^8
    • npm / yarn / docker

    Installation

    NPM

    Run:

    $ npm i // install all dependencies
    $ npm start // starts your express server using process.env.PORT or 8080
    $ npm start:open // starts the aplication and open the browser
    $ npm run compile:sass // compile your .sass files to .css into public folder with a watcher
    $ npm run transpile // transpiles src/index.js into public folder to be used on the client
    $ npm run transpile:watch // watch each change on file
    $ npm run build // build your application to public folder
    

    Yarn

    Run:

    $ yarn
    $ yarn start
    

    Docker

    $ docker build -t <app name>/weather-app .
    $ docker run -p 8080:8080 weather-app
    

    Project structure

    public/ ___________________________________ # Application to serve
    |- assets/
    |  |- weather-icons/ ______________________ # Weather icons
    |- css/ ___________________________________ # Compiled css from scss
    |- js/ ____________________________________ # Transpiled javascript
    src/
    |  |- routes/ _____________________________ # Express routes
    |  |- sass/ _______________________________ # Sass files
    |  |- views/ ______________________________ # Template files
    |- index.js _______________________________ # Client application entry
    

    Technologies used

    Visit original content creator repository https://github.com/jhonatantft/weather-app
  • Pomo

    Pomo

    Simple pomodoro timer CLI written in Rust.

    Installation

    You can install Pomo by running the install script which will download
    the latest release.

    curl -LSfs https://go.mskelton.dev/pomo/install | sh

    Or you can build from source.

    git clone git@github.com:mskelton/pomo.git
    cd pomo
    cargo install --path cli

    Usage

    Get status

    Prints the status of the current session.

    pomo

    Start focus

    Starts a new pomodoro focus session with the default duration.

    pomo start

    Or customize the session duration by providing a
    human like duration.

    pomo start 15m

    Start break

    Starts a new break with the default duration.

    pomo break

    Or customize the break duration by providing a
    human like duration.

    pomo break 10m

    Toggle

    If currently in a focus session, switches to a break, otherwise switch to a new
    focus session. This uses the default session/break duration.

    pomo toggle

    Or customize the session/break duration by providing a
    human like duration.

    pomo toggle 10m

    Change duration

    Changes the duration of the active session using the specified
    human like duration.

    pomo duration 20m

    Stop session

    Stops the current pomodoro session.

    pomo stop

    Config

    The default values for all commands can be customized by creating a $HOME/.config/pomo/config.json file. Below is an example of all available configuration options with their default values.

    {
      "durations": {
        "break": "5m",
        "focus": "30m"
      },
      "emojis": {
        "break": "๐Ÿฅ‚",
        "focus": "๐Ÿ…",
        "warn": ["๐Ÿ”ด", "โญ•"]
      },
      "sound": "default"
    }

    Working Hours

    You can optional configure working hours for Pomo which will auto start/stop
    when you start and end your working day.

    {
      "working_hours": {
        "start": "8am",
        "end": "5:30pm"
      }
    }

    Visit original content creator repository
    https://github.com/mskelton/pomo